Product Import via Excel
In order to view content or perform actions referred to in this article, you need to have the appropriate permissions enabled. An employee must be assigned to the shop with a Shop Owner Admin role.
ShopCtrl Product Import tool allows to:
- Import Product details per Shop group, such as SKU/Code, name, description, EAN, product brand and groups, metadata, product dimensions, properties values.
- Import product prices and regulate product availability per shop.
- Import product stock levels per warehouse and location.
How to import products details
You can import product details per shop group and translation. Update existing products and create new products based on your Excel file. The number of fields to update is customizable, and you can create any number of import profiles specific to your needs.
Create import profile for product details
Properties and Property sets should be pre-created in ShopCtrl, to update the properties correctly. Please check Product Properties for more information. Product brands and Product groups should be pre-created in ShopCtrl as well.
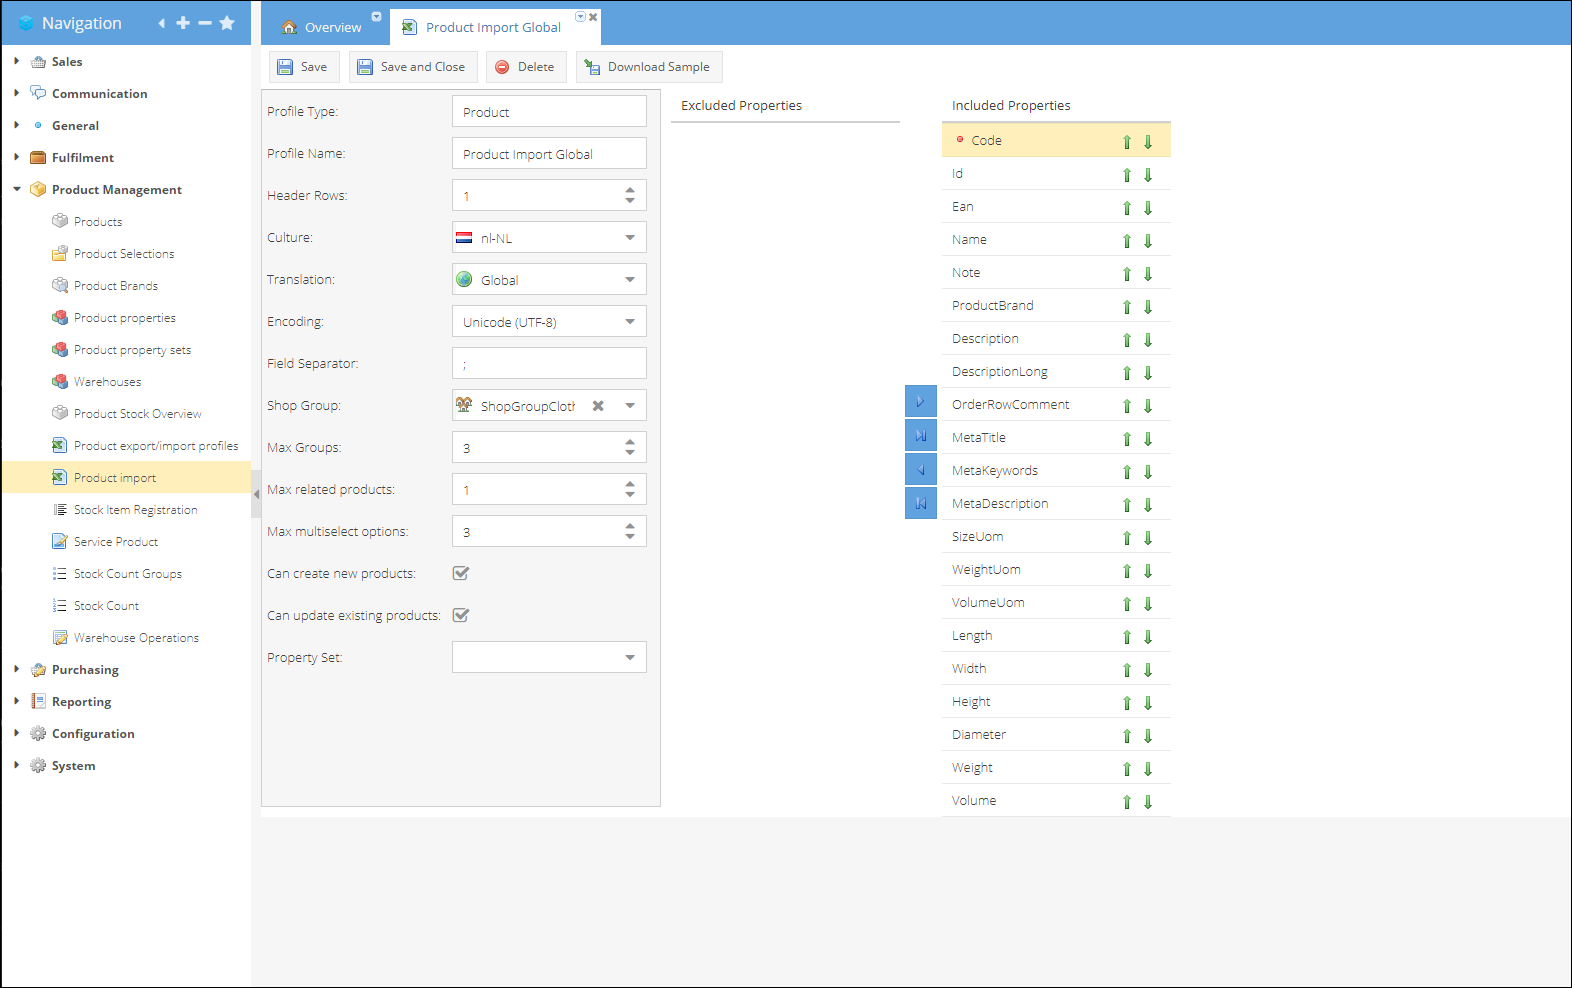
To create an import profile that will update product details per shop group and translation:
- Go to Product Management > Product export/import profiles.
- Click Add.
- Select Profile type: Product.
- Enter the Profile Name.
- Choose a number of Header Rows that will be skipped during import.
- Select Culture of the file being imported.
- Select Translation to be updated. By default, Global is pre-selected.
- Choose the Encoding of the file to import.
- Select the Excel file Field separator.
- Choose Shop Group to which the products belong.
- Max Groups - total number of product groups that could be linked to a product.
- Max related products - total number of relations that a product could have to a different products. Supported relation types: Cross Sell, Upsell, Contains Product.
- (Optional) Max multiselect options - defines a maximum number of options that could be selected for the multi-select type properties.
- Mark the Can create new product checkbox if you would like to create new products if no matching product code was found during product import.
- Turn on the Can update existing products setting to update existing products matched by product code.
- From the dropdown list select Property Set that is used for products. Once selected, the properties from the set will be added to the included properties list.
- Edit the list of Included properties. By default, the list includes all possible properties:
- Exclude unnecessary fields using the ◀ button.
- Use arrows ⬆⬇ to change the order of included properties to repeat the order of the columns in your Excel document.
- Include fields back in the list with the ▶ button.
Product Code will be used to map the products to existing product codes in ShopCtrl. This field is required. Other properties are optional. If products already exist in ShopCtrl, you can additionally use ShopCtrl ID for product mapping. Column order in the file is important. The document should start with the first Included property and continue with subsequent properties. Column names are ignored during import.
- Click Download Sample to download a sample Excel file generated based on the included properties list. The Lookup tab stores the values that already exist in ShopCtrl and should be specified exactly as in the system. To guarantee that values will be matched during import.

- Save or Save and Close profile.
You can create an import profile for one Translation and use it later on different translations. Just choose a different translation while importing a file.
Import product details per shop group
To update product details per shop group and translation:
- Go to Product Management > Product import.
- Select a Product type import profile.
- (Optional) The Translation displayed is the one preselected from the import profile. You can change the translation to a different one.
- Click Browse and choose a file to import.
Supporting file formats: .xlsx and .csv
- If you are uploading a short list of products, you can use an interactive way:
- Click Preview to upload the file and anylize it for any possible errors.
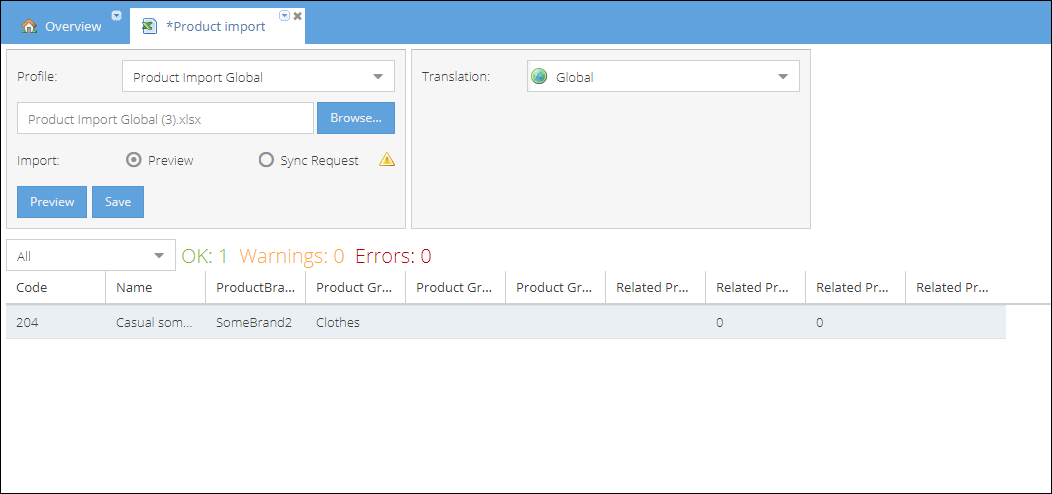
- (Optional) Correct the errors and upload the file again.
- Click Save to process the file and create/update products.
- If the file processed contains a significant amount of data, the preview interactive mode might take a significant amount of time to load. Use the Sync Request option to run the import in the background:
- Select Sync Request.
- Click Import to start the process in the background.
- Process result will be opened on a new tab. Click Refresh to check the process status.

- Once the process is finished, the message field will display the status of the import. If any errors occurred during import, click Download Report to view the detailed import result in the Excel file.
How to import product price and change product availability per shop
The import of product prices in ShopCtrl is performed per shop, as well as change of the product publication status and VAT tariff. To import product prices, you will first need to create a shop-specific profile.
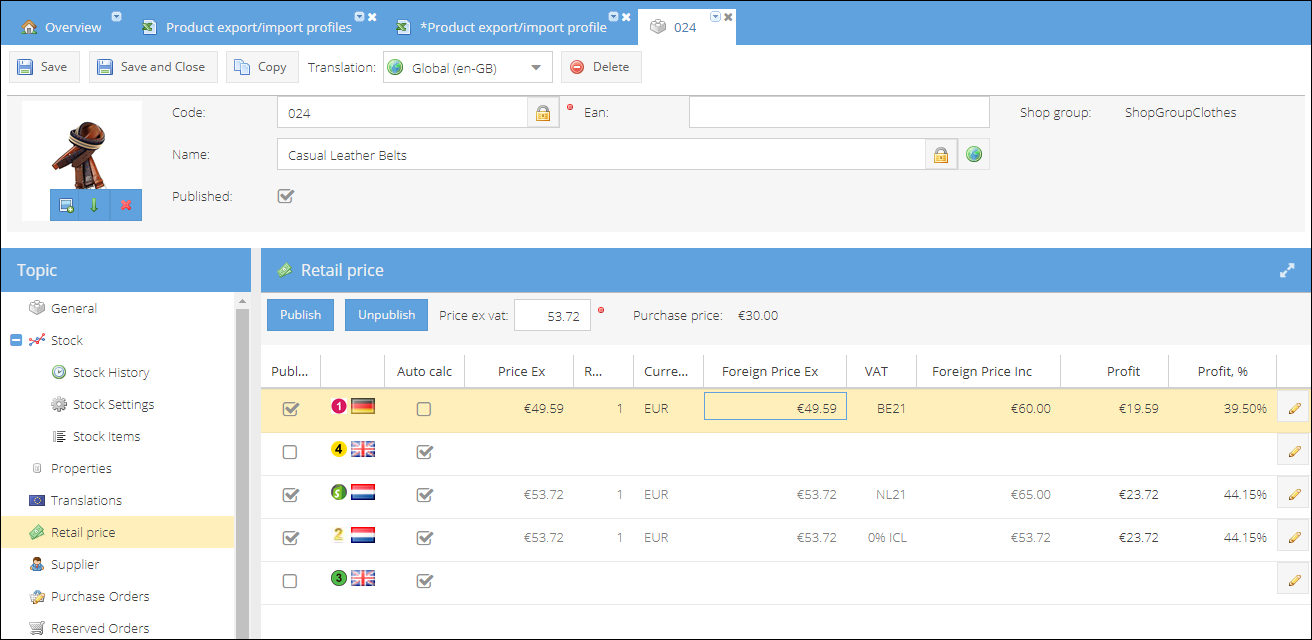
You can update product Price including VAT, excluding VAT, or both. The corresponding shop Foreign Price Inc or Ex prices will be updated. The global price excluding VAT won't be affected. Auto calculation of prices based on global price excluding VAT will be turned off for the product in this shop.
VAT tariff should be configured to be used on a shop you are updating. Otherwise, the import won't proceed. Please check the configured VAT tariffs on Shop details page > Financial > VAT.
Create import profile for product price, VAT and publication status
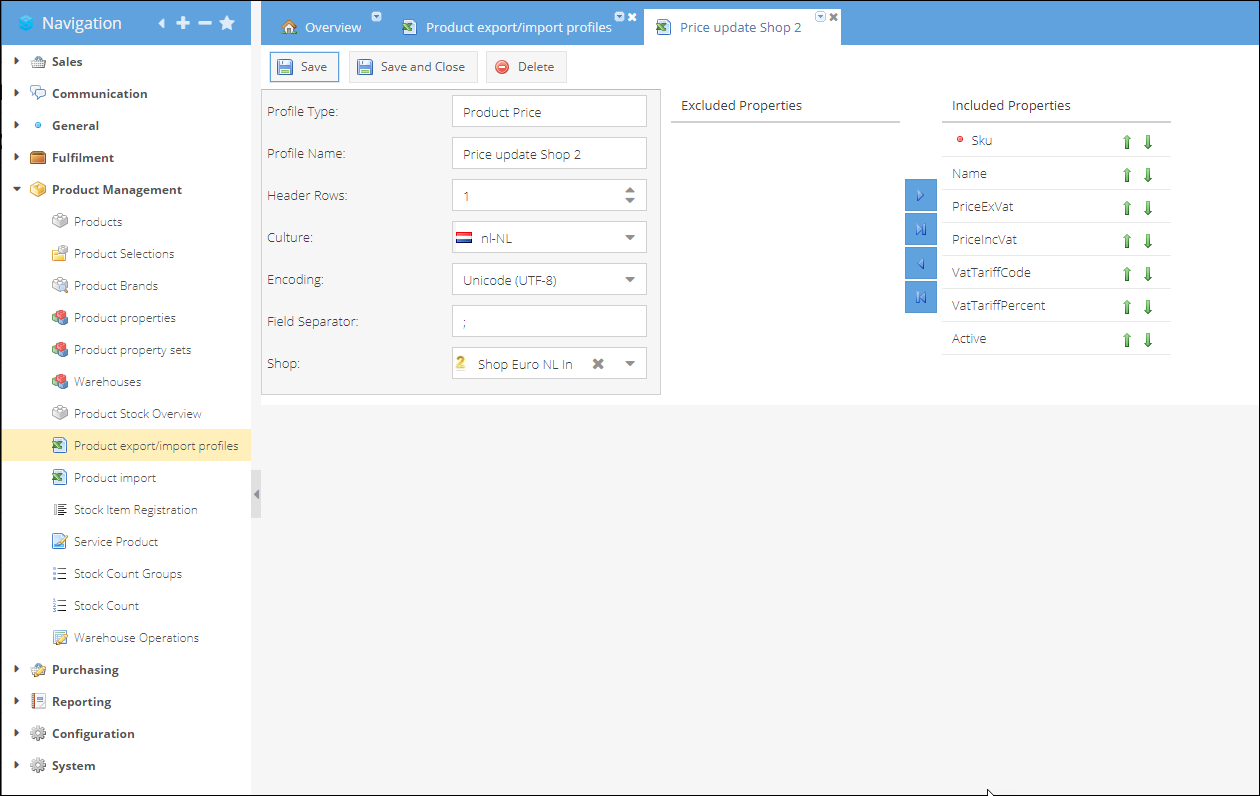
To create an import profile that will update product price excluding VAT and availability per shop:
- Go to Product Management > Product export/import profiles.
- Click Add.
- Select Profile type: Product price.
- Enter the Profile Name.
- Choose a number of Header Rows that will be excluded during import.
- Select Culture of the file being imported.
- Choose the Encoding of the file to import.
- Select the Excel file Field separator.
- From the dropdown list select Shop for which profile will be used.
- Edit the list of Included properties. By default, the list includes all possible properties:
- Exclude unnecessary fields using the ◀ button.
- Use arrows ⬆⬇ to change the order of included properties to repeat the order of the columns in your Excel document.
- Include fields back with the ▶ button.
Product SKU will be used to map the products to existing product codes in ShopCtrl. This field is required. Other properties are optional. Column order in the file is important. The document should start with the first included property and continue with subsequent properties. Column names are ignored during import.
- Save or Save and Close profile.
You can create an import profile for one shop and use it later for different shops. Just choose a different shop while importing the file.
Import product price, VAT, and availability status
To update product prices, VAT tariffs, and publication status per shop:
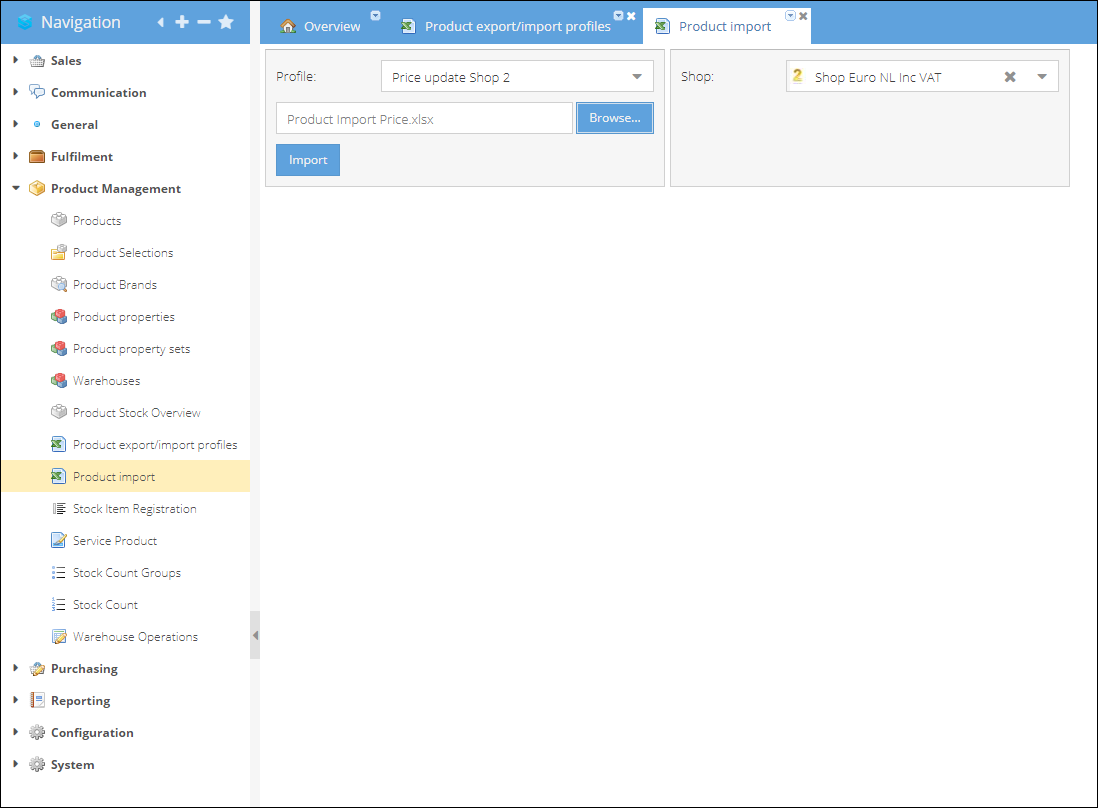
- Go to Product Management > Product import.
- Select a Product price type import profile.
- (Optional) The Shop displayed is the one preselected from the import profile. You can change the shop to a different one.
- Click Browse and choose a file to import.
Supporting file formats: .xlsx and .csv
- Click Start to begin importing process.
- Process result will be opened on a new tab. The import process will be performed in the background. Click Refresh to check the process status.
- Once the process is finished, the message field will display the status of the import. If any errors occurred during import, click Download Report to view the detailed import result in the Excel file.
To change the publication status of a product, you need to set value to true or false in the Excel file for the Active column.
As a result of the import the specific Shop Product Price Excluding VAT, Foreign Price Excluding VAT, Foreign Price Including VAT, Product VAT tariff are updated. The publication status on a certain shop is changed accordingly.
How to import product stock
You can import products stock levels via an Excel file per warehouse and location. It is also possible to set up a scheduled import via FTP or HTTP protocol using the same import profile.
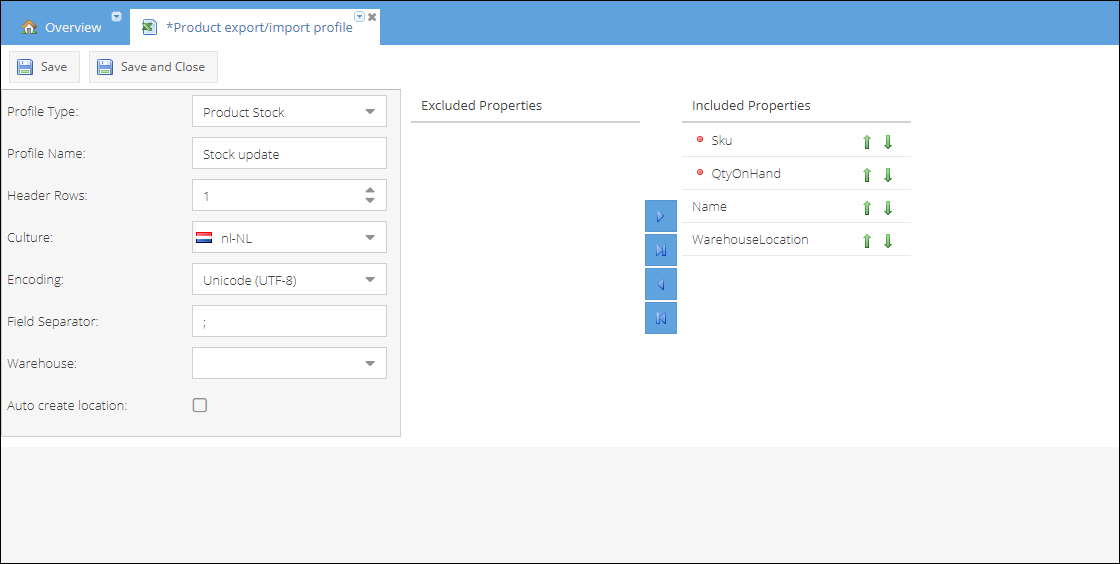
Create import profile for product stock update
To create an import profile that will update product stock per warehouse location:
- Go to Product Management > Product export/import profiles.
- Click Add.
- Select Profile type: Product stock.
- Enter the Profile Name.
- Choose a number of Header Rows that will be excluded during import.
- Select Culture of the file being imported.
- Choose the Encoding of the file to import.
- Select the Excel file Field separator.
- From the dropdown list select Warehouse for which profile will be used.
- (Optional) Check Auto-create location to create a location if no matching location is found.
- Edit the list of Included properties. By default, the list includes all possible properties:
- Exclude unnecessary fields using the ◀ button.
- Use arrows ⬆⬇ to change the order of included properties to repeat the order of the columns in your Excel document.
- Include fields back with the ▶ button.
Product SKU will be used to map the products to existing product codes in ShopCtrl. SKU and QtyOnHand (Quantity on hand) are required fields. Other fields are optional. Column order in the file is important. The document should start with the first included property and continue with subsequent properties. Column names are ignored during import.
- Save or Save and Close profile.
Import product stock to the warehouse
To update product stock per warehouse location:
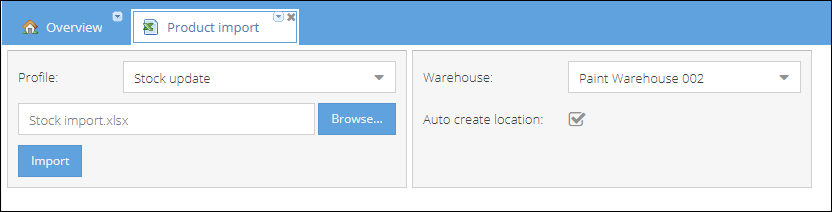
- Go to Product Management > Product import.
- Select a Product stock type import profile.
- (Optional) The Warehouse displayed is the one preselected from the import profile. You can change the warehouse to a different one.
- Click Browse and choose a file to import.
Supporting file formats: .xlsx and .csv
- Click Start to begin importing process.
- Process result will be opened on a new tab. The import process will be performed in the background. Click Refresh to check the process status.
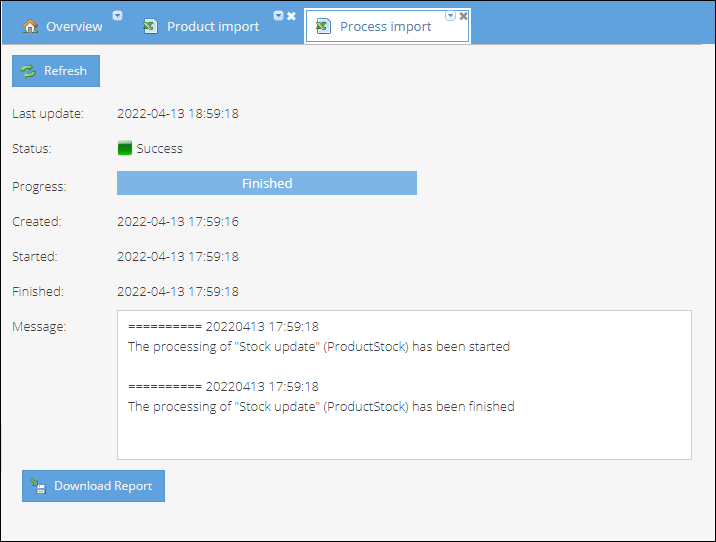
- Once the process is finished, the message field will display the status of the import. If any errors occurred during import, click Download Report to view the detailed import result in the Excel file.