Stock Count
Stock count functionality is a part of the advanced warehouse inventory module. You can count stock on your warehouse using a barcode scanner, register and manage the discrepancies.
How to count the inventory per location

Please ensure before creating the count that there are no open stock transactions - orders are not being packed and shipped from this location.
Create stock count
To create a stock count for a particular location at the warehouse:
- Open Product Management > Stock Count page.
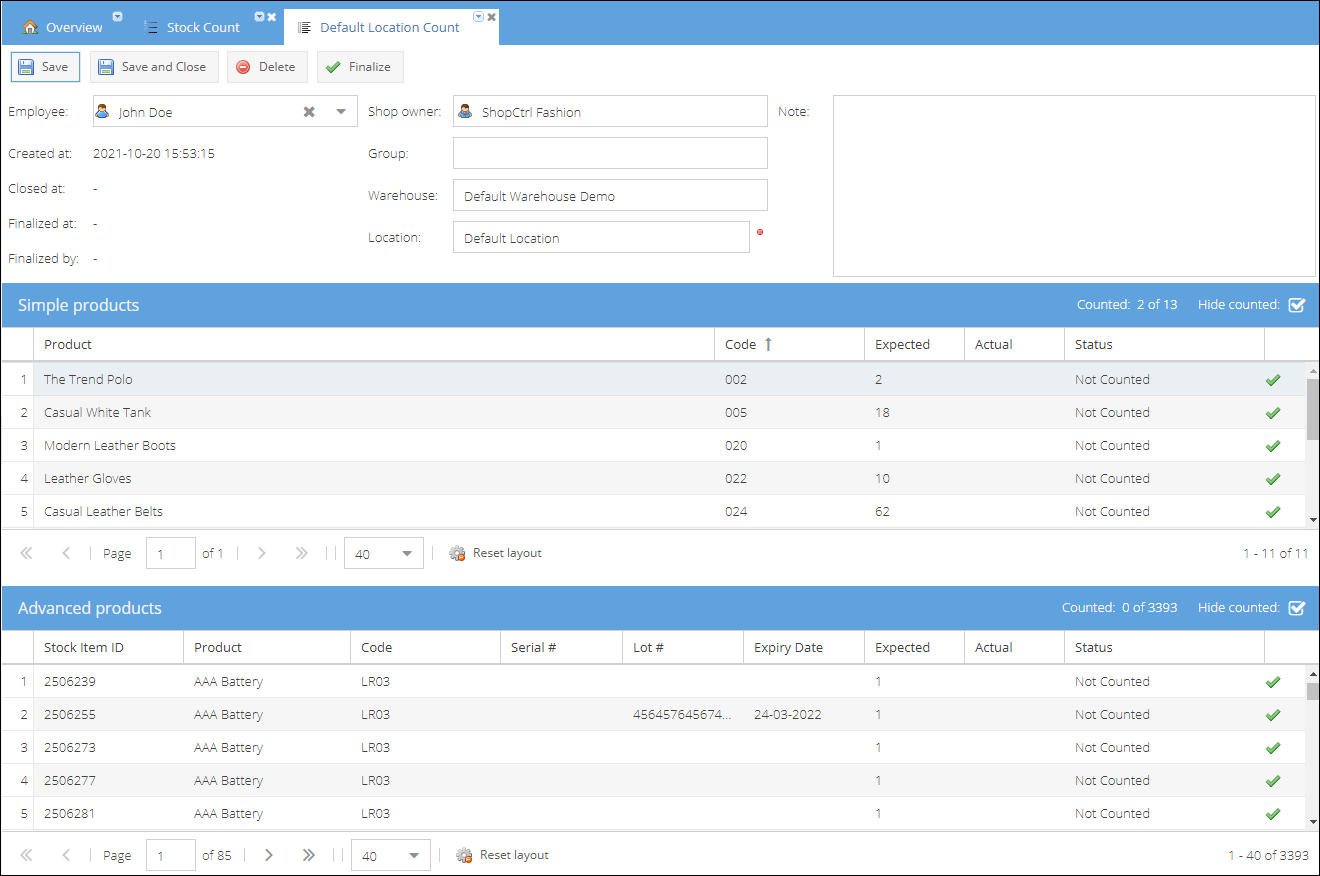
- Click Add. A new stock count page will be opened on a new tab.
- (Optional) If the stock count will be performed by a different person, select the Employee to assign to the task.
- (Optional) If you would like to add this count to a particular stock count group, select this group from the dropdown list.
- Select a Warehouse and a Location. A list of stock items kept at the location will be loaded on the products pane below.
- Click Save or Save and Close to save the count.
Count the stock
Now you can proceed to counting the stock.
Depending on your warehouse setup, you can enter the counted values manually or scan the barcodes on the stock item labels. The actual quantity will be updated in the grid with each scan. If you are missing an advanced stock item, mark its actual quantity as "0" to change the status to "Counted and partially available". For simple products, the status will be updated automatically when the actual quantity is changed.
If all stock items of the product are in place, click the button at the end of the product row, and the Actual quantity will be updated with the Expected value.
Remember to save the stock count as you go along.
Once fully counted, the item rows will be hidden from the grid. Uncheck the Hide counted checkbox to see the whole items list.
Once all of the items are counted and the stock count will be saved, the count is considered closed, and it is now possible to finalize it. You can add a Note to the stock count that will be displayed on the stock counts grid.
Finalize the count
To finalize the stock count and apply the discrepancy in the count:
- Open the saved count from the Product Management > Stock Count page.
- Click the Finalize button on the top action screen. A stock count summary page will be opened in a new pop-up window.
- Depending on the count results, select an action to be applied to each stock item.
- Click Save to save the selected actions.
- Click Save and Apply to finalize the stock count and apply changes.
Here is a list of actions that could be applied to the stock items:
Simple products

| Action | Description |
|---|---|
| Do nothing | Does not apply any action to the stock item |
| Create | Creates the simple stock item and places it to the location the count was created for |
| Missing | Stock item status changes to missing, and item is removed from the available stock |
Advanced products

| Action | Description |
|---|---|
| Do nothing | Does not apply any action to the stock item |
| Move here | If the advanced stock item scanned was previously kept at a different location, applying this action will move it to the current location |
| Missing | Stock item status changes to missing, and item is removed from the available stock |
Once the stock count is finalized, it cannot be edited anymore.
How to count inventory on the whole warehouse

To create a stock count for the whole warehouse:
- Open Product Management > Stock Count page.
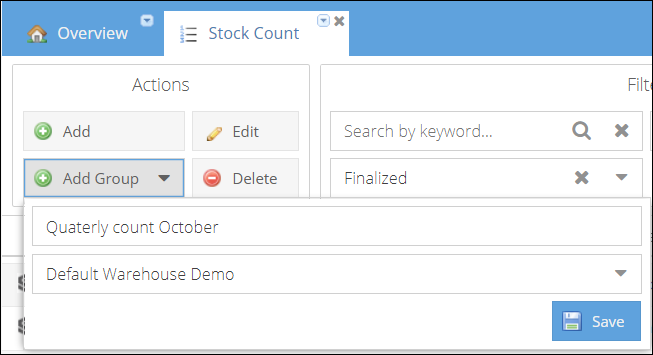
- Click Add Group.
- In the dropdown, enter count group Name.
- Select a Warehouse for which you would like to perform the stock count.
- Click Save to create stock counts for all locations of this warehouse.
Now you can proceed with counting stock per location.
This operation is rather time-consuming and might take a significant amount of time depending on the amount of inventory kept at the warehouse.