Shopify
An employee must be assigned to the shop with a Shop Owner Admin role to perform actions referred to in this article.
Shopify integration connector lets you import orders and products from your Shopify online store using API integration directly to ShopCtrl.
Shopify module synchronization features
Shopify integration connector lets you import orders and products from your Shopify online store using API integration directly to ShopCtrl.
- Importing orders from Shopify
- Tracking update
- Updating Shopify inventory
- Importing product details
- Exporting product details
Setting up integration with Shopify
Create a custom app in your Shopify account
To set up the integration, you first need to create a new ShopCtrl App within your Shopify admin panel and grant it access to the API of your store. For more information on Shopify Custom Apps, visit Shopify Help Center Custom apps.
You might need to enable the possibility to create a new custom app in your Shopify admin settings first. Please check Enable custom app development from the Shopify admin for more information.
To generate credentials to your store and give ShopCtrl access to your open API, you need to create and install a custom app:
- Log in to your Shopify admin.
- On the navigation menu click Settings ⚙ > Apps and sales channels.
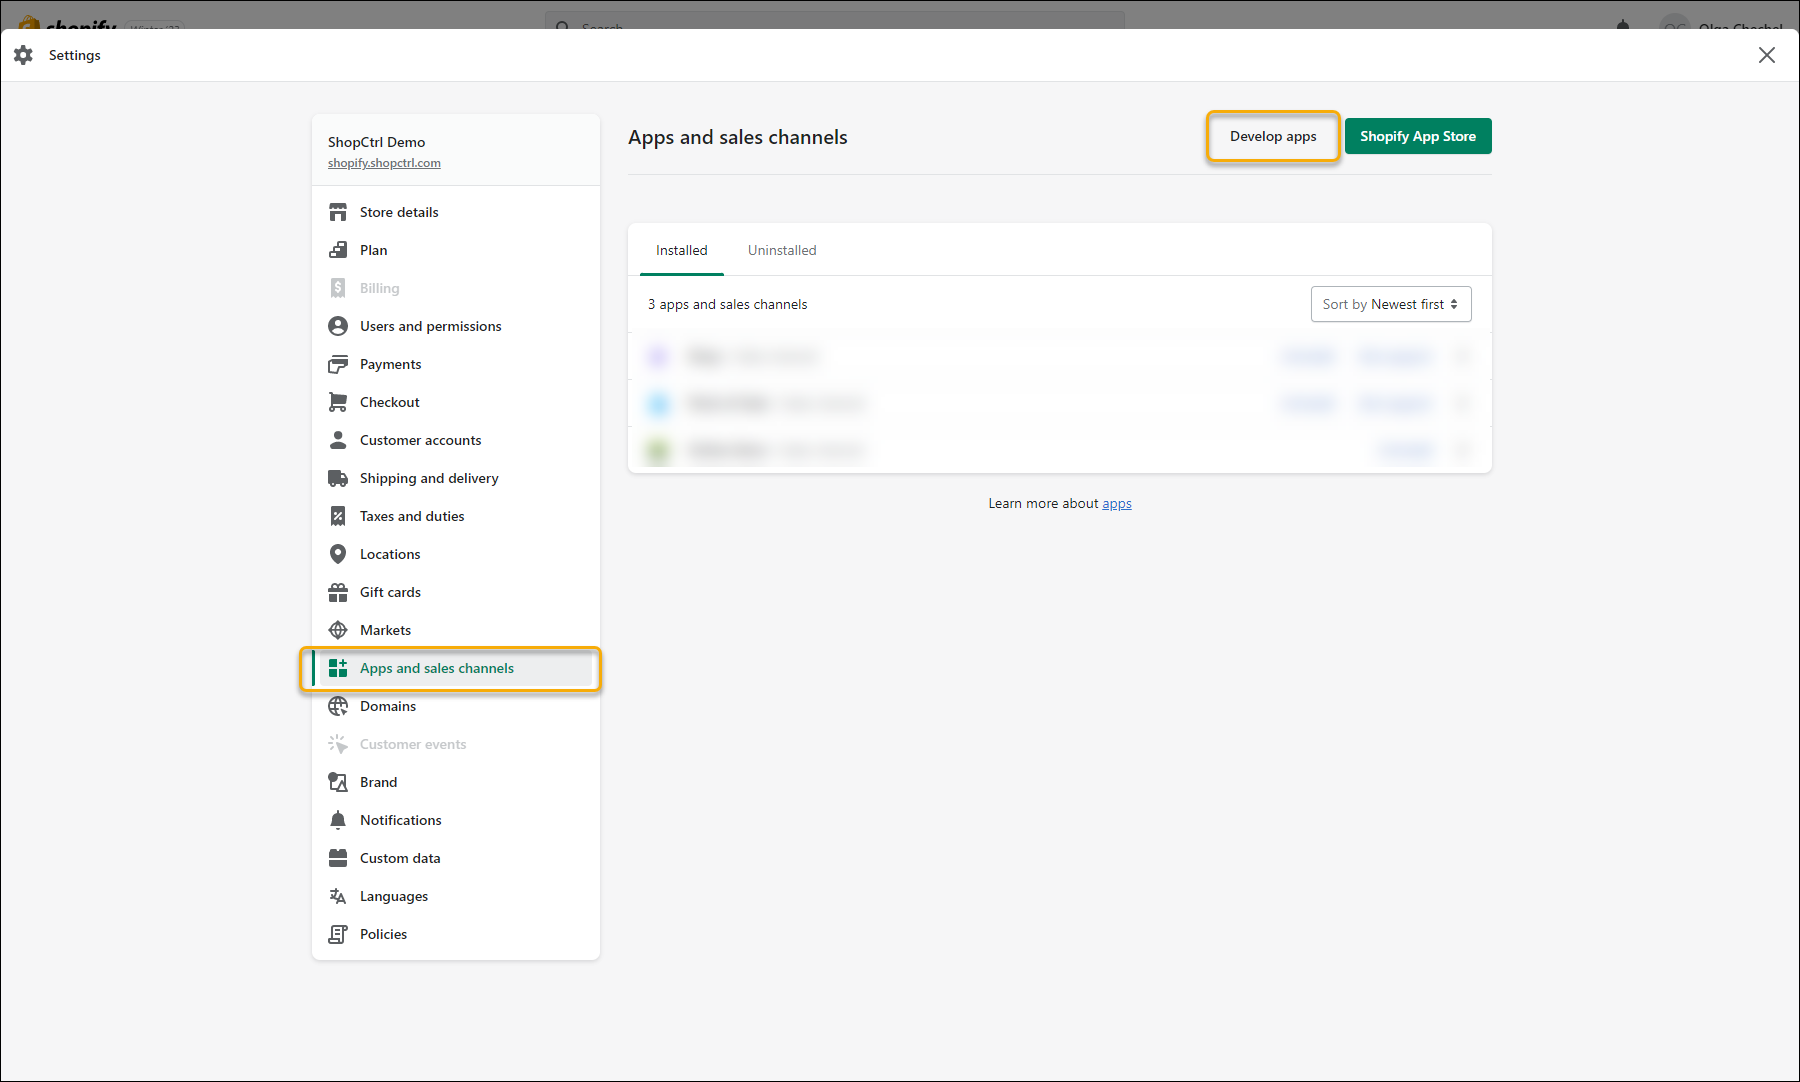
- Click Develop apps.
- Click Create an app.
- In the pop up window, enter the App name and select an App developer.
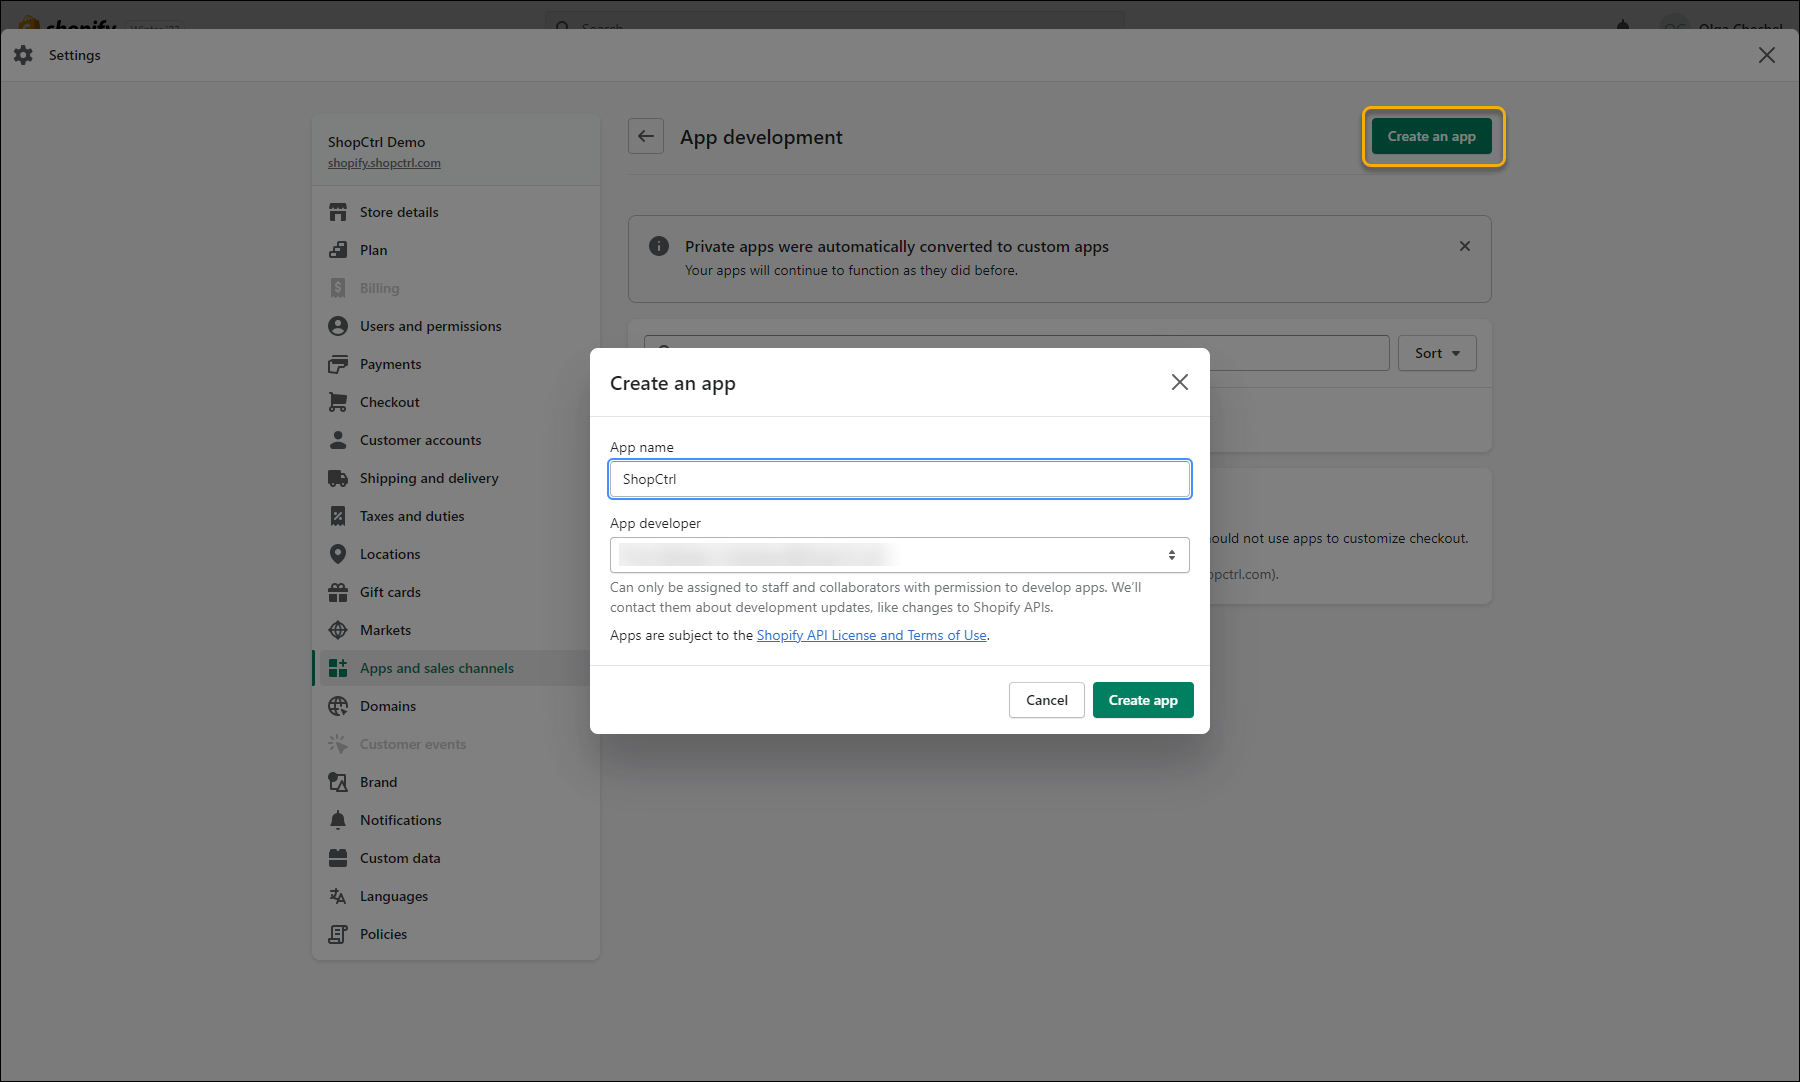
- Click Create app.
- You need to set API scopes to determine which parts of your store the ShopCtrl custom app can access. To do this click Configure Admin API scopes.
- You can now filter and grant ShopCtrl app with access to the following scopes:
- read_assigned_fulfillment_orders
- write_assigned_fulfillment_orders
- read_fulfillments
- write_fulfillments
- read_inventory
- write_inventory
- read_locations
- read_merchant_managed_fulfillment_orders
- write_merchant_managed_fulfillment_orders
- read_third_party_fulfillment_orders
- write_third_party_fulfillment_orders
- read_orders
- write_orders
- read_products
- write_products
- read_shipping
- (optional) read_content
- (optional) write_content
- After you've set API scopes for your app, you can install the app to get the API access tokens. Click Install app.
- In the modal window, click Install app.
- The API key, secret, and Admin API access token are now displayed on the screen. To get the access token: Go to the Admin API access token section and click Reveal token once. Save it in a secure place like you would normally do with passwords.
To establish a connection to ShopCtrl you will need Api key and Admin API access token.
According to Shopify:
The app developer can be the store owner, or any staff or collaborator account with the Develop apps permission.
Setup your Shopify synchronization in ShopCtrl
Before enabling synchronization with Shopify, please set up the corresponding shop currency, VAT tariffs, and payment types for your ShopCtrl shop.
Once you have enabled integration in your Shopify account, you can set up synchronization in ShopCtrl.
-
Log in to your ShopCtrl account as a user with the Shop Owner Admin role.
-
In the navigation menu select Configuration > Shops to open the list of shops created.
-
Select a shop you would like to set up Shopify synchronization for and click Edit to open shop settings.
-
Within topic menu select Shop synchronization > Shopify Synchronization
-
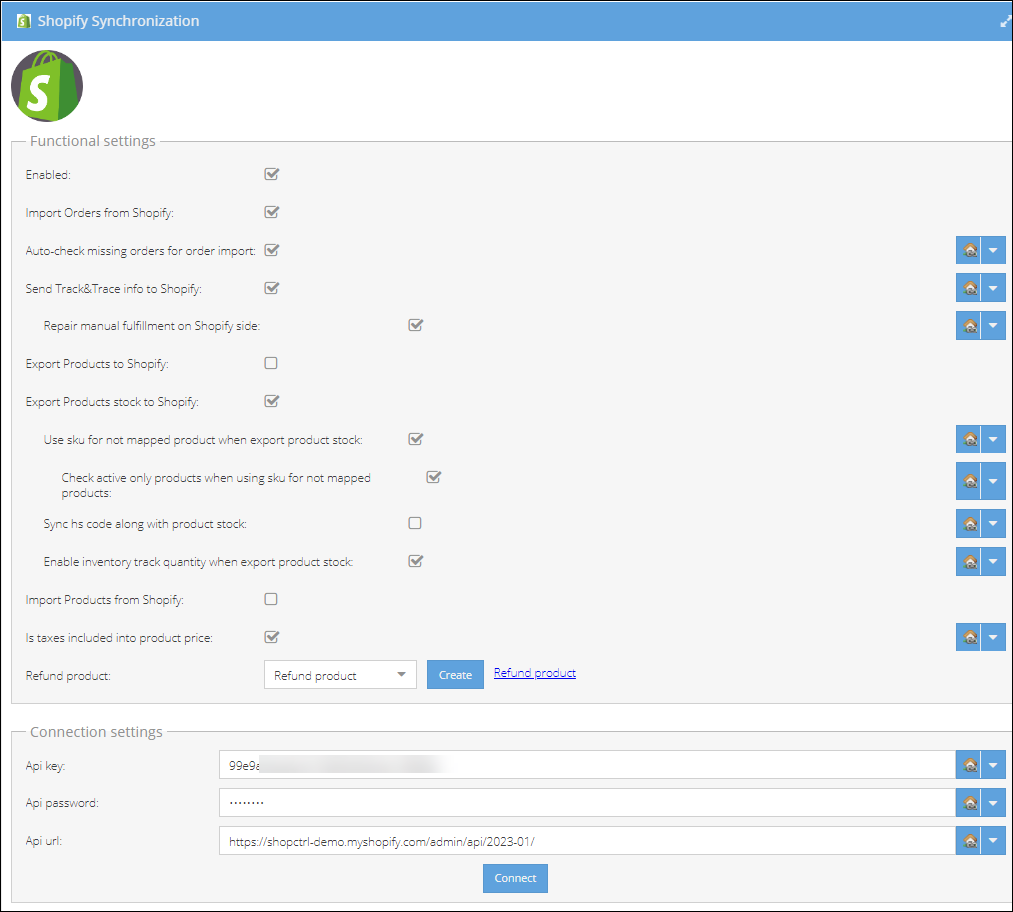
In the Connection settings pane, provide the API key and API password (API access token) generated for the ShopCtrl app in Shopify.
-
Provide an Api url, which is
https://{hostname}/admin/api/{version}/. The current supported API version is '2023-01'. -
Click the Connect button to check the connection settings. A popup window will appear identifying whether the connection was established successfully or if there is a problem with credentials provided incorrectly.
-
In the Functional settings pane, check the features you would like to use:
- Import Orders from Shopify - imports new orders at the specified interval
- Auto-check missing orders for order import - check this feature to exclude all possible synchronization mistakes and import orders that went missing for any reasons
- Send Track&Trace info - exports tracking code, carrier and tracking url to Shopify
- Repair manual fulfillment on Shopify side - in case the orders were accidentally fulfilled in Shopify admin, this fulfillment is mapped to the ShopCtrl shipment and missing tracking information is auto-updated at Shopify.
- Export Products - exports new and updates existing products to Shopify
- Export Products stock to Shopify - export available product stock
- Use sku for not mapped product when export product stock - required if initial product import was not performed via Shopify module.
- Check active only products when using sku for not mapped products - this setting helps avoid the situation, when one of your product stock doesn't get updated
- Sync hs code along with product stock
- Enable Inventory track quantity when export product stock - enables track quantity for a product in Shopify, if stock for this product increases in ShopCtrl
- Import Products - imports new and updates existing products from Shopify
- Refund product - this is the not synchronized system product that will be created in case the refund imported from Shopify does not have a link to a certain order row.
NoteSend Track&Trace info. To enable this feature, you also need to map Warehouses to Shopify Locations and create a Carrier mapping below.
-
Choose whether Taxes are included in product price. This setting depends on your Shopify store settings. Learn more on Shopify Taxes.
-
To guarantee that the ShopCtrl carrier account names correspond to the ones used in Shopify, we need to create a Carrier account mapping.
- Click Add and in the new row select from a dropdown a ShopCtrl Carrier account used for this shop.
- Type in a Shopify Carrier account name. This carrier will be sent along with the tracking code back to Shopify when the order is marked as shipped.
-
Configure Warehouse to Location mapping: Choose a warehouse enabled for the shop and a corresponding Shopify location.

-
Enable the synchronization.
-
Click Save or Save and Close to apply changes to the shop.