Magento 2
An employee must be assigned to the shop with a Shop Owner Admin role to perform actions referred to in this article.
Magento integration connector allows you to:
- import orders
- export track and trace information back to Magento
- synchronize products
- export stock levels
Setting up Magento Integration
To set up an integration with Magento, you first need to enable REST API integration in your Magento account. First, create a new user for your new ShopCtrl integration following these steps:
-
Assign an admin role to the newly created user. Please make sure to grant the new ShopCtrl API integration access to these resources on your Magento stores:
- Sales
- Products
- Carts
- Customers
- Marketing
- Content
- Stores
- System
- Global Search
Please check Magento Role Resources for mre information.
Setup your Magento synchronization in ShopCtrl
Before enabling synchronization with Magento, please set up the corresponding shop currency, VAT tariffs, and payment types for your ShopCtrl shop.
Once you have generated API keys in your Magento account, you can set up synchronization in ShopCtrl.
- Log in to your ShopCtrl account as a user with the Shop Owner Admin role.
- In the navigation menu, select Configuration > Shops to open the list of shops created.
- Select a shop you would like to set up Magento synchronization for and click Edit to open shop settings.
- Within topic menu select Shop synchronization > Magento V2.X Synchronization

- Provide the Username and Password created for the ShopCtrl API integration in Magento.
- Enter the API Url which is
https://{hostname}/index.php/rest. - Click Connect to Magento and load available Store Views. If credentials were correct and the connection was established, the Store view field will be enabled.
- Select the Store View that you would like to connect to this shop in ShopCtrl.
- Check the features you would like to use:
- Import orders
- Export parcels
- Import products
- Export stock
- Export sales product stock
- Export sales product price
- Select the Allowed product type:
- Simple
- Bundle
- All - use both Simple and Bundle products
- (Optional) Specify the Specific mappings for importing Magento orders.
- Map the ShopCtrl Main Order Statuses to the Magento order statuses. Please, see Magento Order Statuses for more information.
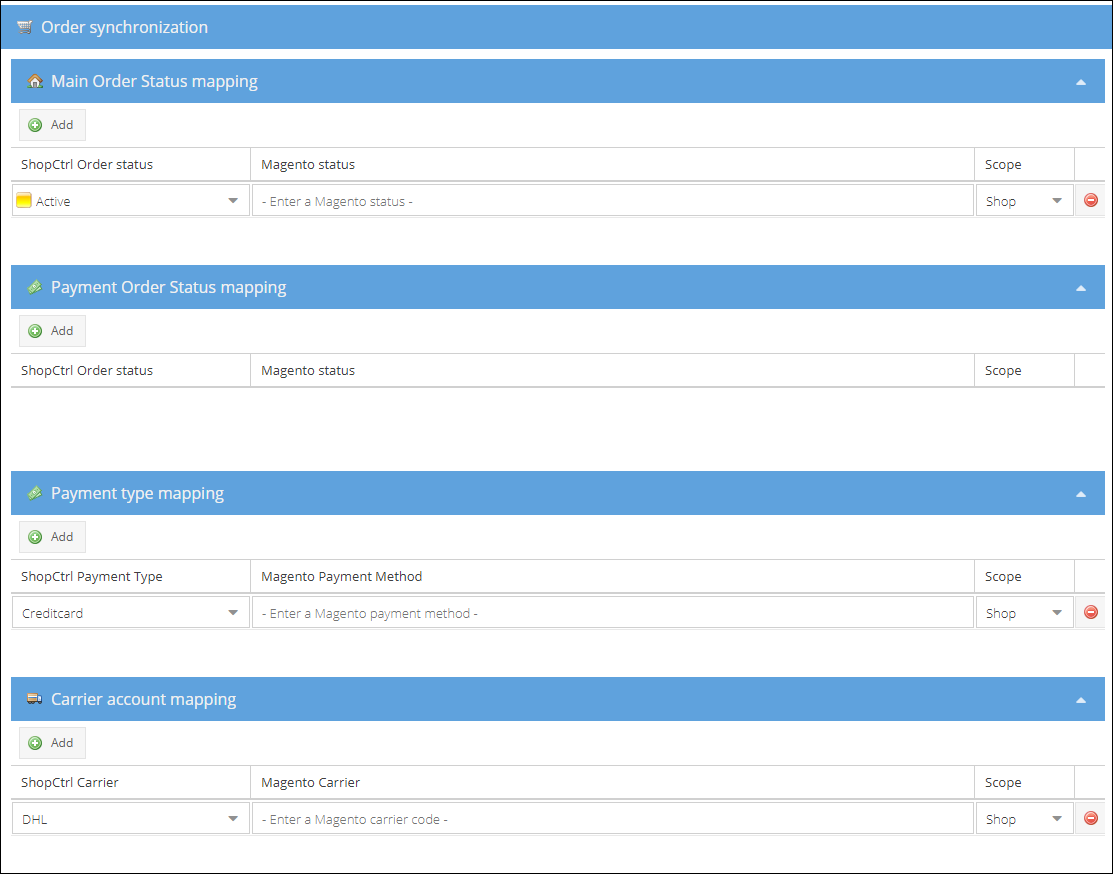
- Map the ShopCtrl Payment Statuses to the Magento Payment statuses.
- Map the ShopCtrl Payment Types to the Magento Payment Methods. 14. Create Carrier account mapping to guarantee that the ShopCtrl carrier account names correspond to the Magento carrier codes.
- Enable the synchronization.
- Click Save or Save and Close to apply changes to the shop.
Orders synchronization feature is enabled by default once the Magento synchronization is enabled.