Creating Return Label
A customer contacts you and wants to send back a whole order or just a few items from it. To let them ship the goods back at your expense (or with your carrier contract), you can generate a return label in ShopCtrl, print it, or email it to the customer.
A return label is a regular Parcel with the Return option enabled. The difference with a normal shipping label is the direction: the parcel travels from the customer to your warehouse (or return address), so the ship from and ship to addresses are reversed.
Before you start
Make sure the following is configured:
- The carrier account used for the return supports return labels. Not every carrier integration can create a return label through a third party tool - check the Carrier documentation for your carrier.
- A Default ship from address is filled in for the shop (Shop Settings > Shipping > Default ship from address). This address is used as the return destination when you create a parcel manually.
- (Optional) A dedicated Return label template is selected on the carrier account (Fulfillment > Carriers > carrier account). When no return template is set, the regular shipping label template is used.
The Default return address field in Shop Settings > Shipping is only applied when a return parcel is generated automatically (for example, through the API). When you create the parcel yourself from the order or from the parcels list, ShopCtrl fills the return destination from the Default ship from address of the shop. If the two addresses differ, adjust the address on the parcel before saving.
Which addresses are used
When you click Create parcel on an order, ShopCtrl prefills the new parcel as follows:
| Field | Value taken from |
|---|---|
| Shop | The shop of the order |
| Carrier | The carrier account selected on the order; otherwise, the first carrier account of the shop |
| Ship from | Default ship from address of the shop (Shop Settings > Shipping) |
| Ship to | The shipping (delivery) address of the order - not the invoice address |
When you tick the Is return checkbox, ShopCtrl swaps these two addresses when the parcel is saved. The customer's delivery address becomes the sender, and your shop ship from address becomes the receiver.
Creating a return label from the order
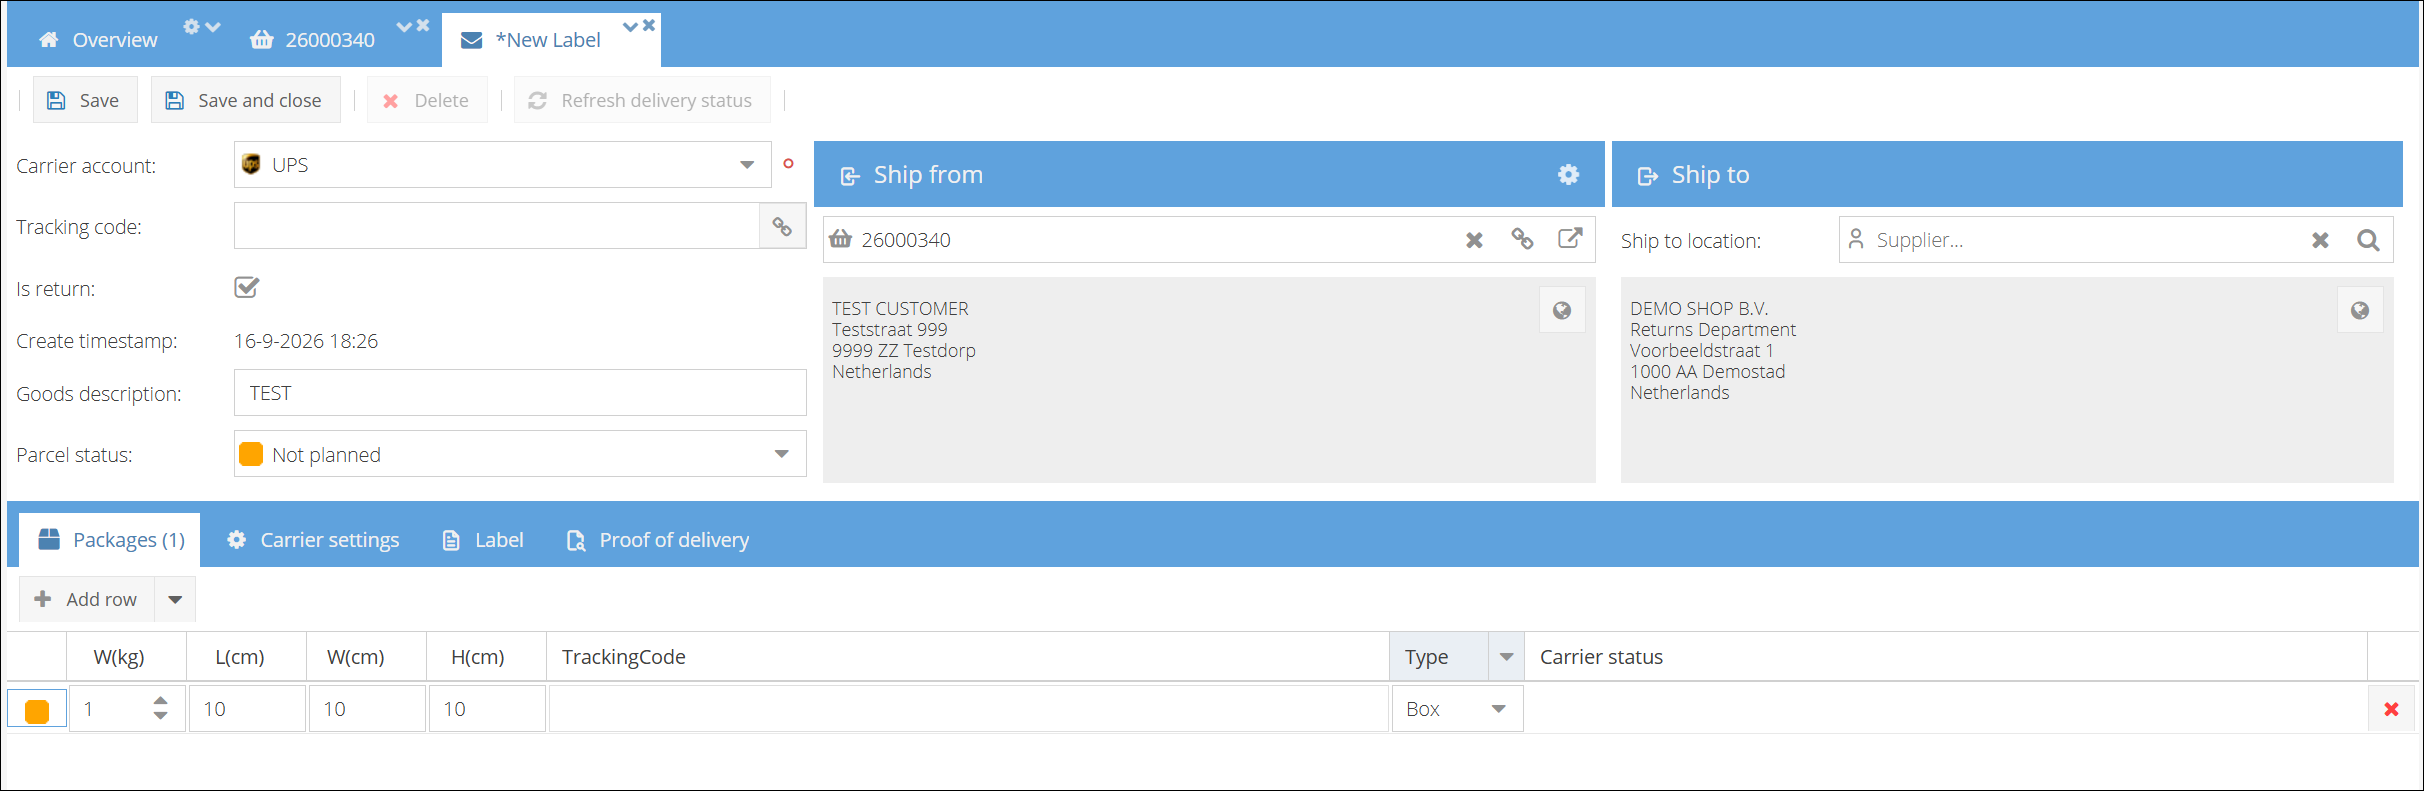
- Open the order the customer wants to return, and go to the Topic menu > Parcels.
- Click Create parcel and confirm. The order is saved first and a New label tab opens.
- Select the Carrier that will collect the return.
- Tick the Is return checkbox. The Ship from and Ship to panels swap: the customer becomes the sender and your warehouse or return address becomes the receiver.
- Check both addresses:
- Only the customer's address can be edited directly: use the tool icon on its panel to correct the street, zip code, city, or country. The address fields themselves cannot be typed over on the other panel.
- The return destination is taken from the shop and normally needs no change. If the goods should go back to a supplier instead of your own warehouse - for example when the order was dropshipped - select that supplier in the Ship to location field (labelled Ship from location until the Is return checkbox is ticked). The supplier's main address is then used as the receiver.
- Fill in the Goods description and correct the package weight and dimensions in the packages grid. Carriers validate these values, so enter the data of the package the customer will actually send back.
- Set any additional Carrier settings required by the integration.
- Click Save. ShopCtrl requests the tracking code and the label from the carrier.
- Open the Label section of the parcel to see the generated PDF. From here you can print the label, or download it and send it to the customer by email.
The Create parcel button is not available for a new, on-hold, or archived order. Save or release the order first.
A return parcel is listed in Fulfillment > Parcels with the Return column ticked, and in the order's Parcels pane with the delivery status Return labels. Use the Status filter Only return labels on Fulfillment > Parcels to find all return labels.
Creating a return label from the parcels list
You can also start from the parcels list instead of the order, for example when you handle several returns one after another.
- Go to Fulfillment > Parcels.
- Click Add and select the shop. A New label tab opens.
- In the Order field, type and select the code of the order the return belongs to. The customer's address is filled in from the order, exactly as when you start from the order itself.
- Tick Is return and continue from step 3 of the procedure above.
The Order field can be left empty, but then the ship to address stays blank and you have to type the customer's address in by hand, and the label is not linked to any order. Always select the order when the return belongs to one.
After the customer ships the parcel
- When the carrier integration supports tracking, the parcel status of the return label is updated automatically, so you can see when the customer actually handed in the parcel. You can also refresh it manually with Refresh delivery status on the parcel, or Check delivery status on Fulfillment > Parcels.
- Register the goods coming back in Fulfillment > Returns and process the reason, condition, and resolution as described in Manage Returns.
- If the customer keeps the product and only gets a replacement, follow Issuing Free Replacement instead.