Setting up Shop Synchronization in ShopCtrl
Once you have enabled integration in your Amazon account, you can set up synchronization in ShopCtrl.
Before start: Configuring shop in ShopCtrl
Before enabling synchronization with Amazon, please set up the corresponding shop currency, VAT tariffs, and payment types for your ShopCtrl shop.
To continue setting up the shop in ShopCtrl, we need to determine how the customer contact information is stored. Amazon sends customer names as well as customer addresses as single fields to ShopCtrl. Adjust the designated shop settings to process this data correctly.
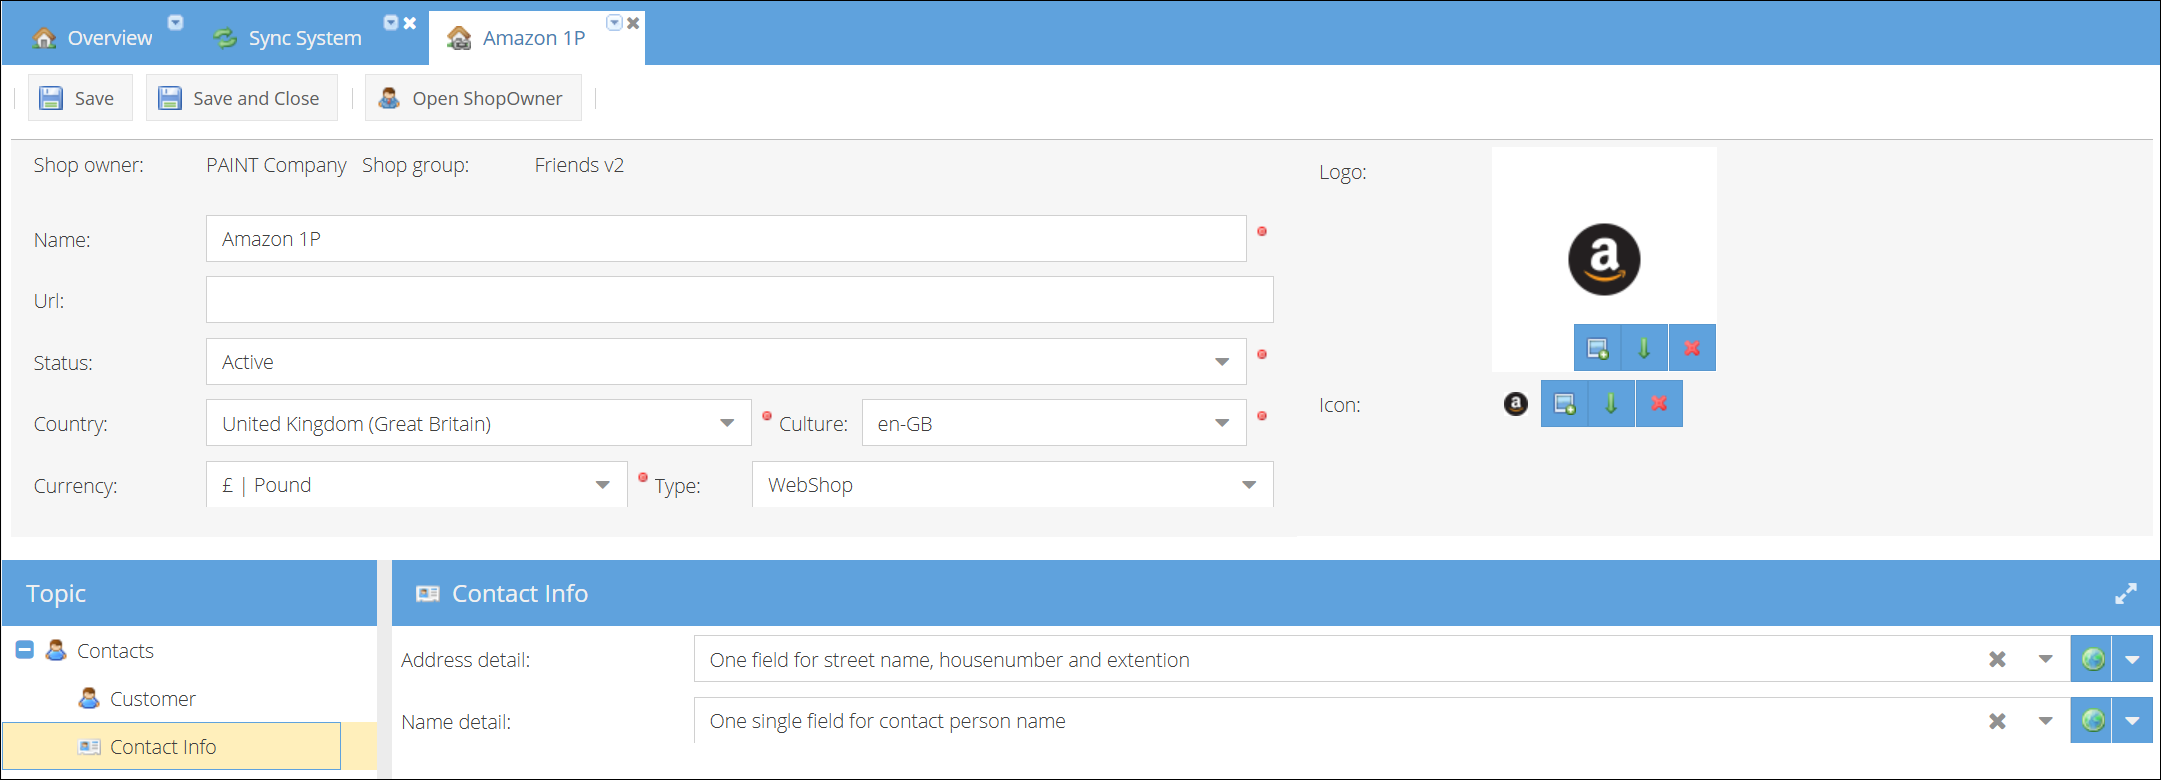
To change the way customer contact information will be stored in ShopCtrl:
- Log in to your ShopCtrl account as a user with the Shop Owner Admin role.
- Open the shop settings page for which the Amazon connection was established.
- Within the topic menu, expand the Contacts nod and click Contact Info.
- Change the Address detail setting to One field for street name, house number and extension.
- Change the Name detail setting to One single field for contact person name.
- Click Save or Save and Close to apply changes to the shop.
Setting up Amazon shop synchronization in ShopCtrl
Amazon 1P appmodule has quite a number of features. We will break the setup process into several steps:
- Establish connection to Amazon 1P
- Prepare for importing orders: configure mapping and Fulfillment centers
- Setup Bulk Buy (Optional).
- Configure orders acknowledgement
- Setup initial order import and start synching orders
- ASN submission configuration
Show full shop settings
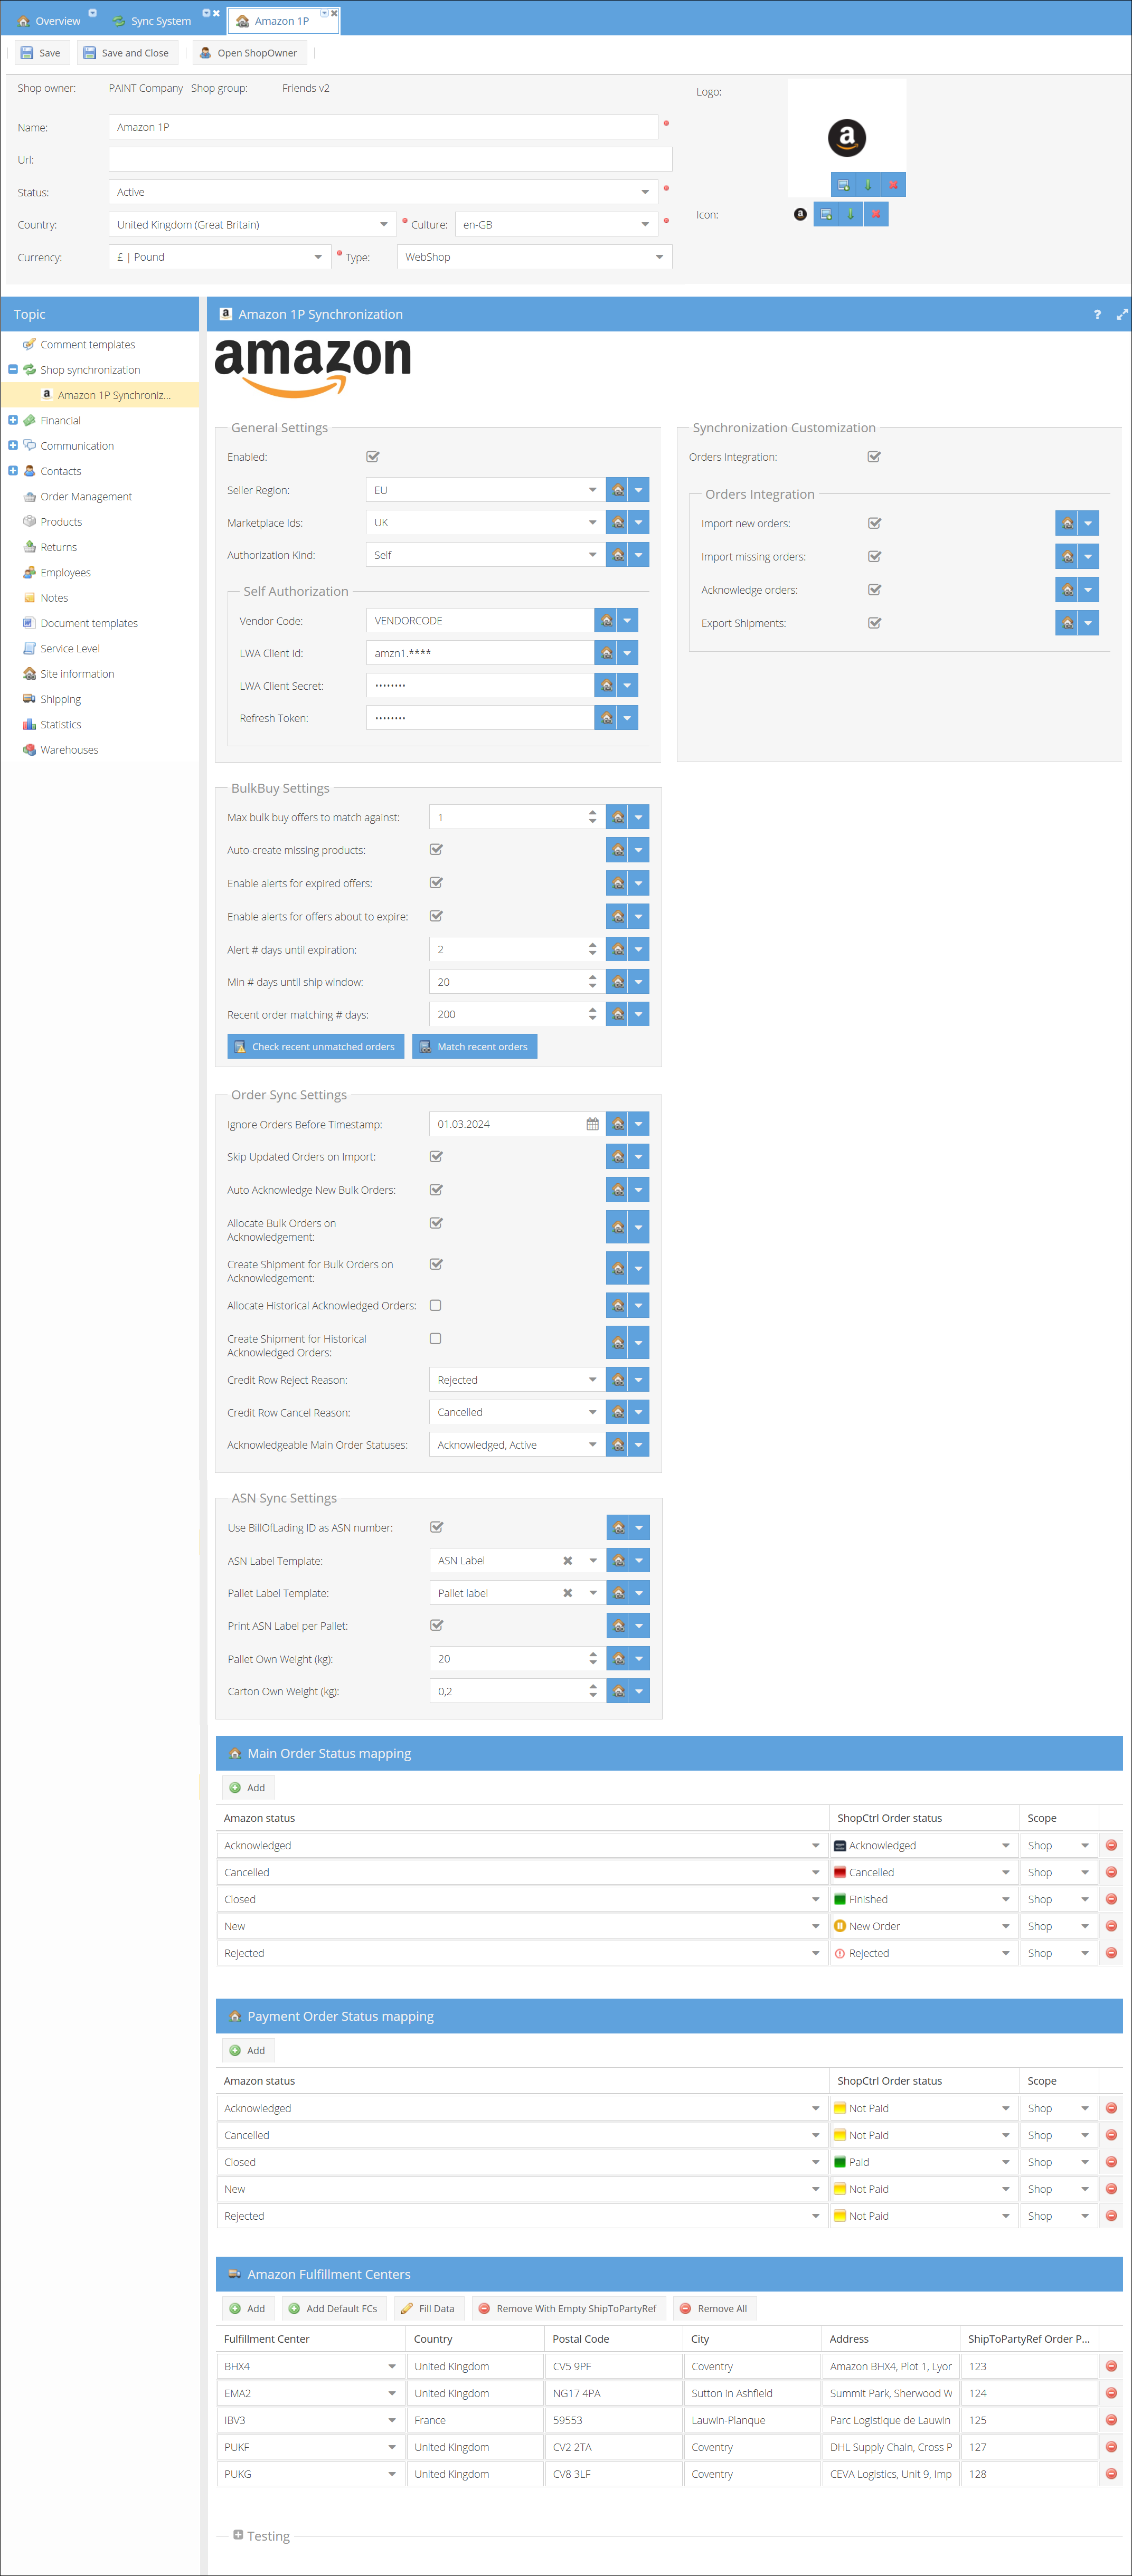
Step 1. Establish connection to Amazon 1P
Connect your ShopCtrl shop to Amazon by providing your vendor credentials and API keys.
- Log in to ShopCtrl as a user with the Shop Owner Admin role.
- Navigate to Configuration > Shops in the menu to access the list of created shops.
- Choose a specific shop for which you want to configure Amazon synchronization and click Edit to access shop settings.
- Within the topic menu, select Shop synchronization > Amazon 1P Synchronization.
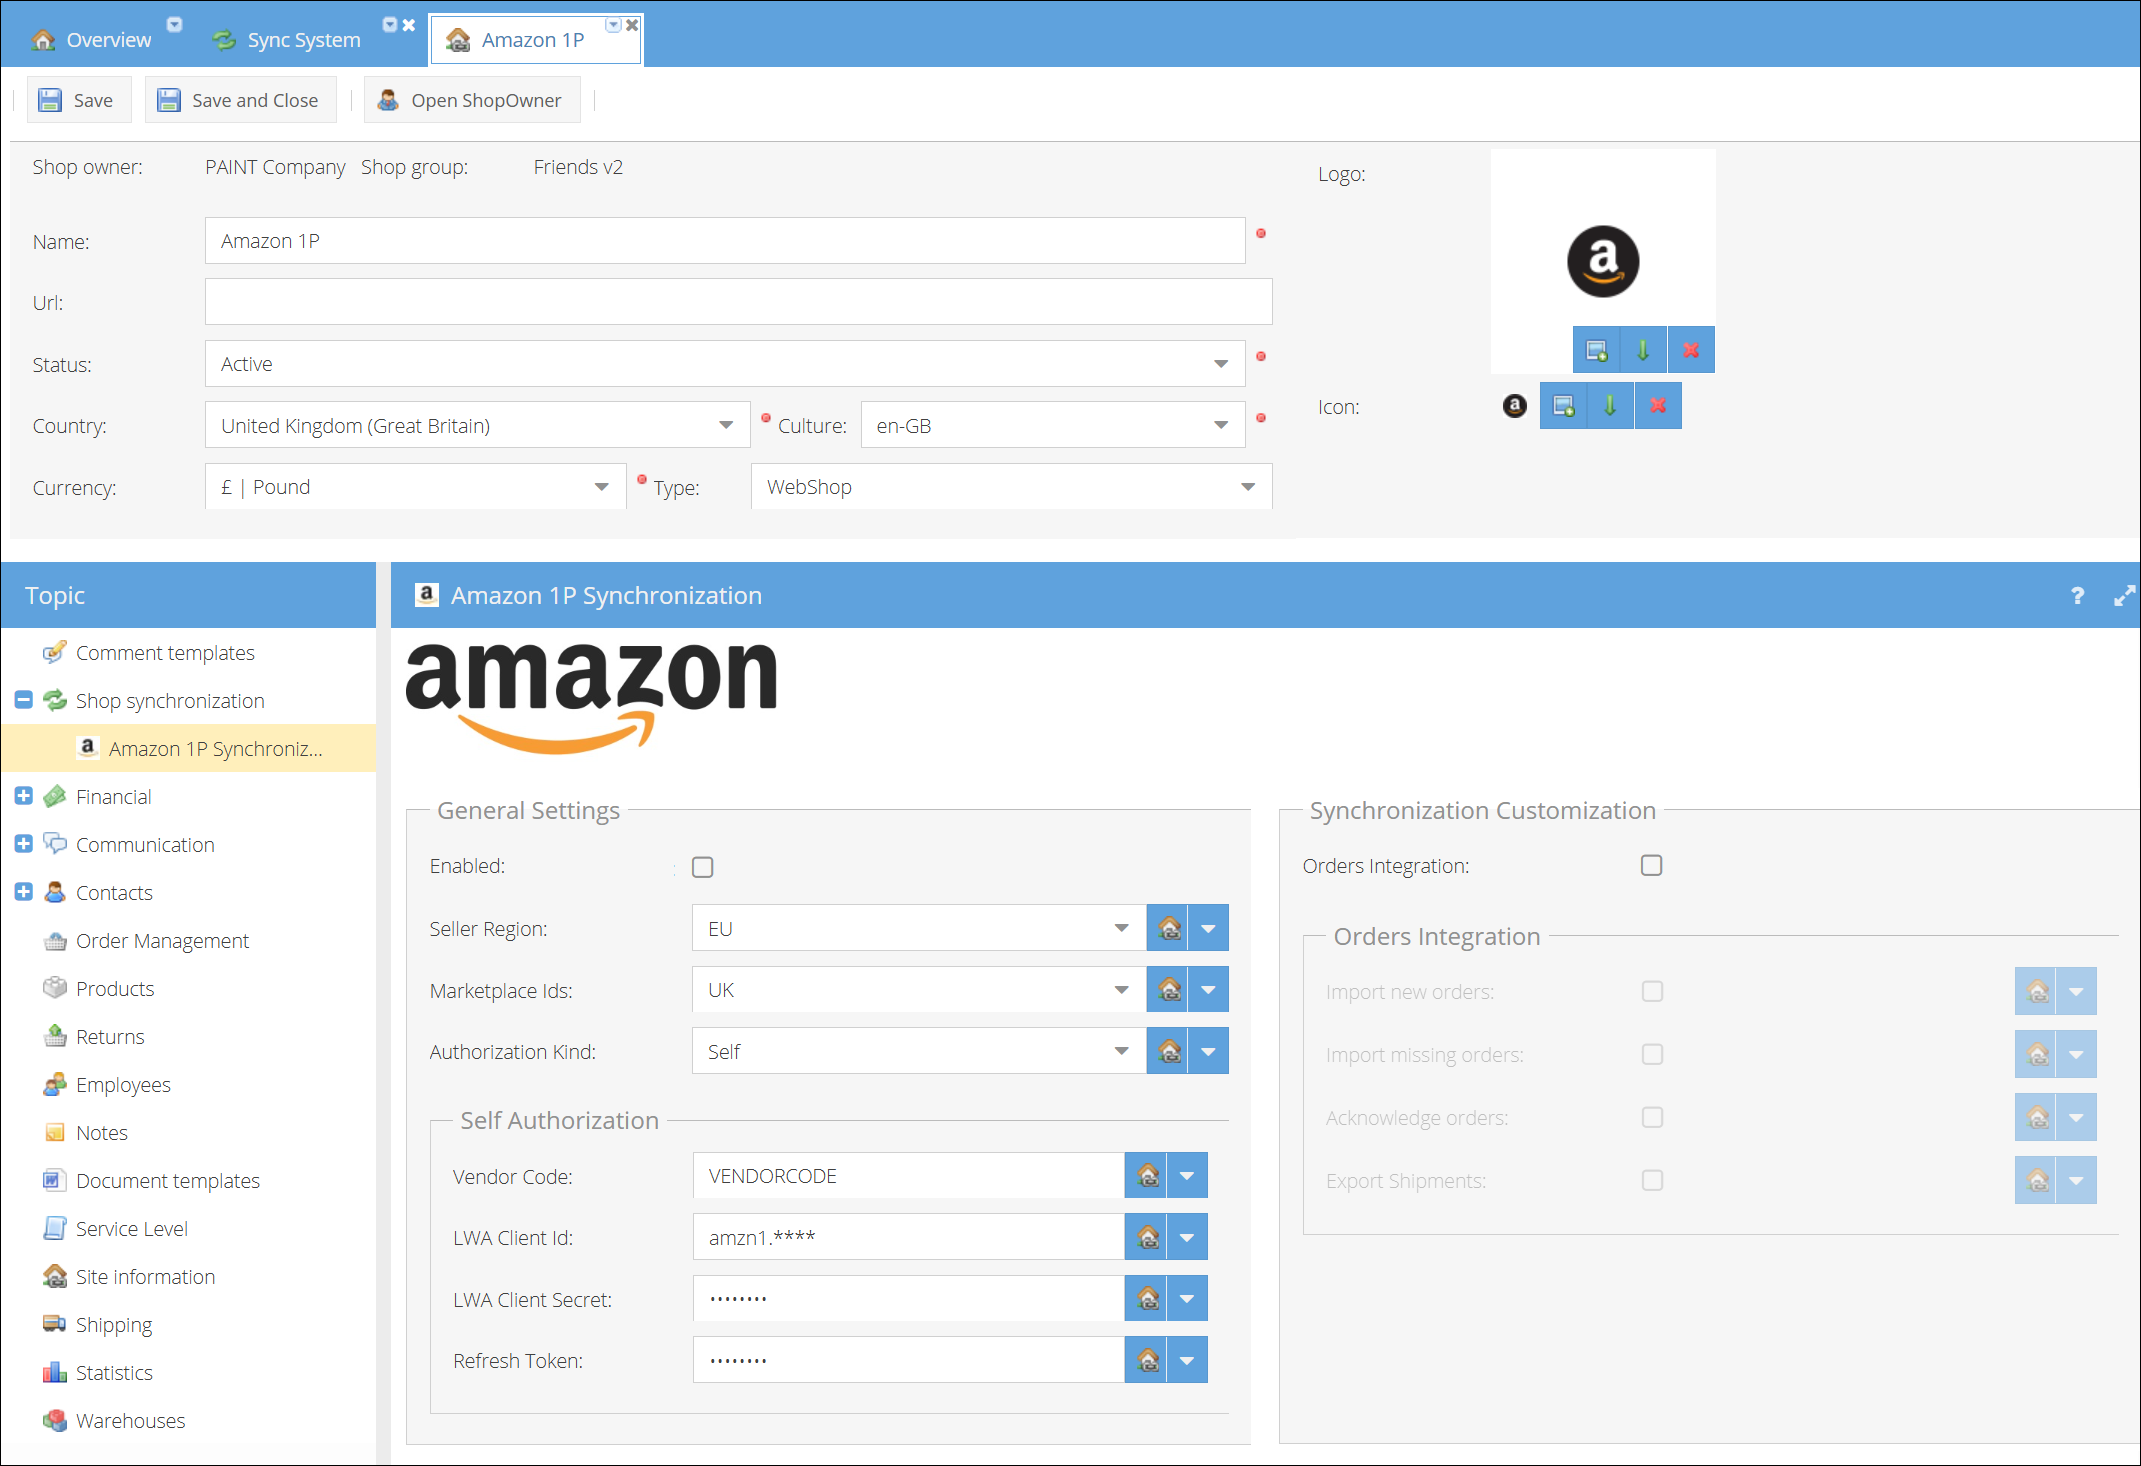
- Specify a Region and a Marketplace from which you wish to import orders via this shop.
- Leave the Authorization kind - Self.
- On the Self Authorization section enter the Vendor code.
- Provide the LWA Client Id and LWA Client Secret generated for the ShopCtrl private app on Amazon.
- Enter the Refresh Token.
- Click Save or Save and Close to apply changes to the shop.
You have now established the connection to Amazon, but synchronization is not yet active and no data has been imported.
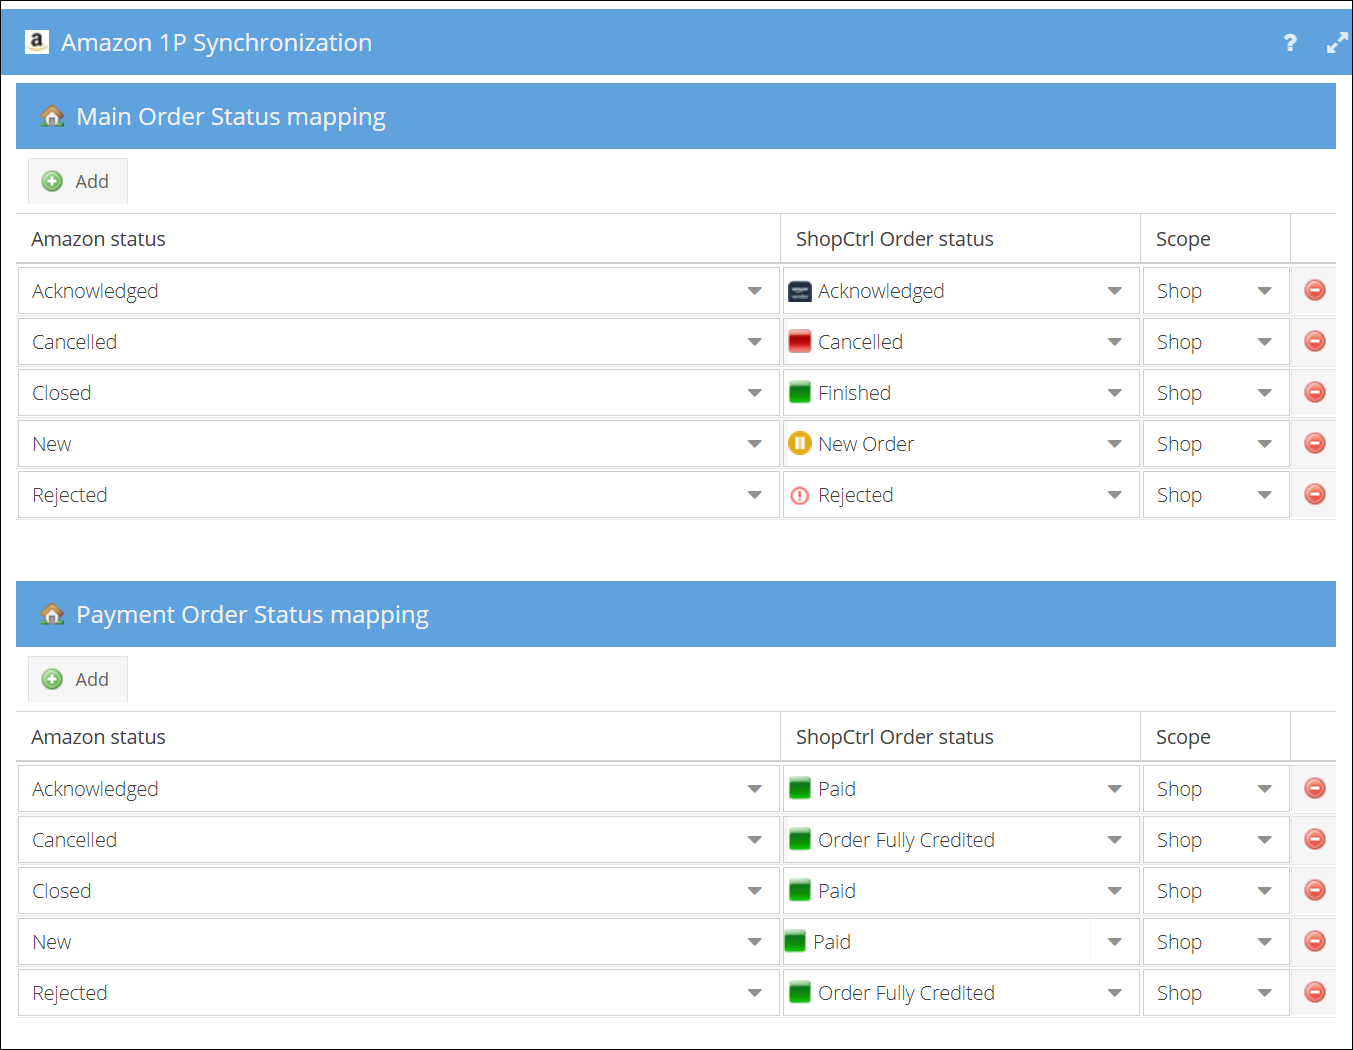
Step 2. Configure statuses mapping and Fulfillment centers
According to the Amazon SP-API documentation, Amazon 1P provides two key concepts for tracking order progression: purchaseOrderState and PurchaseOrdersStatus.
ShopCtrl consolidates both the Amazon purchaseOrderState and PurchaseOrdersStatus information, translating them into the appropriate ShopCtrl Main Order Status. This ensures that key state changes from Amazon - such as an order being acknowledged, rejected, or cancelled - are accurately represented in your ShopCtrl workflow.
Please ensure you have created two main order statuses in ShopCtrl: "Acknowledged" (Base status Active) and "Rejected"(Base status Cancel), as they will be required for the status mapping configuration.
Main Order Status mapping Configure the mapping of order statuses by manually selecting the incoming Amazon purchase order status and aligning it with an appropriate ShopCtrl status. For example:
- Map Amazon's
ACKNOWLEDGEDstate to your ShopCtrl Acknowledged status - Map Amazon's
CANCELLEDstate orREJECTEDstatus to your ShopCtrl Rejected status
Payment Order Status mapping Amazon doesn't return payment status/payment when retrieving orders via API integration. Though for finilizing orders inside ShopCtrl you might need to configure the mapping rules. Assuming that closed order is a paid order, you can map it to ShopCtrl Paid status. Cancelled or Rejected orders can receive Fully credited status.
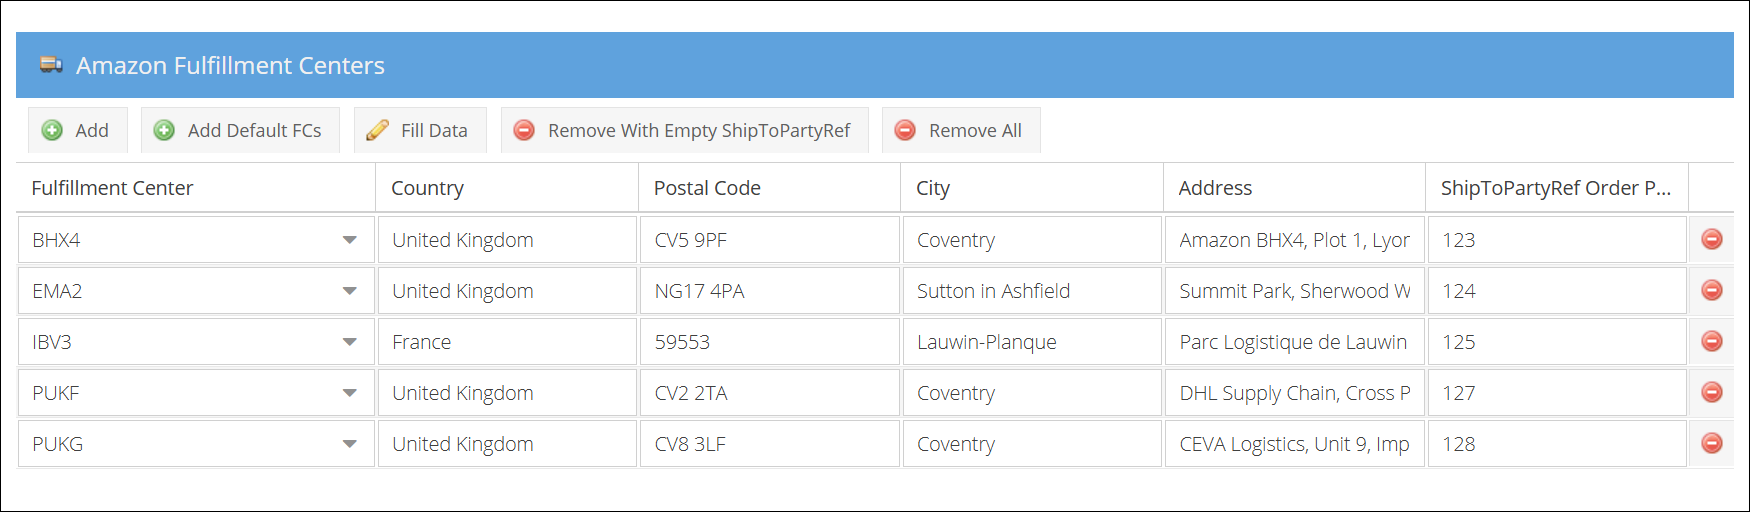
Fulfillment centers
When retrieving orders, Amazon provides only a code for the fulfillment center, not its full address. ShopCtrl handles this by using a built-in list to match these codes to physical addresses.
Upon importing a new order, ShopCtrl automatically matches the code provided by Amazon to an address in this list.
If you have not configured any fulfillment centers here, ShopCtrl will still use its built-in predefined list to function correctly.
You can add new fulfillment centers, override the addresses of existing ones or add mapping to your internal code directly from this pane.
- Preload Default Centers: To easily add your internal codes to the most common centers, use the ‘Add Default FCs’ button. This will populate the list with Amazon's standard fulfillment centers.
- Add a New Fulfillment Center: If Amazon notifies you of a new fulfillment center code, please add it to this list to ensure seamless order import.
- Mapp Internal Codes (ShipToPartyRef): This column allows you to map your internal codes to each fulfillment center. During order import, ShopCtrl will add this code as the ShipToPartyRef parameter to the order. This provides a unique identifier for integration when pushing orders further into your internal system.
- Edit Information: Edit the address or ShipToPartyRef fields for any entry.
- Save Changes: Save the shop settings to apply any changes immediately.
- Clean Up: After mapping your codes, you can click ‘Remove rows with empty ShipToPartyRef’ to clean up the list and remove any default centers you don't use.
Changes to addresses or codes will only apply to orders imported after the settings are saved. Previously imported orders will not be updated.
Step 3. Configure Bulk Buy Offers (Optional)
If you participate in Amazon's Bulk Buy Offers program, you can manage the approval workflow within ShopCtrl. For detailed setup instructions, see the dedicated guide: Setting up Bulk Buy Offers.
Step 4. Configure orders acknowledgement
Set the rules for how and when orders are confirmed back to Amazon.
- Navigate to Shop configuration > Amazon 1P Synchronization and go to the Order Sync Settings section.
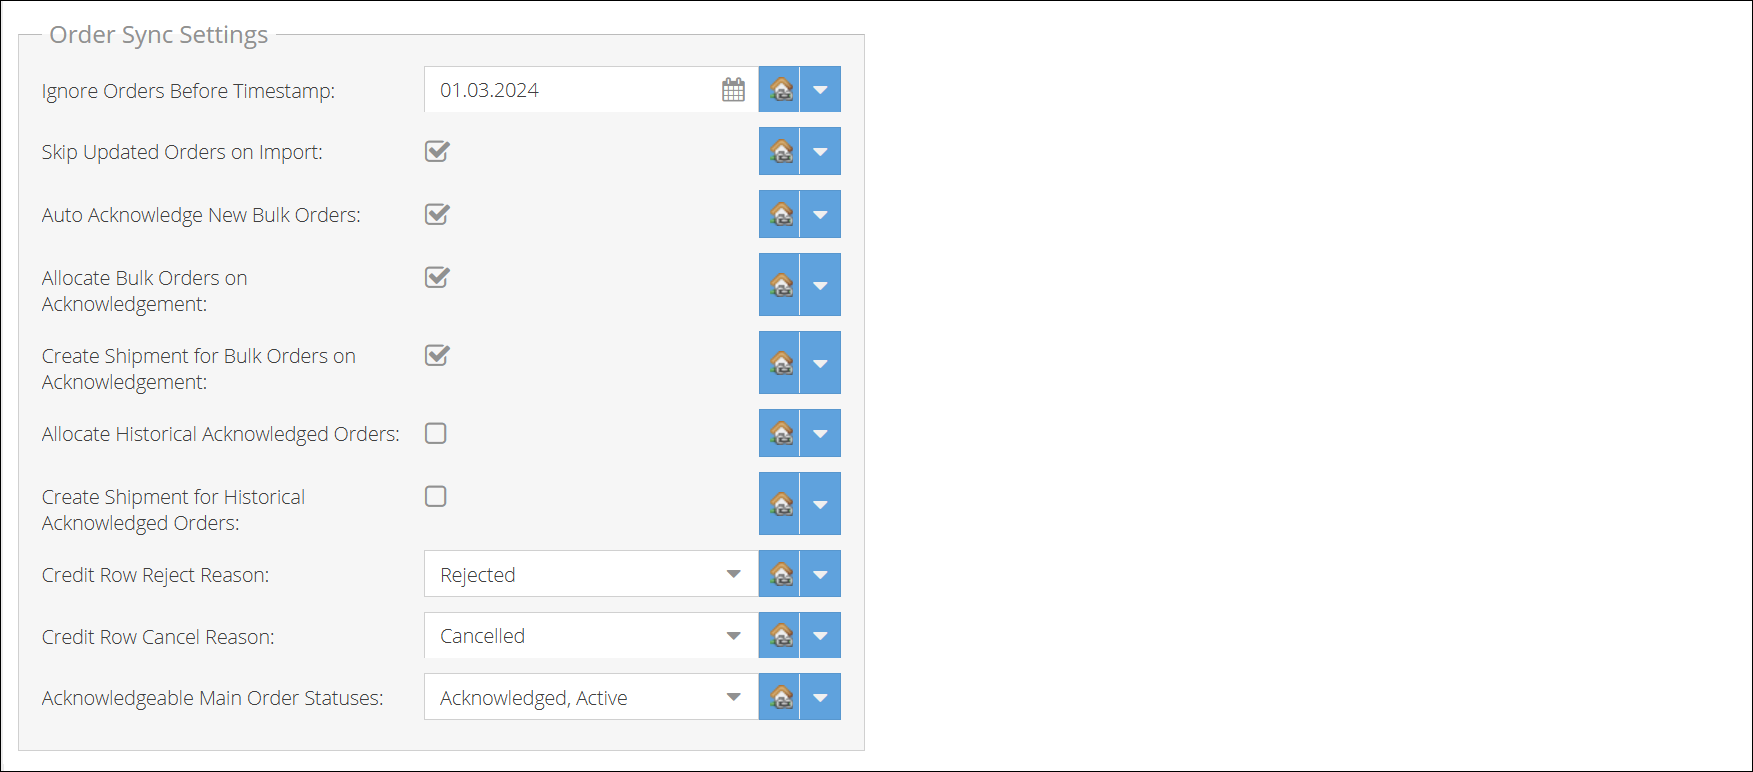
- Configure Credit Reasons: At the end of the section, select the reasons for crediting that will be used when acknowledging orders:
- Credit Row Reject Reason: We suggest creating a 'Rejected' credit reason.
- Credit Row Cancel Reason: We suggest creating a 'Cancelled' credit reason.
- Select Acknowledgeable Statuses: In Acknowledgeable Main Order Statuses, choose which main order statuses allow acknowledgement. Orders will only be acknowledged to Amazon when they are in one of these statuses. By default, we recommend selecting main order statuses with an Active base status.
- Configure Bulk Buy Auto-Acknowledgement: Enable the Auto acknowledge new bulk orders checkbox if you want orders matching registered Bulk Buy offers in ShopCtrl to be acknowledged immediately upon import.
- Set Up Bulk Order Automation: Configure these settings to establish an automated workflow for Bulk Orders:
- Allocate Bulk Buy Orders on acknowledgement: Reserve stock for Bulk Orders immediately after acknowledgement to Amazon.
- Create shipment for Bulk Orders on acknowledgement: Automatically create shipments for acknowledged bulk orders.
- Enable Orders Acknowledgement: Finally, enable the Orders Acknowledgement feature by checking Acknowledge orders in the Synchronization Customization pane at the top of the Amazon synchronization tab.
- Click Save or Save and Close to apply your configuration changes to the shop.
Step 5. Setup initial order import and start synching orders
Begin the process of bringing existing orders from Amazon into ShopCtrl and activating ongoing synchronization.
- Navigate to Shop configuration > Amazon 1P Synchronization and go to the Order Sync Settings section.
- Set Import Start Date: Use the Ignore Orders Before Timestamp setting to select the date from which you want to start importing historical orders. This prevents older, irrelevant orders from cluttering your system.
- Manage Order Updates: Enable Skip updated orders on import to filter out historical orders that Amazon has marked as changed (e.g., due to cancellations of undelivered or damaged items). This is recommended because ShopCtrl currently does not support continuous import for order updates
- Process Historical Orders: Handle orders already acknowledged in Amazon by choosing to finalize them within ShopCtrl:
- Allocate historical Acknowledged Orders: Check this to reserve stock for these past orders.
- Create Shipment for Historical Acknowledged orders: Check this to generate shipments, helping to synchronize fulfillment status.
- Activate Order Import: In the Synchronization Customization pane at the top of the page, enable the features to:
- Check Orders integration feature.
- Check Import new orders for ongoing synchronization of new orders.
- Check Import missing orders to attempt to import any orders that may have been missed previously.
- Click Save or Save and Close to apply your configuration changes to the shop.
New orders will not start importing until you enable the entire synchronization. Once you check the main synchronization checkbox at the top of the Amazon 1P Synchronization page, the import will begin based on your settings. Depending on your configuration, historical orders will also be processed at this time.
Step 6. Configure ASN (Advanced Shipment Notice) Submission
Set up the automatic creation and sending of Advanced Shipment Notices to Amazon.
- Navigate to Shop configuration > Amazon 1P Synchronization and go to the ASN Sync Settings section.

- Configure ASN Number Source: Enable Use BillOfLading ID as ASN Number if you prefer to use the Bill of Lading identifier instead of the default GroupShipment code as your ASN number when submitting to Amazon.
- Set Up Label Templates: Configure the templates that will be used during the shipment process:
- ASN Label Template: For labels printed during the group-shipment pack process
- Pallet Label Template: For pallet identification labels
- Configure Pallet Settings: Define how pallets are handled in your ASN:
- Print ASN label per pallet: Enable this to generate separate ASN labels for each pallet
- Pallet Own Weight: Specify the default weight of an empty pallet in kilograms
- Configure Carton Weight: Set the Carton Own Weight in kilograms to specify the default weight of empty cartons/boxes.
- Activate Shipments Export: In the Synchronization Customization pane at the top of the page, enable Export Shipments to begin sending ASN data to Amazon.
- Click Save or Save and Close to apply your configuration changes.
Completing the Setup
Once all six configuration steps are finished, enable synchronization by checking the main synchronization checkbox at the top of the Amazon 1P Synchronization settings page.
Your integration is now active! Amazon purchase orders will begin syncing in the background, and depending on your configuration, ASNs will be automatically submitted as you process shipments.
This integration streamlines your order management process by ensuring your ShopCtrl environment stays synchronized with your Amazon store, enhancing efficiency and reducing manual effort across platforms.