Item Placement in Group Shipments
When a shipment is part of a group shipment, ShopCtrl lets you record where each item physically sits inside the shipment: on which pallet, and in which carton on that pallet. This structure is called placement.
To adjust placement you need both the Shipments > Edit Shipments and the Group Shipments > Manage Placement Structure permissions. Without them the placement controls are either hidden or read-only.
Placement is what turns a flat list of goods into the pack information that is consolidated into the group shipment and sent to Amazon in the Advanced Shipment Notification (ASN). If your warehouse sends pack files through the Pack integration, that structure is built automatically — the placement tools described below let you build or correct it by hand.
How to Pack and Place a Shipment Manually
The starting point is a shipment that is already part of a group shipment — see How to Manually Create a Group Shipment.
Open the shipment. Because it belongs to a group shipment, the Goods to ship grid now shows the placement controls: the Placed column, the i (Show placement) button at the end of every row, the Filter by placed… filter, and the Place to, Unplace and Move unplaced buttons.
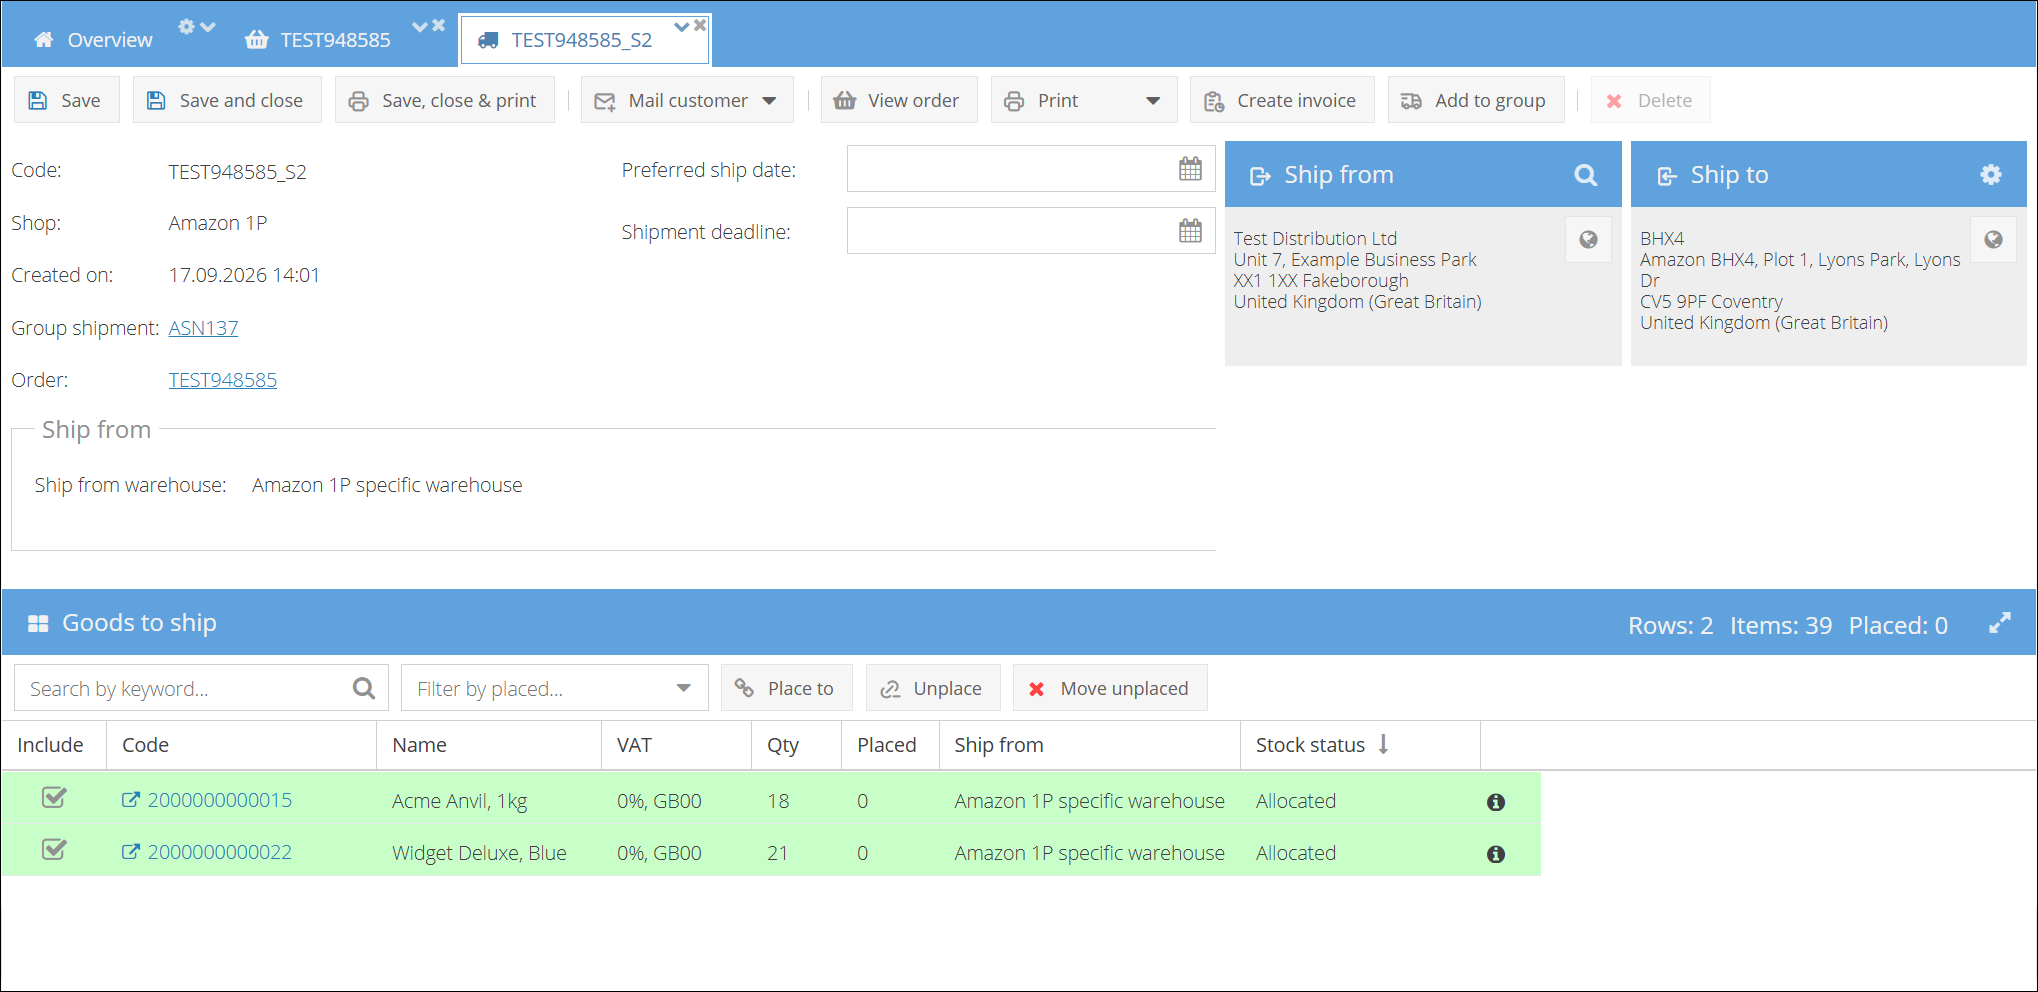
Step 1. Place a whole row on a pallet
- Select the product row you want to place.
- Click Place to.
- Type the Pallet identifier. If the pallet already exists in this shipment, pick it from the list.
- Optionally, type or select the Carton identifier — use it when the items go into a carton that stands on that pallet. Leave it empty to place the items directly on the pallet.
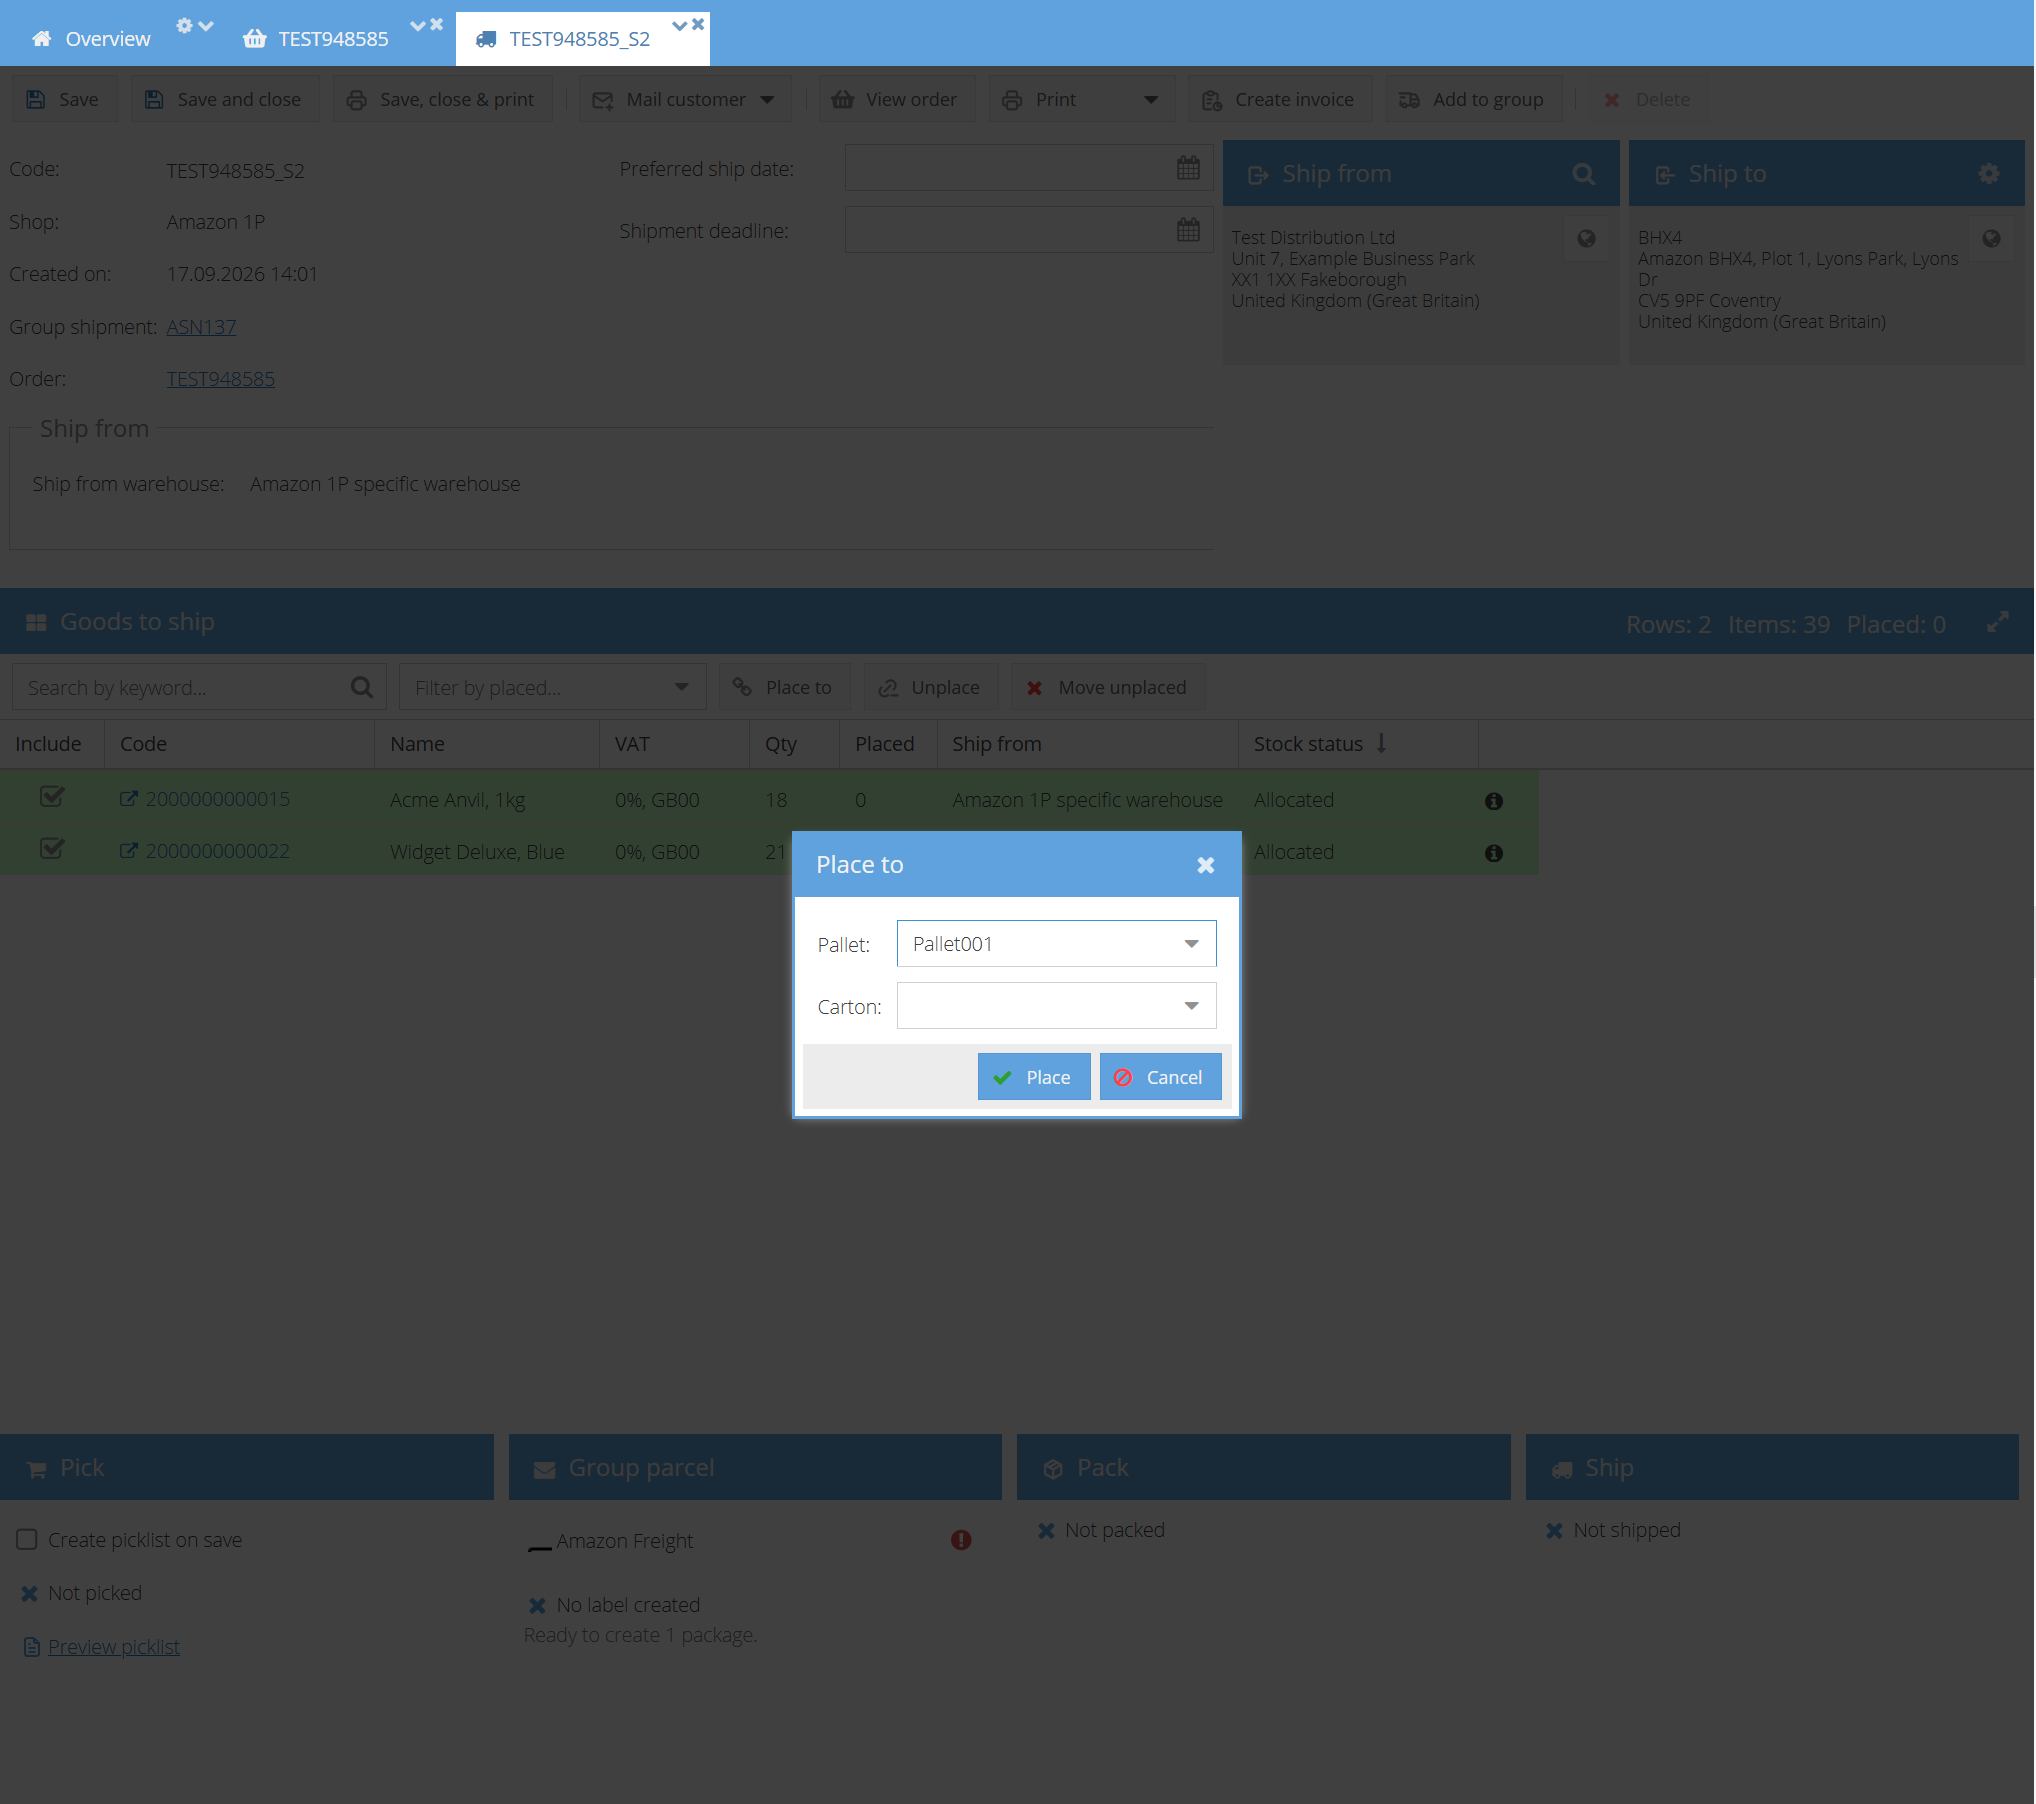
- Click Place. The whole row is now placed on that pallet, and the Placed column matches the row quantity.
- Click Save to apply the changes to the shipment.
To check the result, click the i button at the end of the row.
Place to only ever places the items that are still unplaced, so rows that are already placed in full are left untouched and it is safe to run it twice. If you select no rows before clicking it, ShopCtrl asks whether to apply the action to all rows — a quick way to put an entire shipment on one pallet. The same applies to Unplace, which clears the placement of the selected rows and removes any pallet or carton that is left empty.
Use the Filter by placed… > With unplaced items filter to see at a glance what still needs to be placed, then select those rows and place them in one go.
Step 2. Split a row over several pallets
When the items of one row travel on more than one pallet or in more than one carton:
- Click the i button at the end of the row to open the Placement window.
- Click Add and adjust the Quantity, Pallet and, optionally, Carton of the new line.
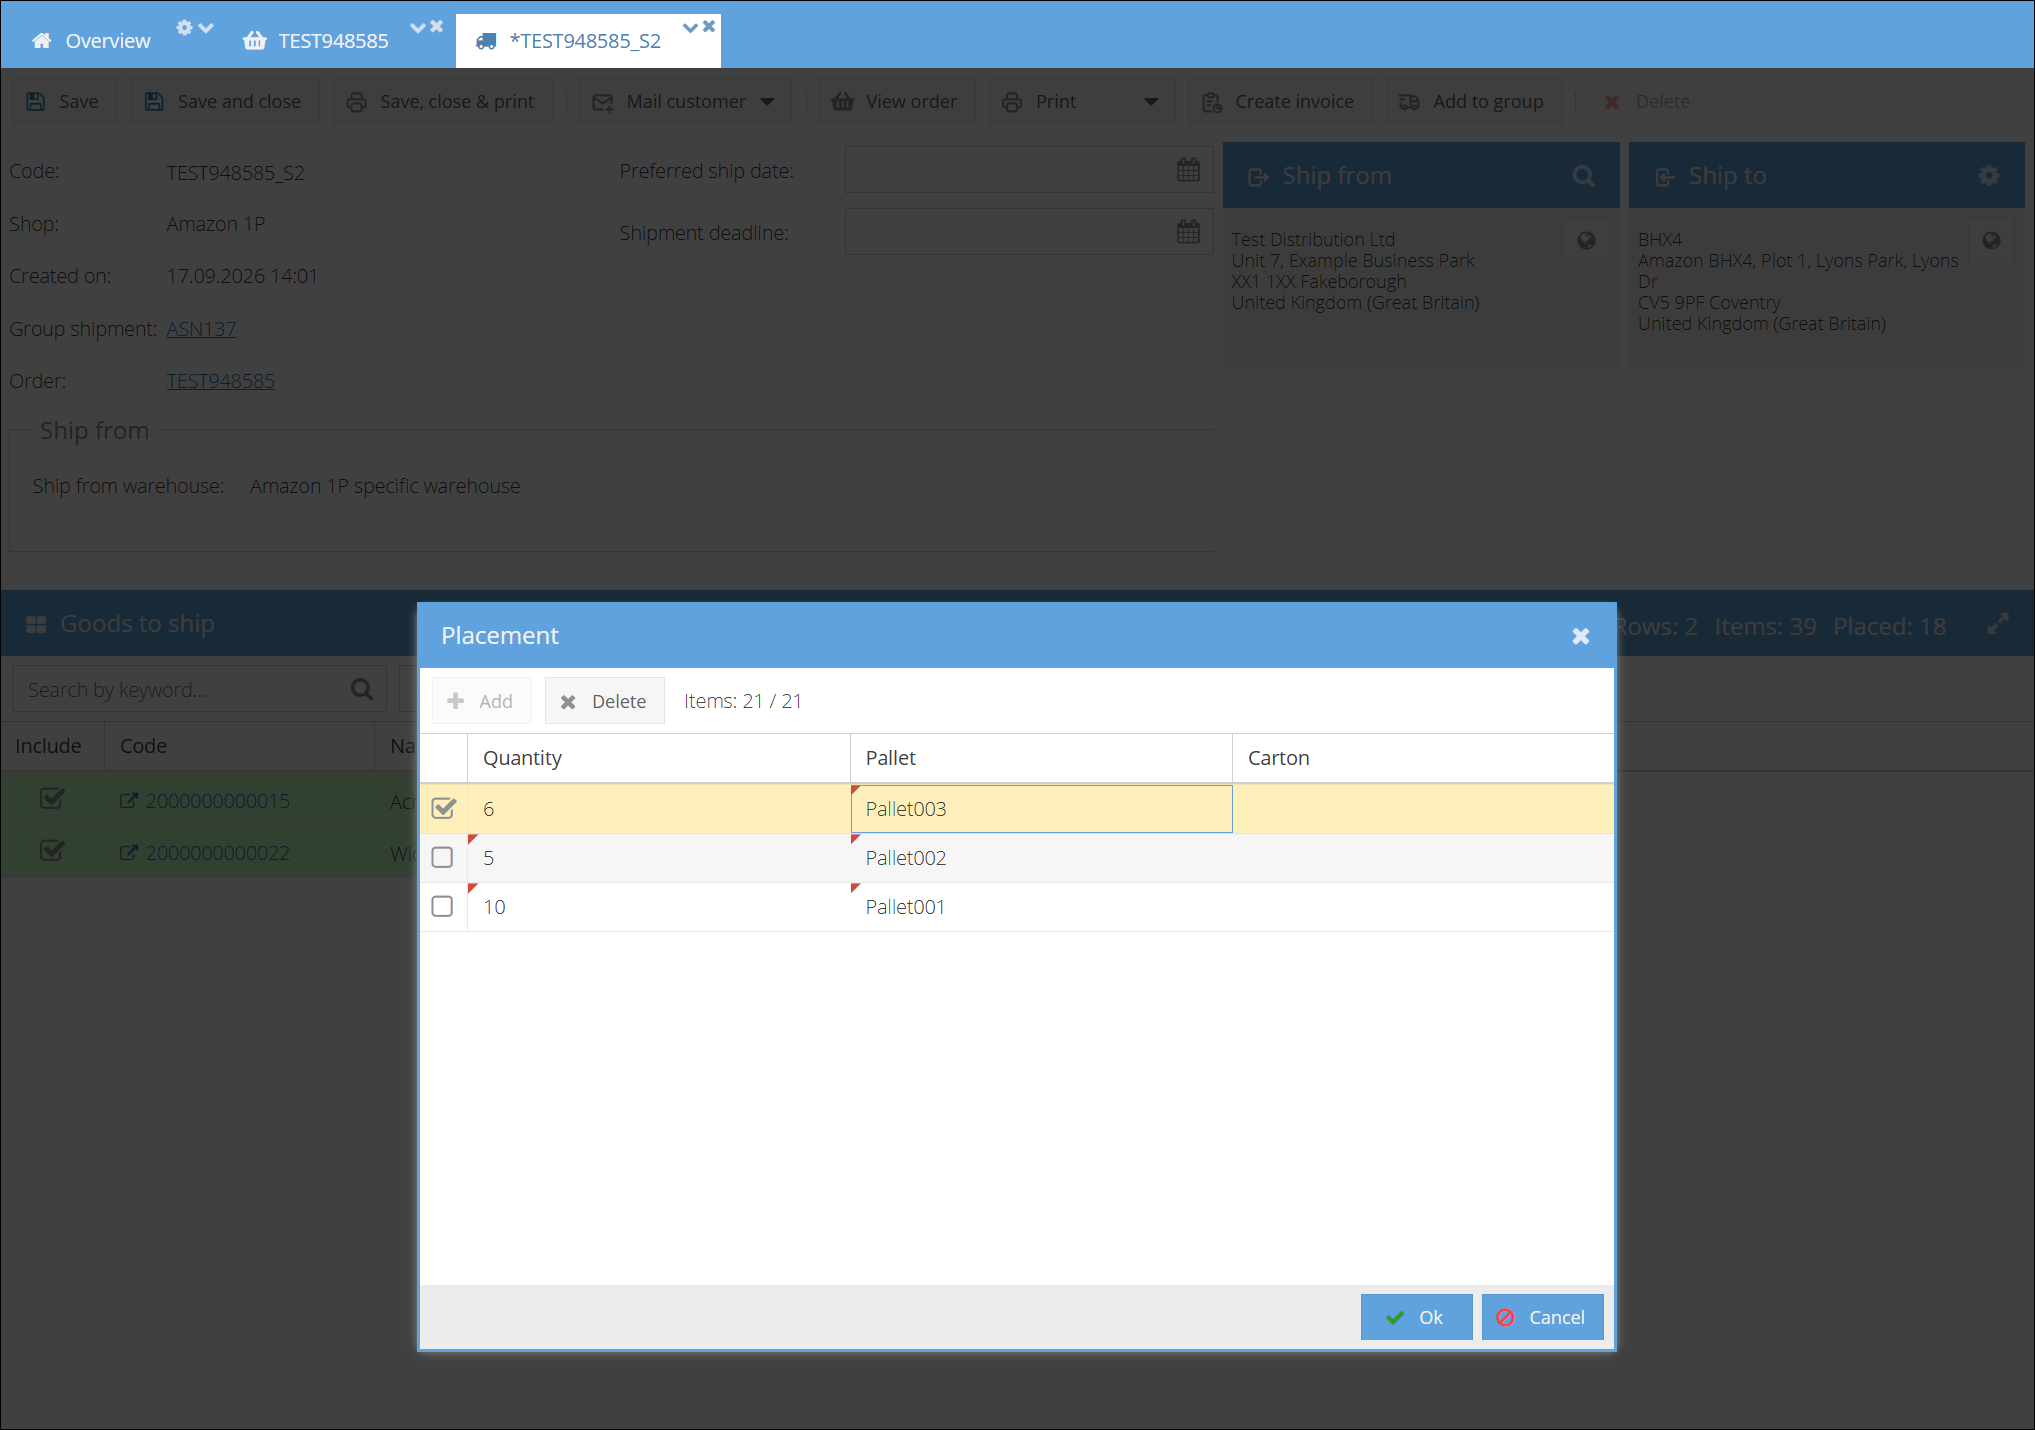
- Repeat until everything is distributed. The counter in the toolbar shows Items: placed / total, and Add becomes unavailable once the row is placed in full.
- Click Ok to close the Placement window.
- Click Save to apply the changes to the shipment.
Keep in mind while filling in the lines:
- Pallet is mandatory. An item can be placed directly on a pallet, or in a carton that stands on a pallet.
- You can type a new identifier instead of picking an existing one — ShopCtrl then creates that pallet or carton for the shipment.
- If you pick an existing Carton first, ShopCtrl fills in the pallet that carton already stands on. If you then change the Pallet, the carton is cleared, because a carton belongs to exactly one pallet.
- A new line is pre-filled with all items that are still unplaced, and a line can never push the total above the row quantity.
- To remove a line, select it, click Delete and confirm.
Step 3. Move out what is not being shipped
If, after placing everything, some items are not packed and will not be shipped, click Move unplaced.
Choose whether to move those items to a New Shipment or to one of the existing shipments already created for the order. The list offers only shipments that are not deleted and not yet shipped, each with its status: (Not picked), (Picked) or (Packed).
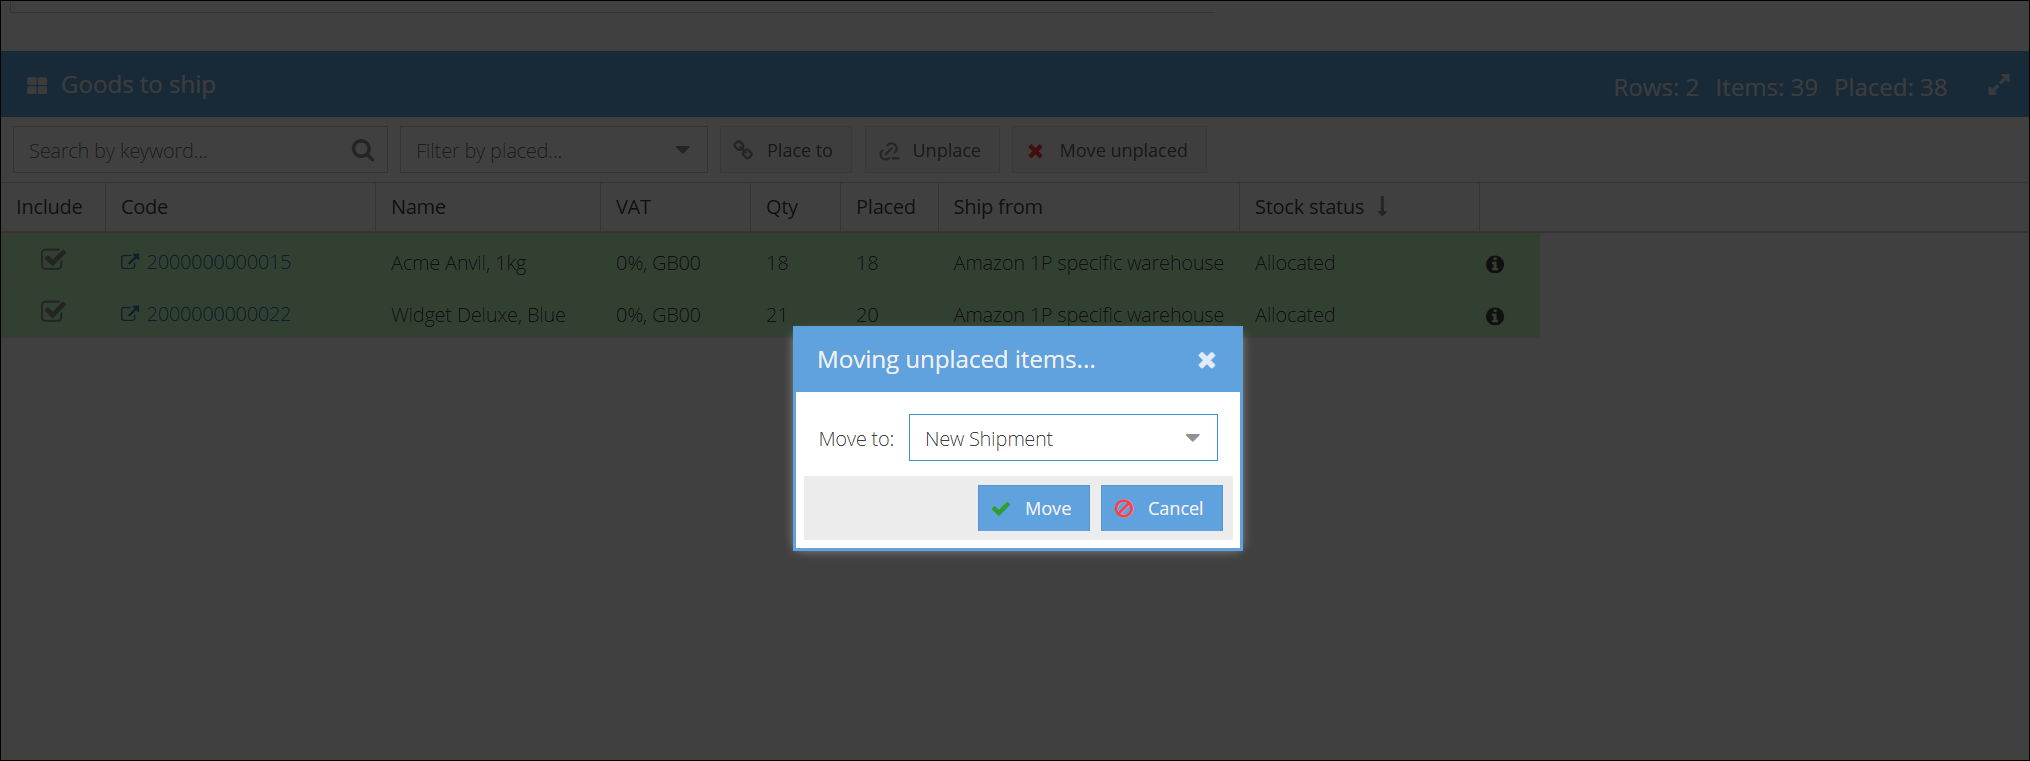
Click Move and confirm. Only the items that have no placement are moved, so the shipment is left with exactly what is physically going out.
This action saves all pending changes of the current shipment before splitting it.
Step 4. Check the structure in the group shipment
Once everything is packed and placed, save the shipment and open the group shipment. The Pallets and — if you used them — Cartons tabs show the consolidated structure of all its shipments.
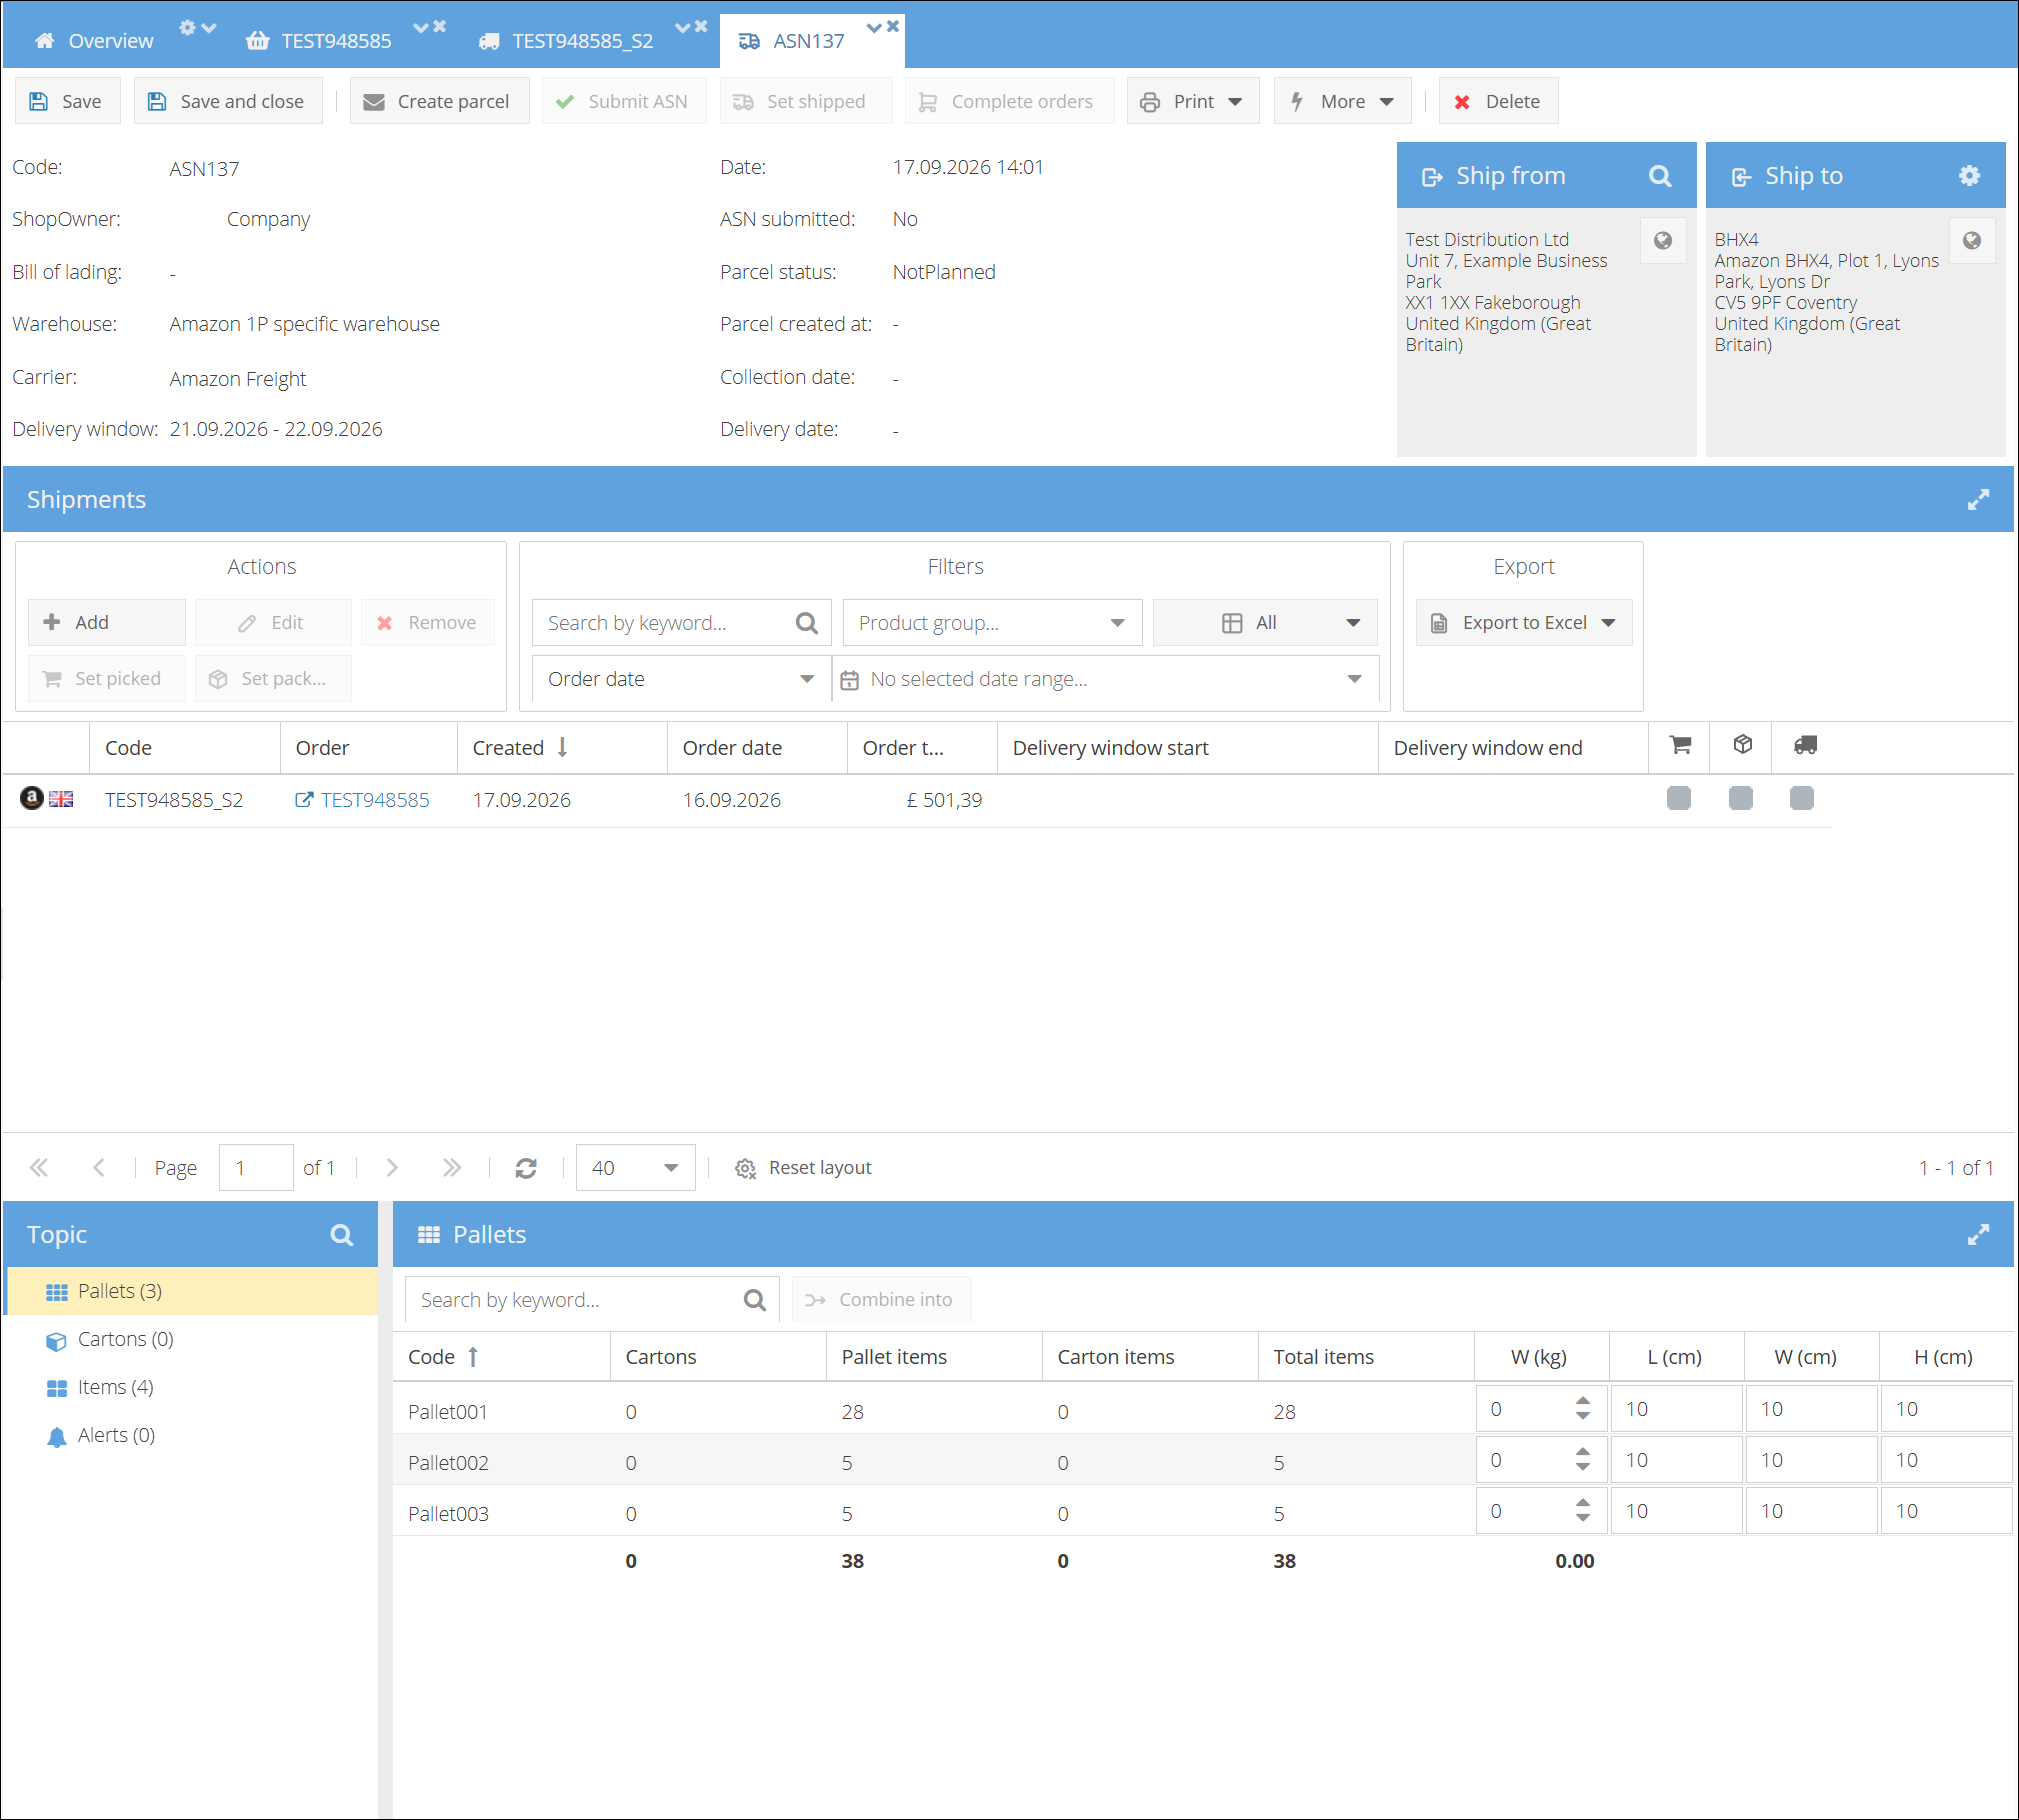
From here you can check the pallet and carton weights and dimensions, create the shipping label and submit the ASN.
Common Corrections
Pallets and cartons exist only as long as items are placed on them. There is no separate "delete pallet" action: as soon as the last item is unplaced, ShopCtrl removes the pallet or carton from the shipment for you.
Except for Move unplaced, which saves the shipment itself, all the changes below have to be confirmed by saving the shipment.
Find the shipment the item belongs to
A group shipment can hold many orders, so start from the group shipment to find out which one you need:
- Open the group shipment and go to the Items topic.
- Enter the EAN or ASIN of the product in the search field. You can also search by SKU.
- The Order column tells you which order the item belongs to, and the Pallet and Carton columns show exactly where it is placed.
- Click the order code to open the order in a new tab, and from the order open its shipment.

Remove one item from a packed pallet
Use this when the pallet holds one item too many — for example a damaged piece that is taken out before the truck leaves.
- Open the shipment and click the i button at the end of the product row.
- In the Placement window, reduce the Quantity on the line of that pallet by one and click Ok. The counter shows the row is no longer placed in full, and the Placed column drops below Qty.
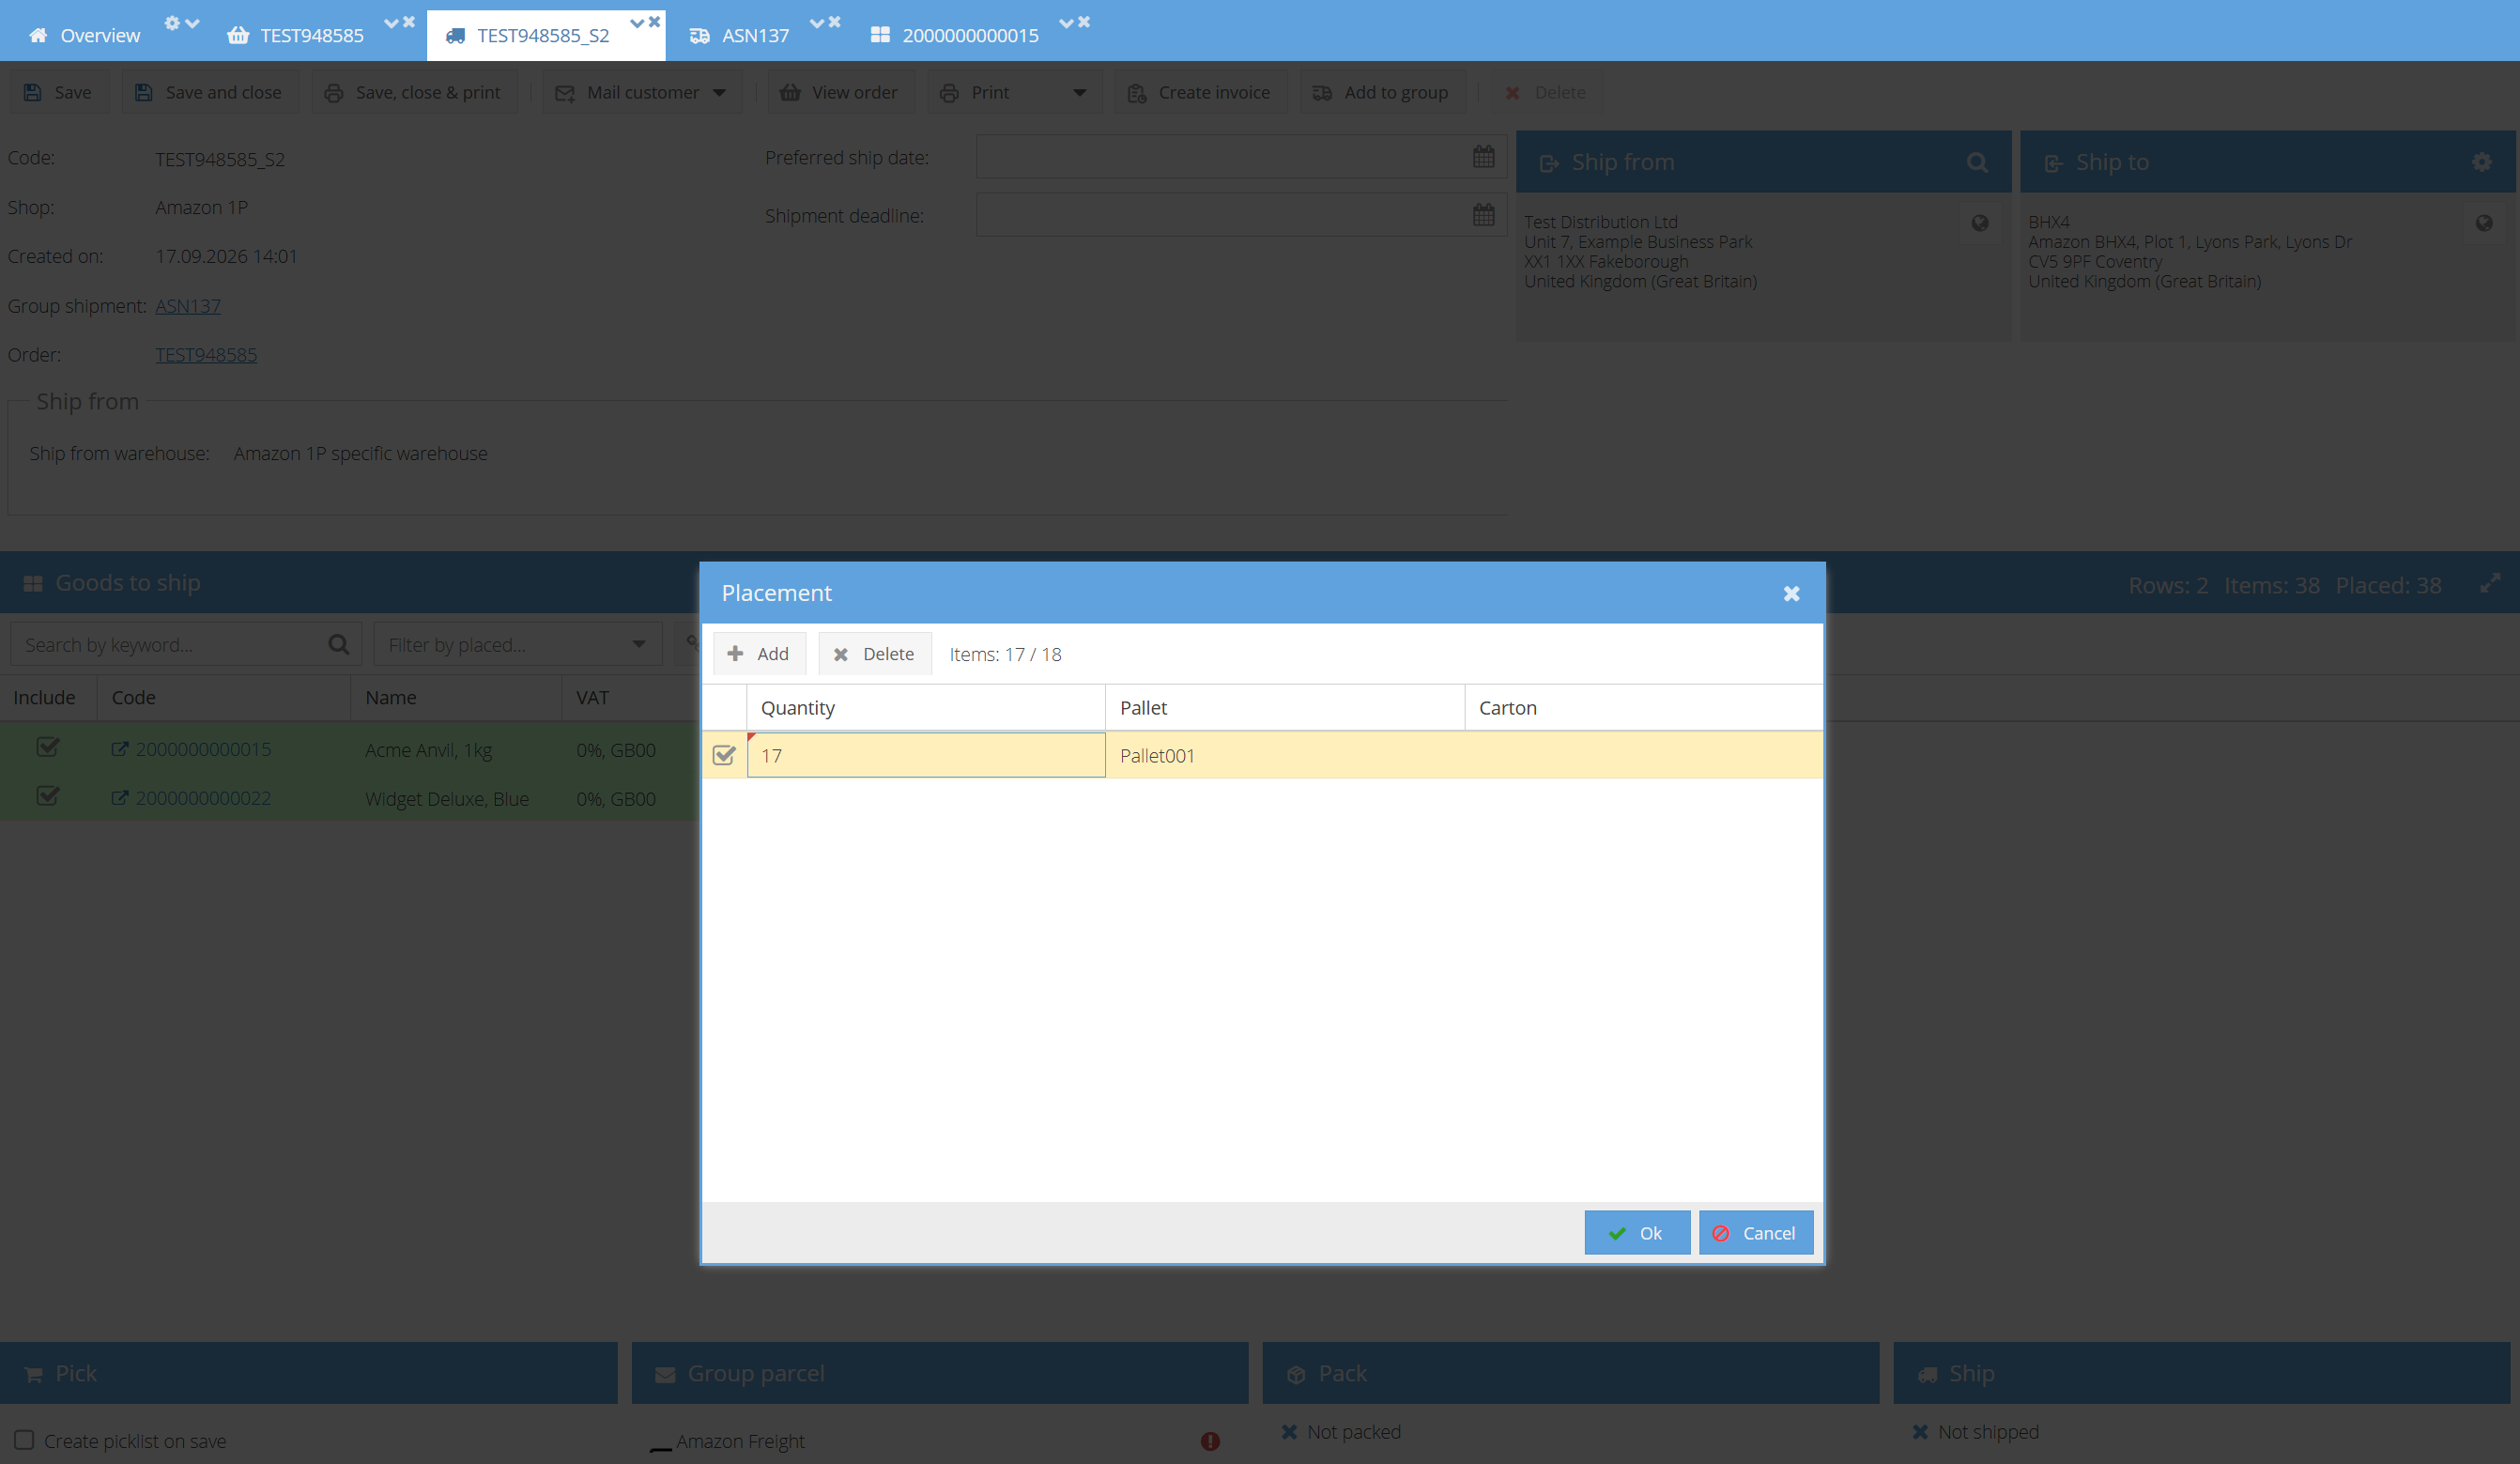

- Decide what happens to the item you took out:
- to send it on another pallet of this shipment, place it with Place to or with an extra line in the Placement window;
- to take it out of this shipment, click Move unplaced and choose New Shipment or one of the existing shipments of the order, then click Move and confirm.
A placement line cannot go below one item. If the whole line has to go, select it and click Delete instead of lowering the quantity.
Remove one product row from a packed pallet
Use this when an entire product is taken off the pallet.
- Open the shipment and select the product row in the Goods to ship grid.
- Click Unplace. All placements of that row are removed, its Placed value becomes 0, and any pallet or carton left empty is removed from the shipment.

- Place the row somewhere else with Place to, or take it out of the shipment with Move unplaced.
You can achieve the same from the Placement window: click i, select the lines, click Delete, then Ok.
Remove a whole pallet from a shipment
A pallet disappears as soon as nothing is placed on it, so removing a pallet means unplacing every row that sits on it.
- Find out what is on the pallet: in the group shipment, open the Items topic and search for the pallet code. The grid then lists every item on that pallet together with the order it belongs to. Within a shipment, the i button on a row shows the same from the other side.

- Open each of those shipments, select the rows that sit on the pallet and click Unplace. If every row of a shipment is on that pallet, click Unplace without selecting anything and confirm the prompt to apply the action to all rows.
- The pallet, together with the cartons that stood on it, is now gone. Check the result in the group shipment on the Pallets tab.
- Place the items again on the correct pallet with Place to, or move them out of the shipment with Move unplaced.
Troubleshooting
If ShopCtrl refuses to save a placement, it explains why. Here is what the messages mean:
| Message | What it means |
|---|---|
| Pallet identifier is required. | A line has a carton or a quantity but no pallet. |
| Quantity must be greater than 0. | Remove the line instead of setting its quantity to zero. |
| The identifier 'X' is used both for a carton and pallet. | Pallet and carton identifiers must be unique across the shipment. |
| The carton 'X' is placed on different pallets. | One carton cannot stand on two pallets. |
| Changing the parent pallet 'A' → 'B' for the carton 'X' is not supported in this view. Use the Shipment Packages window instead. | Moving a whole carton to another pallet is a packaging change, not a placement change — do it in the Shipment Packages window. |