Amazon Seller Fulfilled Prime
To start buying Amazon shipping services for prime orders within ShopCtrl, we need to follow several steps.
Step 1. Create an Amazon SFP Carrier account
How to create an Amazon SFP carrier account and configure it:
- Go to Configuration > Transport > Carrier Accounts.
- Click Add and select Amazon Prime from the list.
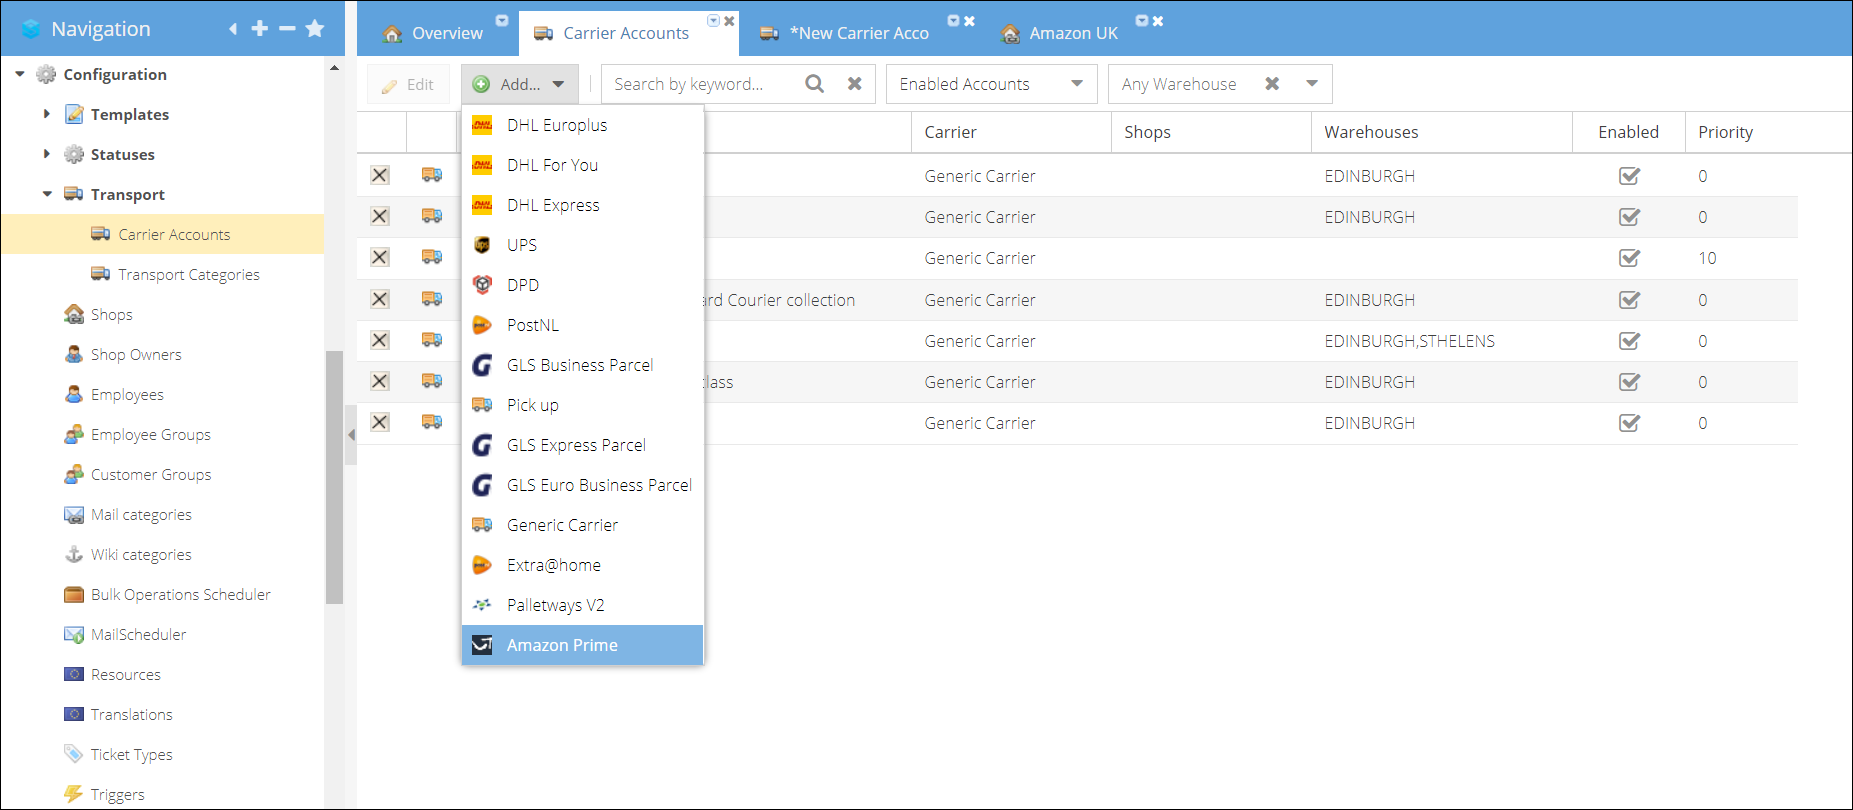
- On the new carrier details page, enter the carrier's Name.
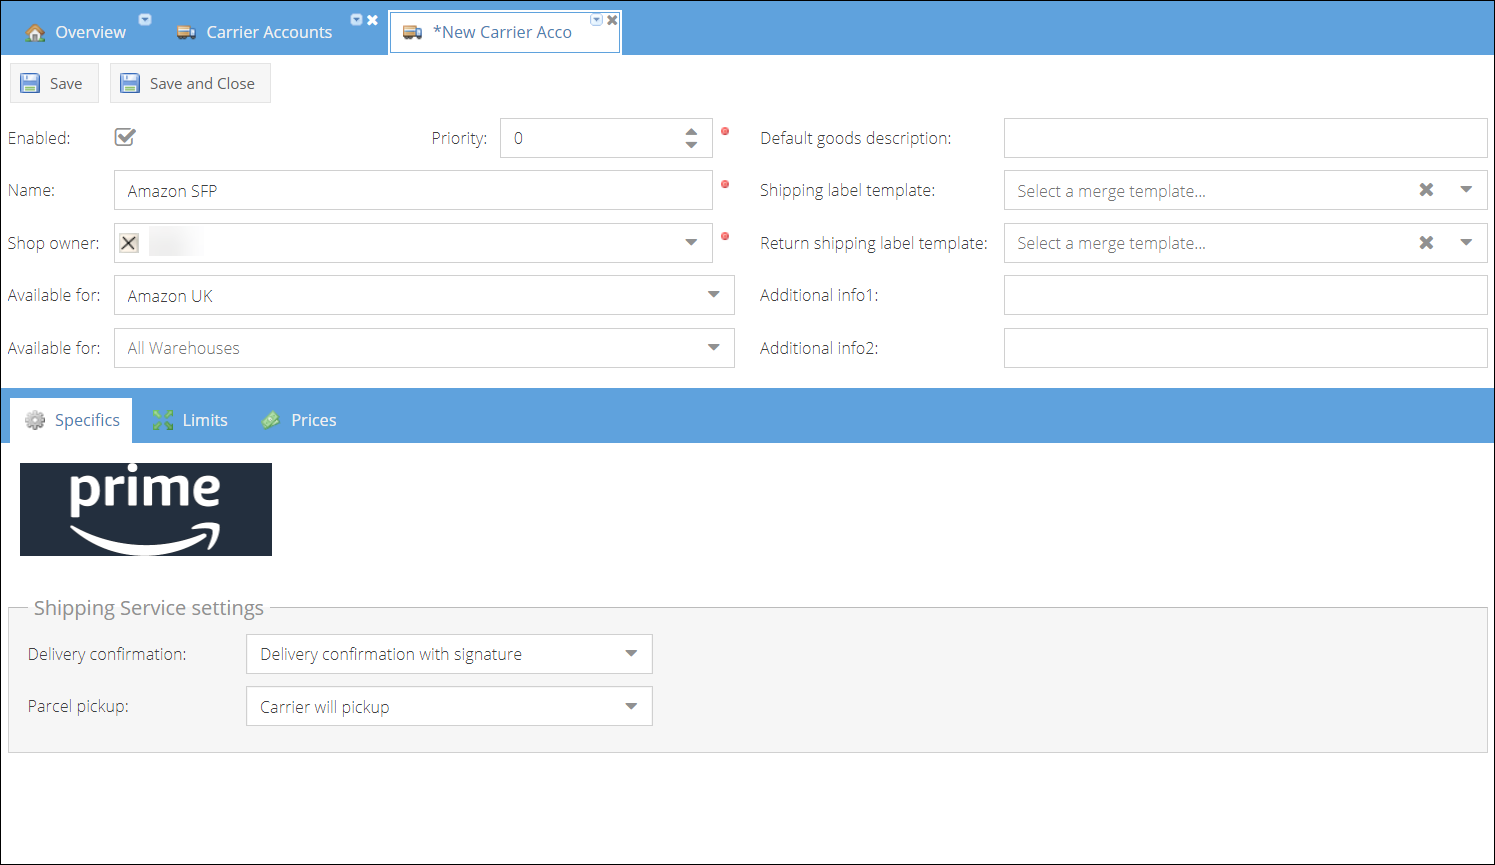
- Select an Amazon shop for which this carrier will be available.
- On the Specifics tab configure the Shipping Service settings. These settings will directly affect the carrier suggestion list:
- Delivery confirmation method:
- Delivery confirmation with adult signature.
- Delivery confirmation with signature.
- Delivery confirmation without signature.
- No tracking.
- Parcel pickup:
- Carrier will pickup
- Shipper will drop off
- Delivery confirmation method:
- Click Save or Save and Close to create a carrier account.
Setting up tracking URL mapping for Amazon SFP carrier
Since Amazon API doesn't return tracking URLs for shipping labels bought from Amazon, ShopCtrl provides a feature that will help you configure tracking URLs for parcels shipped by Amazon SFP.
To be able to generate tracking URLs for parcels bought from Amazon SFP, we need to provide tracking URL templates for carriers that could be used to ship a parcel. To configure templates, we can use a variety of wildcards. Wildcards provide a way to load content dynamically to a tracking URL depending on the customers' data.
Here is a list of wildcards available:
| Wildcard | Description |
|---|---|
{TrackingCode} | Parcel tracking code |
{PostalCode} | 'Ship to' postal code |
{CountryCode} | 'Ship to' country code |
{OriginPostalCode} | 'Ship from' postal code |
{OriginCountryCode} | 'Ship from' country code |
{CultureCode} | Customer culture code |
{CultureCodeU} | Customer culture code delimited with underscores |
{OrderDate} | Order creation date |
{ParcelDate} | Parcel creation date |
For example, when generating a tracking URL for this template https://www.royalmail.com/track-your-item?trackNumber={TrackingCode}, {TrackingCode} will change for every shipment.
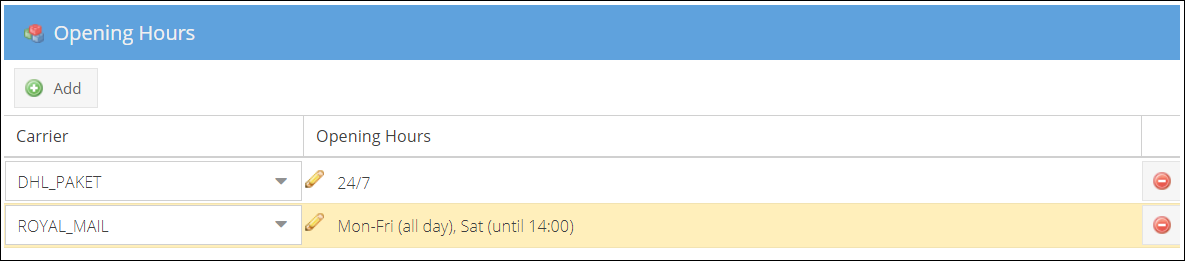
To create Tracking URL Mapping:
- On the Amazon Prime Carrier details page go to the Tracking URL mapping pane.
- Click Add to add a new row.
- Select a Carrier in the left column.
- Provide a Tracking URL template. Some of the known tracking URLs could be selected from the list of available templates.
- Proceed with other carriers.
- Click Save or Save and Close to apply changes to the carrier.
Configure cut-off time for certain services
You can configure opening and closing hours for certain carriers based on their working hours in your area.
For example, you can set a cut-off time for carries not operating on a weekend. The parcels will be routed to the next preferred carrier on the list. Make sure to select your current time zone when configuring the opening hours.
Step 2. Ensure Warehouse contact information is provided
To retrieve shipping labels from Amazon, ShopCtrl provides the contact information of the warehouse the order will be shipped from. It is important to fill in the correct Address on the warehouse details.
Step 3. Configure Amazon shop settings
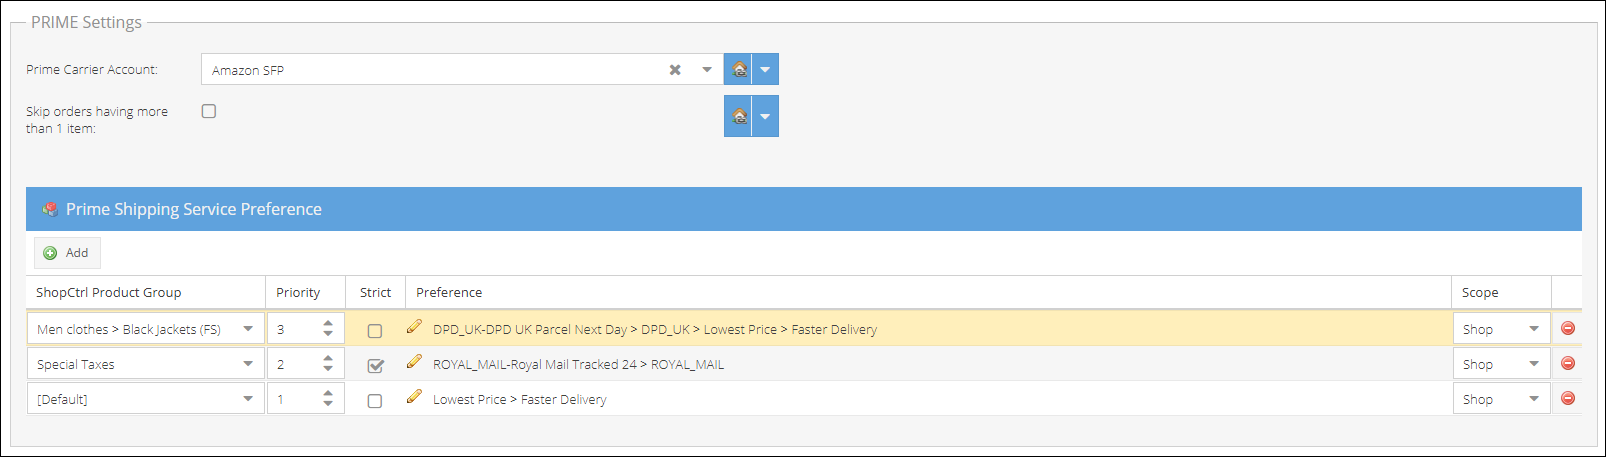
First, we need to select a default carrier for Amazon Prime orders. On the PRIME Settings pane, select a pre-created Prime Carrier Account to be used for this shop. Carriers for orders with lower priority will be selected based on basic ShopCtrl [carrier distribution]/User-Guide/07-Fulfillment/Carriers/index.md. Please configure it separately.
On the Prime Shipping Service Preferences pane, create preference rules for selecting a carrier. The rules could be defined for all of the products (Default) or for a specific Product group. You can limit the number of items shipped by Amazon SFP to one item by marking the Skip orders having more than 1 item checkbox.
To set preferences common for all products, we need to create a rule set for the Default (includes all products) product group. Rule sets can be configured both for parent and child product groups. In case no rules are specified for a product, the default rules set is used as a fallback scenario.
Rule set Priority defines which rule set to use in case the order has several products from different product groups.
The preferences apply subsequently to the carrier list. For example, how the rule is set for the black jacket product group: DPD-Parcel Next Day > DPD > Lowest Price. If the Amazon Prime order is for the black jackets, the following logic will be applied: First, ShopCtrl will look for the "DPD UK-Parcel Next Day" service among the list of carriers and services offered by Amazon, and choose it for the order once found. If it is not in the list of available for the order, ShopCtrl will search for any DPD_UK service and define the preferred option based on the lowest price. If the DPD carrier is not offered at all for the order, the shipping service option with the lowest price will be chosen.
To configure shipping services preference rules:
- Go to Shop details page > Shop synchronization > Amazon Shop Synchronization tab.
- On the Prime Shipping Service Preference pane click Add.
- Select Default to apply to all products, or specific Product group to apply only to the product of the group.
- Choose Priority for the rule set. The higher the number, the higher the priority.
- Click
 button to open the Prime Shipping Service Preference Configuration window. On the left side, you can see the possible Criteria. On the right side, is the final list of criteria that will be used to select carriers for this product group.
 - Edit the Order of preference list. By default, the list includes all possible criteria:
- Exclude unnecessary fields using the ◀ button.
- Use arrows ⬆⬇ to change the priority of included criteria.
- Include criteria back in the list with the ▶ button.
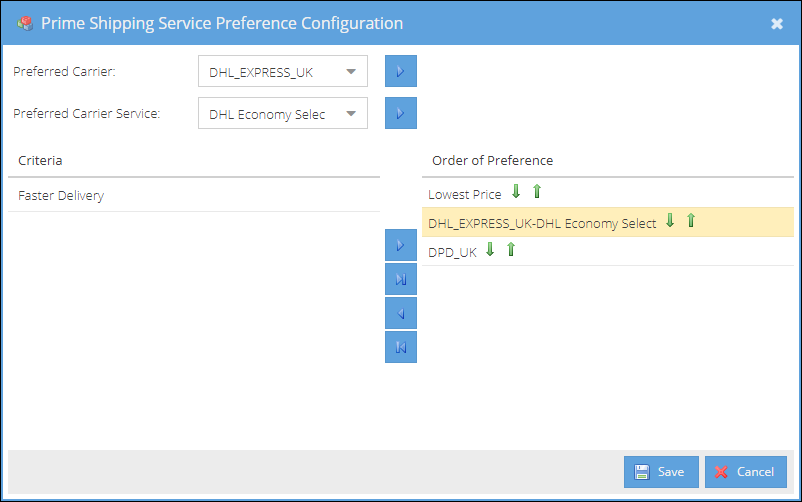
- Add Preferred Carrier to the selection by selecting a carrier from the dropdown and clicking arrow ▶ to add it to the Order of Preference list.
- Refine the Carrier selection by specifying a Preferred Carrier Service for the carriers: select a carrier, choose a carrier service and click arrow ▶ next to the carrier service name to add it to the list.
- Click Save when ready.
- (Optional) You can also mark the rule Strict to ensure that if among carriers and services offered by Amazon, none meet the specified criteria, the label won't be bought. Order will receive an alert, identifying that it needs further attention.
- Proceed with creating other rules.
- Click Save or Save and Close to apply settings to the shop.
Step 4. Test carrier selection by shipping prime order.
Once the priority preferences are configured for all of the product groups, we could test that suggestions work as expected, by manually creating shipments for the prime orders.
To create a shipment for prime order:
- Locate and open for editing prime order.
- Allocate the stock for the order automatically or manually.
- Click Fulfillment > Create Shipment to create a shipment for an order.
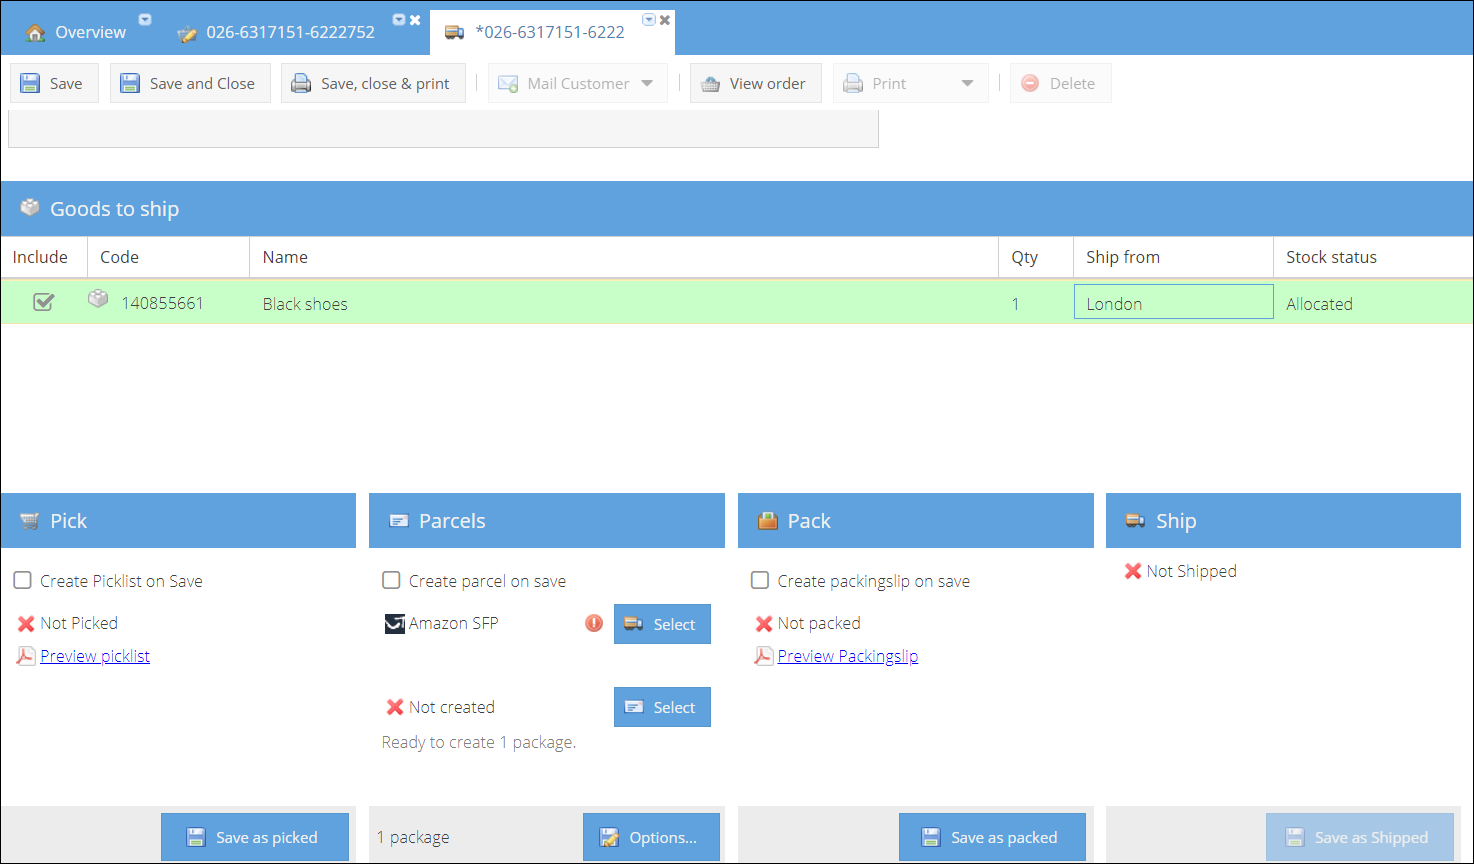
- On the Parcels pane you can see, that an Amazon SFP carrier was selected. Click Options to check the suggested carrier and shipping service.
- On the Additional Settings pane you can see the preferred carrier and shipping service that will be used to ship this prime order.
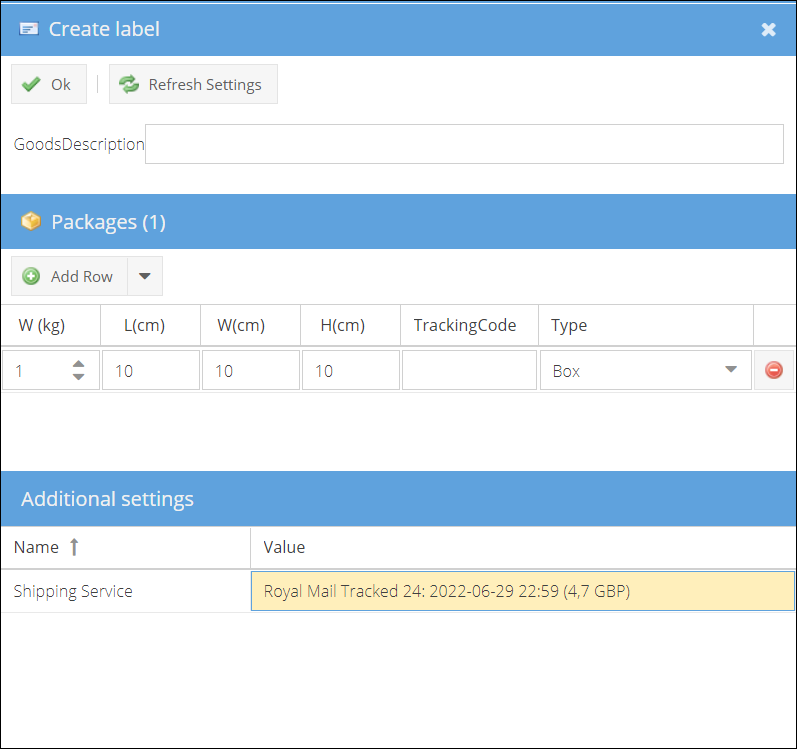
- Click on the selected Shipping Service to choose a different service from the list of options offered by Amazon. Check if the preferred carrier meets the specified criteria.
- You can change the Package size manually. Note, that you will need to click the Refresh Settings button to update the list of suggested Amazon carriers.
- Close the Create label tab.
You can now either proceed with shipping the parcel:
- Check the Create parcel on the save ✅ option.
- Save shipment. The shipping label will be retrieved from Amazon and attached to a corresponding parcel.
Or cancel shipment by closing the shipment page. Shipping labels won't be generated in this case.