Setting up Email protocols to your Microsoft Office 365 mailbox in ShopCtrl
- 09 Aug 2023
- 8 Minutes to read
- Print
- DarkLight
- PDF
Setting up Email protocols to your Microsoft Office 365 mailbox in ShopCtrl
- Updated on 09 Aug 2023
- 8 Minutes to read
- Print
- DarkLight
- PDF
Article summary
Did you find this summary helpful?
Thank you for your feedback
This article describes the process of setting up your Microsoft Office 365 mailbox in ShopCtrl based on the OAuth authorization flow using pop3/imap and smtp protocols.
Below are the five steps you need to accomplish to set up a Microsoft Office 365 mailbox in your ShopCtrl environment.
Video Instructions. Setting up your Microsoft Office 365 mailbox in ShopCtrl
Step 1. Configure your Microsoft Office 365 user apps access permissions
- Log in to your Microsoft admin console.
- Click on the ☰ menu in the top left corner and go to Users > Active users.
- Select your shop user and click on the User name to open preferences.
- Go to the Mail tab and click the Manage email apps link.

- Choose apps the user can use to access their Microsoft email:
- Depending on a protocol you are planning to use, choose either Pop or IMAP.
- (Optional) If you are going to use the Microsoft SMTP server to send emails, check the Authenticated SMTP as well.

These are the minimum requirements for the ShopCtrl mail integration. Use your best judgment to decide on other apps available for this account.
- Click Save changes.
Step 2. Create and configure an API application for ShopCtrl
- Sign in to the Microsoft Azure Active Directory administration console as an admin.
You can also access the Azure Active Directory admin center from the Microsoft Admin Console by clicking the ☰ menu > Admin Console > Azure Active Directory.
- In the Azure Active Directory admin center, go to the Enterprise applications > All applications and click New application.
- On the Browse Azure AD Gallery page click Create your own application.

- In the What's the name of your app field, enter any name you want to use to find the added app in the list of Active Directory apps.
- Select Register an application to integrate with Azure AD (App you're developing).
- Click Create. The added program will appear in the workspace in the Enterprise applications section. The Register an application window will open.

- On the Supported account types section select: Accounts in this organizational directory only (Single tenant).
- On the Redirect URI select Web and enter your ShopCtrl environment URL with a path to the mail authorization:
https://{HOST}/Mail/Microsoft365/Auth.aspx. - Click Register.
Check and change redirect URI
You can always check and change the link provided by entering application Properties > application registration > Authentication.
Please check Microsoft docs Redirect URI (reply URL) restrictions and limitations for more information.
If you are testing a connection in the acceptance environment and plan to use the same application in the production environment, just add another Redirect URI to your production HOST for the same application.
Grant permissions to the ShopCtrl application
To complete application registration, we need to grant new app API permissions to retrieve mail via Pop or IMAP, and (optional) send mail via SMTP protocol.
- To add minimal required API permissions to the new app:
- Go back to Enterprise applications > All applications.
- Click on the app you just created. The application details will open.
- On the left menu, select Properties.
- Click on the application registration to manage additional properties.

- On the menu on the left select API permissions.
- On the API permissions page click Add a permission.

- On the new Request API permissions window on the Microsoft APIs tab select Microsoft Graph API.

- Choose Delegated permissions for the Microsoft Graph.
- Use the search in the Select permissions field to find and tick the following permissions:
- offline_access
- Depending on the protocol you are planning to use:
- POP.AccessAsUser.All
- or IMAP.AccessAsUser.All
- If you are planning to use this mailbox to send emails:
- SMTP.Send
- Click Add permissions.
The added permissions will be displayed in the list:

Do not close the screen just yet. We will need to copy the application data to ShopCtrl.
Step 4. Getting credentials for your Microsoft 365 mailbox synchronization with ShopCtrl
To get the incoming and outgoing server settings please visit Microsoft 365 documentation POP, IMAP, and SMTP settings
To establish the API connection with your Microsoft 365 account, we need to provide the following information:
- Application (client) ID
- Directory (tenant) ID
- Client secret value
To create and get credentials:
- Sign in to the Microsoft Azure Active Directory administration console as an admin.
- In the Azure Active Directory admin center go to the Enterprise applications > All applications
- Click on the app you created for integration with ShopCtrl. The application details will open.
- On the left menu, select Properties.
- Proceed to manage additional properties by clicking on the application registration: "If this application resides in your tenant, you can manage additional properties on the application registration."
- On the left menu, select Overview.
- Copy the Application (client) ID and save it to a secure place. It is your Client ID.
- Copy the Directory (tenant) ID and save it to the secure place. It is your Tenant ID.

- On the left menu, select Certificates & secrets.
- Click New client secret.
- On the Add a client secret pane, enter the Description for a secret.

- Select the Expires period for the secret. Consider setting up a bigger period.
Attention
Once the client secret expires, the mail synchronization in ShopCtrl will stop. To restart the synchronization, you need to issue a new client secret and enter it into the corresponding mailbox settings in ShopCtrl. There is no need to create and register a new application, but the client secret needs to be replaced with a valid one for the existing application.
- Click Add to generate the client secret.
- Copy the Value field of the client secret and save it as you would normally do with passwords.

Note
Client secret values cannot be viewed, except for immediately after creation. Be sure to save the secret when created before leaving the page.
Step 5. Setting up Microsoft Office 365 mailbox synchronization in ShopCtrl
The next step is to enter the credentials for the created application into ShopCtrl and authorize it on Microsoft 365.
Please check Microsoft support pages to get the up-to date server settings.
Setting up the outcoming mail server

- Log in to your ShopCtrl environment as a user with Shop Owner admin role.
- On the sales channels panel, click the designated shop icon and select Settings from the list.
- In the topic menu go to Communication > E-mail > Sending email.
- Enter the Mail address you are configuring.
- Click Add to create a new connection.
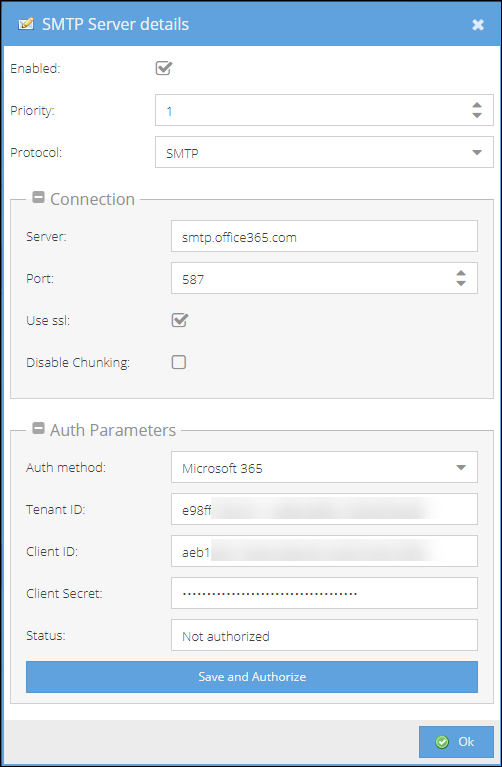
- Provide the SMTP Server for your Microsoft 365 mail account.
- Enter the SMTP Port to use for connecting to the mail server.
- Mark the Use SSL checkbox.
- Expand Auth Parameters pane and select Microsoft 365 as an Auth method.
- Enter the Tenant ID of the application you created.
- Provide Client ID.
- Enter Client Secret. The Status field will be changed to Not authorized.
- Click Save and Authorize. You will be redirected to authorization confirmation. Please make sure there are no unsaved changes on the other tabs. If you proceed, progress on other tabs will be lost.
- Login to your Microsoft 365 account under the user you are configuring. Review the permissions and confirm granting access.

Important
To set up the integration with the Microsoft , it is essential to authenticate as the user account associated with the application, rather than logging in as the Active Directory admin.
- After confirmation a Success window will be displayed confirming that access has been granted successfully for the account. In case any of the auth parameters were provided wrong, a corresponding window will be displayed. Correct the errors and proceed with the same steps.
- Click the Back to Shop Settings button and you will be redirected back to your ShopCtrl environment.
- On the shop settings page, the Status of your connection will change to Authorized
- Enable the connection on the top of the window.
- Click Ok to close settings.
Send test mail
To check if outcoming server details were provided correctly, click Send test mail and enter an email address to send a test email to.
Setting up the incoming mail server

- On the sales channels panel, click the designated shop icon and select Settings from the list.
- In the topic menu go to Communication > E-mail > Receiving email.
- Click Add to create a new connection.
Important
If you have your mailbox configured already in ShopCtrl, open and modify the exisitng connection instead of creating new one.

- Select Protocol you are going to sync mail with: POP3 or IMAP.
- Provide the Server of your mail account (POP3 or IMAP accordingly).
- Enter the Port to use for connecting to the mail server (POP3 or IMAP accordingly).
- Mark the Use SSL checkbox.
- Expand Auth Parameters pane and select Microsoft 365 as an Auth method.
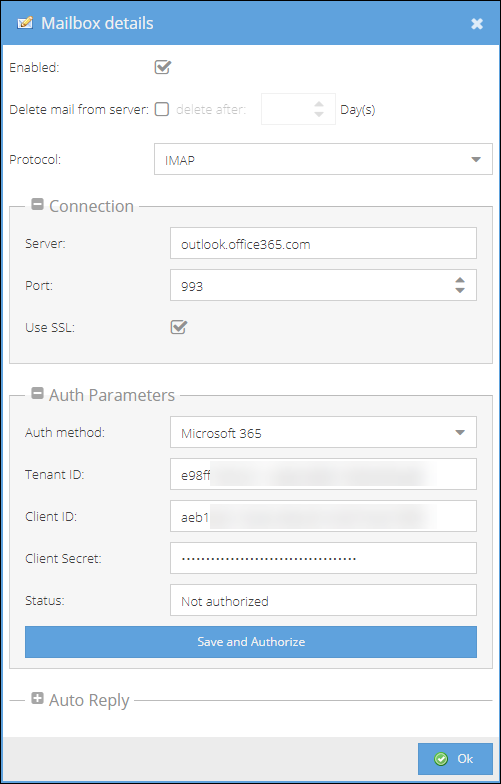
- Enter the Tenant ID of the application you created.
- Provide Client ID.
- Enter Client Secret. The Status field will be changed to Not authorized.
- Click Save and Authorize. You will be redirected to authorization confirmation. Please make sure there are no unsaved changes on the other tabs. If you proceed, progress on other tabs will be lost.
- Login to your Microsoft 365 account under the user you are configuring. Review the permissions and confirm granting access.

Important
To set up the integration with the Microsoft , it is essential to authenticate as the user account associated with the application, rather than logging in as the Active Directory admin.
- After confirmation a Success window will be displayed confirming that access has been granted successfully for the account. In case any of the auth parameters were provided wrong, a corresponding window will be displayed. Correct the errors and proceed with the same steps.
- Click the Back to Shop Settings button and you will be redirected back to your ShopCtrl environment.
- On the shop settings page, the Status of your connection will change to Authorized.
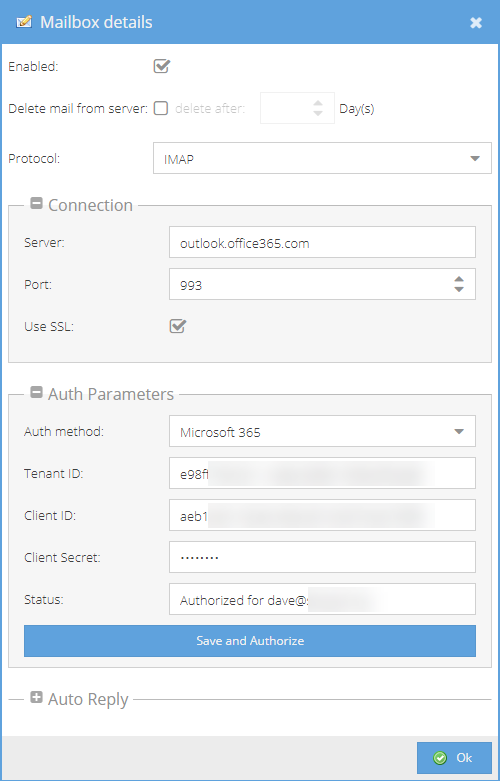
- Enable the connection on the top of the window.
- Click Ok to close settings.

Test connection to the mailbox
To test if the mailbox was configured correctly, click the Test MailBox button. The popup message will inform you if the connection was successful.
Once the connection is established, mark the Check mail checkbox to start receiving emails to ShopCtrl.