Creating Deliveries
- 26 Jul 2021
- 2 Minutes to read
- Print
- DarkLight
- PDF
Creating Deliveries
- Updated on 26 Jul 2021
- 2 Minutes to read
- Print
- DarkLight
- PDF
Article summary
Did you find this summary helpful?
Thank you for your feedback!
A Deliveries is a new way to manage wholesale shipments of ordered goods to your warehouse.
If the purchase order is delivered in one piece, there is no need to create a delivery for the purchase order manually. Proceed to the provisioning of the goods received, and ShopCtrl will automatically create a delivery for the associated purchase order.
Suppose a purchase order is going to be delivered in parts. It is important to distinguish what products will be delivered when. And calculate the expected date accordingly.
By creating a delivery for the purchase order, you can specify what products to expect with each delivery.
Creating a delivery for a purchase order
To create a delivery for the purchase order:
In the purchase order details page, navigate to Topic Menu > Deliveries.
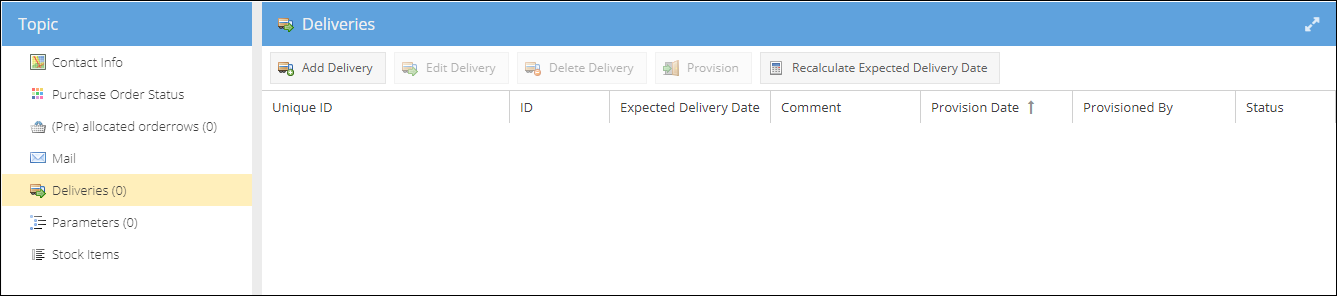
Click Add delivery. A pop-up window will appear.
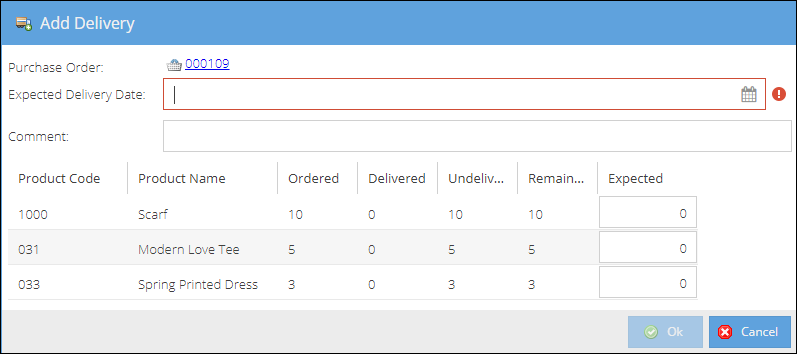
Enter or choose an Expected Delivery Date. This is a required field for deliveries.
In the list of ordered products, enter the expected amount for each product. Leave 0 if the product is expected with the next delivery.
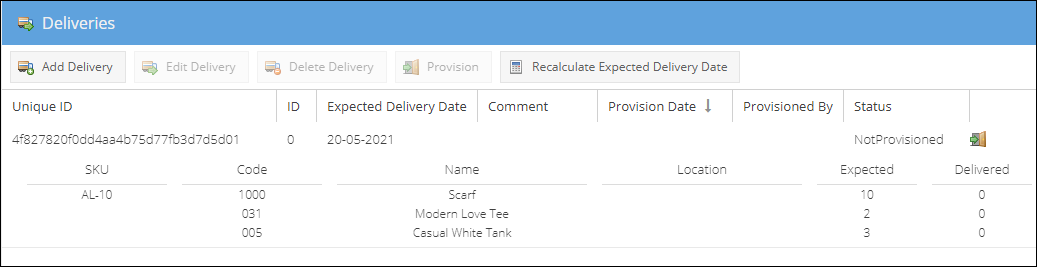
Click Ok to save the delivery. The first delivery is now displayed in a list.
Click Add delivery again to start creating second delivery. After finished, both deliveries will be displayed in a list.
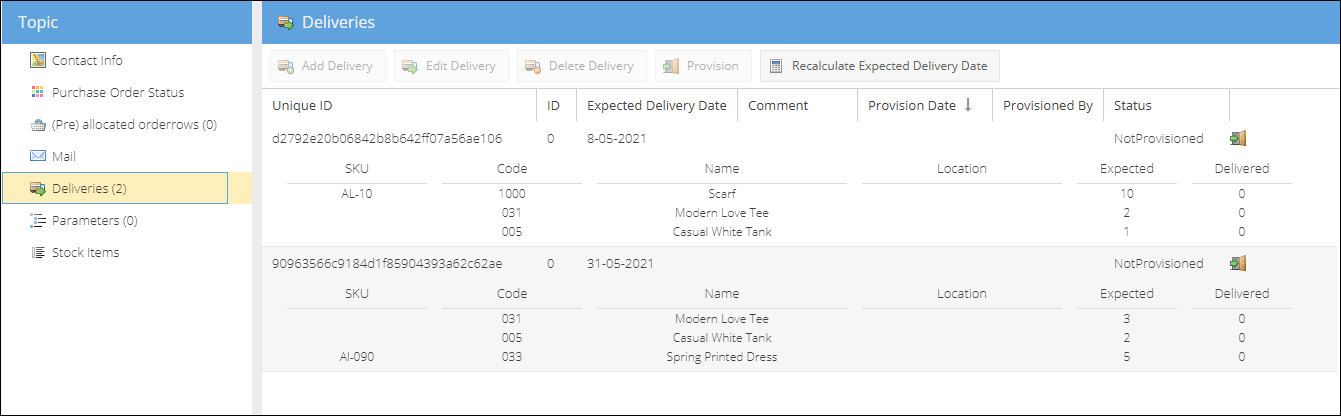
Proceed with other deliveries. The number of deliveries is not limited.
When all of the products were added to the deliveries, the Add Delivery button is disabled. Click Save or Save and Close to save the purchase order.


Deliveries menu
Buttons become visible when a delivery row is selected.
| Button | Description |
|---|---|
| Add delivery | Creates a new delivery for the purchase order |
| Edit delivery | Edits the existing delivery |
| Delete delivery | Deletes the existing delivery |
| Provision | Opens a new provision page for the selected delivery |
| Recalculate Expected delivery Date | The expected delivery date is auto-calculated when the first delivery is provisioned. This button is used to recalculate the expected date in the transition period manually. |
The expected delivery date calculation
While creating a delivery for the purchase order, the expected delivery date is set for each delivery. Current ShopCtrl settings suppose that the expected delivery date for the purchase order is set as the earliest delivery date.
After provisioning the first parcel, the expected delivery date for the whole purchase order will be changed to the date of the next parcel. This way, the purchase order will always have the expected date of the following delivery to arrive.
At the moment, ShopCtrl supports only the earliest expected date calculation strategy. But it is possible to add a different one, based on your requirements.
Provisioning purchase orders with several deliveries

To provision purchase order with two or more deliveries:
- To open the provision page:
- From the main purchase orders table:
- Find the purchase order you would like to provision and click a Provision button in the purchase order row.
- Alternatively: locate and select a purchase order, click the Provision button in the top action menu. If there exist two or more deliveries for the purchase order before proceeding to provision, please choose the delivery to be provisioned.
- Within a purchase order details page:
- Go to Topic menu > Deliveries. Choose the delivery that arrived.
- From the main purchase orders table:
- A delivery provision page will open in a new tab. Enter or scan the goods received.
- Select a Location where goods will be stored.
- Save, close, and print labels if required.
After the first delivery was provisioned, the deliveries list is updated accordingly:

The expected purchase order date is automatically set to the next delivery date. Purchase order provision status is changed to "Partially delivered".